Showing posts with label after. Show all posts
Showing posts with label after. Show all posts
Thursday, November 10, 2016
How To Log Off Your Mac After A Set Period Of Inactivity
How To Log Off Your Mac After A Set Period Of Inactivity
All operating systems have a setting that will automatically lock the current user’s session if the user has been inactive for too long. User have the option to set how long this period of inactivity should be. Locking your screen is of course different from logging out of your system. A locked screen prevents others from accessing your desktop but logging out of a system will close the session you have open; your browser will be closed, Skype will exit, and so will any and all other apps you might have open. If you’re looking to automatically log out your Mac after a set period of inactivity as opposed to it just locking, OS X has a built-in function that lets you do just that. Here’s where it is.
Open the System Preferences and go to the Security & Privacy group of preferences. If the padlock icon at the bottom is locked, click it, and enter the administrator password if prompted to. With the preferences unlocked, an ‘Advanced’ button at the very bottom will appear and the ‘Allow apps downloaded from:’ option will no longer be greyed out. Click the ‘Advanced’ button.
![[IMG]](https://lh3.googleusercontent.com/blogger_img_proxy/AEn0k_v9nzJiL-Gn--mLAd1uedsF4nGw2alv2UmTvAb89FvO8XKdohPueFC--QZ8rGZlG1qFWy41Eed9X34EuoNVwoOzoLojs1rlRqHYFujfMEl6MkUTVbouO4bkoLbwIOHq29QbjrPEzBkGm5m5L-AOjbq7Hw=s0-d)
The advanced security settings are where you can set your system to log out if you’ve been inactive too long. Clicking the Advanced button will open a pop-up that lets you enable the log out option and set the period of inactivity. Click Ok and you’re all done.
![[IMG]](https://lh3.googleusercontent.com/blogger_img_proxy/AEn0k_scE-fkL1z7Ay2aw-CQcEzAxYmJdHPFw4B4C0xKnRZ4XKke7Ft9LJBut77ochGImFid87_eiewy7ADBVjYIJX3b0a6oOPpPOtZ5_hB2bqfxaHOcTETU1SpT43p5EOZ9AxpAnGrq2xwgRoUqKN4jW53_jEVS8g=s0-d)
Logging out makes it so that if someone does figure your password out, they can’t get into your web browsing session or find your files too easily. It also means you won’t appear online over messaging apps when you’re away from your desk. It does mean that you’ll have to open multiple apps again when you return to work. You are effectively making a trade-off between security and productivity so choose carefully.
Open the System Preferences and go to the Security & Privacy group of preferences. If the padlock icon at the bottom is locked, click it, and enter the administrator password if prompted to. With the preferences unlocked, an ‘Advanced’ button at the very bottom will appear and the ‘Allow apps downloaded from:’ option will no longer be greyed out. Click the ‘Advanced’ button.
The advanced security settings are where you can set your system to log out if you’ve been inactive too long. Clicking the Advanced button will open a pop-up that lets you enable the log out option and set the period of inactivity. Click Ok and you’re all done.
Logging out makes it so that if someone does figure your password out, they can’t get into your web browsing session or find your files too easily. It also means you won’t appear online over messaging apps when you’re away from your desk. It does mean that you’ll have to open multiple apps again when you return to work. You are effectively making a trade-off between security and productivity so choose carefully.
Go to link Download
Sunday, October 2, 2016
How to Show Adsense After Blog Post on Mobile Phone
How to Show Adsense After Blog Post on Mobile Phone
 This tutorial, I will be sharing with you, How to Show Adsense After Blog Post on Mobile view of your Blogspot blog.
Visitors of your blog posts are more likely to click on ads after reading your post. Hence, I suggest you add an adsense unit right after each blog post.
Adsense added below each post on the desktop view of your Blogger blog wont show by default on the mobile view. You must enable "custom" mobile template and add the adsense code to the HTML of the Blogger mobile template.
If you check my Blog Post you will see a 300x250 Adsense ad showing after my blog post on the mobile view.
How to Implement it.
Log in to www.google.com/ad sense to generate the Adsense code for the ad unit you want to add to the mobile view. Example 300x250 Medium Rectanglead size.
Now, we need to parse the ad code.
Go to http://www.freehtml parser.blogspot.co m/
Copy and paste your ad code inside the box and click the "Encode" button
Copy and paste the "Encoded Code" somewhere, you will soon use it.
Ensure you have enabled "CUSTOM" Blogger mobile template. If not sure, login to your Blogger dashboard, go to "Template". Under "Mobile", select "Yes. Show mobile template on mobile devices" scroll down and choose "Custom" from the "choose mobile template" dropdown box and save your settings.
Now, we need to find the code for the Blogger Mobile Template Post title so we can place the Adsense code directly below it.
Always remember to back up your template before editing it , now go to "Template" ---> "Edit HTML"
Click inside the HTML and use CTRL F to find the code below:
<b:if cond=data:top.showMobileShare>
If you have seen the above code Directly above it, paste the parsed Adsense code there (thats is the code you have saved earlier)
Save your template.
Now View one of your blog posts on mobile view using default browser of your mobile device [NOT Opera Mini] and you should see the adsense ads after each blog post on POST pages (Not on the homepage).
Thats all.
You can als place any ad code there, or any code there just like you can see Google custom search on mine, also you can add share buttons to your Blogger mobile template, you can also paste the codes of the buttons there.
To access the mobile view of your Blogger post on PC, just add ?m=1 at the end of the post URL.
Try it and let me know if it works for you and leave any comment if you encounter any error. Thanks.
Go to link Download
Friday, September 30, 2016
How To Fix Issues With iMessage After Updating To iOS 7
How To Fix Issues With iMessage After Updating To iOS 7
Ever since people have updated to iOS 7 there have been reports of a lot of bugs. Some users are reporting that the OS as a whole is very unstable where others are only experiencing issues using certain features of their device such as iMessage.

In fact there are hundreds of complaints from iPhone, iPod Touch and iPad users about iMessage after updating to iOS 7 on the Apple Support forums. You would think this would be to do with issues on Apple’s side, but it appears that isn’t the case, rather an issue with iOS 7 in general.
iOS 7.0.3 will be released soon to fix these issues, but until that time here is a quick solution that has worked for many.
Fix iMessage Issues After Updating To iOS 7
Step 1) - The first thing you will ned to do is launch the Settings app and going into the Messages section to disable iMessage.
Step 2) - Next go into the General section, followed by reset, and reset your device’s Network Settings.
Step 3) - Finally re-enable iMessage.
That wasn’t so bad was it?
What this will do is reactivate your iOS Device on the iMessage server, so any issues with sending or receiving iMessages should now be fixed.
Via
Go to link Download
Monday, September 19, 2016
How to Fix Nokia Lumia unboot after hard reset or update
How to Fix Nokia Lumia unboot after hard reset or update
Many users need to apply a hard reset our devices, But they have detected some problems with this process and some devices do not get past the first step showing gears constantly turning. Then I discussed a method to try to recover the nokia lumia device.

The good news is that, before taking the Nokia device to what will try to recover, you can now attempt a first terminal recovery at home, and try to fix it yourself.
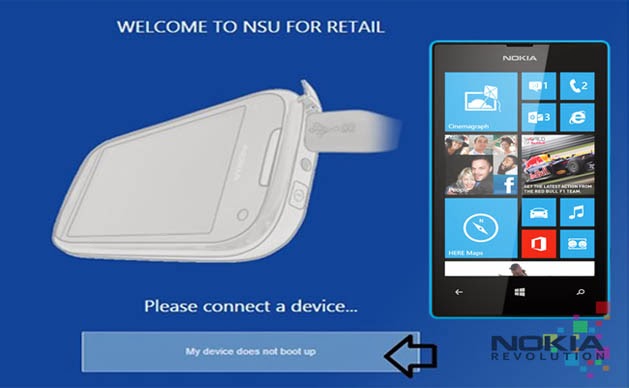
we see a button that tells us: "my device does not boot" . Its what we choose to enter will use in the next step wizard.
We hope the tutorial will serve as a support and allows you to recover those devices that are giving you headaches after the hard reset.
The good news is that, before taking the Nokia device to what will try to recover, you can now attempt a first terminal recovery at home, and try to fix it yourself.
Step 1: Install Nokia Software Updater for Retail
The first step is to download the software from Nokia that lets you install the firmware on our phone. If you had already, just open it and tell you that there is an update.Step 2: Connect the phone to your computer
The next step is simply to connect the phone to the computer with the USB cable. Of course, the device will light if it was not, but will not be recognized by any application (you may receive a message that a USB device is not recognized.) We start the Nokia Software Update for Retail application and see the image indicates that we connect the phone.we see a button that tells us: "my device does not boot" . Its what we choose to enter will use in the next step wizard.
Step 3: software reset
In this step, you click Continue, the program tries to find the phone, and then you apply a soft reset . To do this, we pressed the buttons on and volume down until we noticed a vibration. When the phone starts to boot you again, you should see that is recognized by the program.Step 4: Installing the firmware
In this step, download the firmware needed Nokia server, and then proceed with the installation if necessary. By installing a complete firmware, is how to perform a clean installation of the software on the terminal, so if there is no hardware problem should be solved and recover your phone. The process is the same as mentioned for upgrade to Lumia Amber .We hope the tutorial will serve as a support and allows you to recover those devices that are giving you headaches after the hard reset.
Go to link Download
Subscribe to:
Posts (Atom)