Monday, November 28, 2016
HOW TO HIDE A FILE OR A DOCUMENT WITHOUT USING ANY APP IN AN ANDROID SMARTPHONE
HOW TO HIDE A FILE OR A DOCUMENT WITHOUT USING ANY APP IN AN ANDROID SMARTPHONE
Create a folder with a name youd like, and add "." before other characters along the file name and save.
example
file name is Document, then itd now become .Document
Your smartphone should notify you that the folder will be hidden
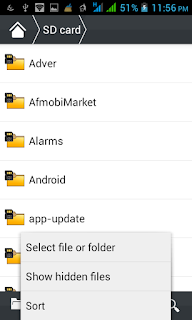
2. CLICK OPTION TO HIDE OR UNHIDE THE FOLDER
;
3.COPY THE FILES TO THE FOLDER YOUR CREATED
Copy the files youd want to hide to the folder you created and it will be hidden, take for instance pictures or videos you wouldnt like to be displayed in your gallery once they are moved to this folder you created it wont display there again
4. GO BACK TO STEP THREE IN ORDER NOT TO ALLOW PEOPLE ACCESS THOSE FILES FROM YOUR FILE EXPLORER
THATS ALL!!!!!!!!!!!!!!!!!!
Go to link Download
How to delete and Recover Google or Gmail account
How to delete and Recover Google or Gmail account
A Google account gives you access to all of Google’s services, including Gmail, YouTube, Google+, Drive, and more. There’s certainly a lot of data you’ll be losing if you plan to delete your Google account. You may have a secondary account that you don’t use anymore, or have some other reason to do so, but if you want to delete your Google account permanently, it is quite easy to get done. Let’s take a look. How to delete a Google or Gmail account

If you have used your Google account for a while, you’ll probably have some important data that needs saving, such as emails, notes, photos, and other information. If there isn’t a lot, you can download them individually, but Google provides a simple way to backup all your data.
> Open your Google account settings by going to accounts.google.com.
> Under the “Personal info & privacy” option, click on “Control your content.”
> Once open, click on “Create archive.” There you can select which Google products you want the information saved from.
> You can then choose the file type of the archive and where you want to save it. You can also opt to get a download link via email, or save it to cloud services like Drive, OneDrive or Dropbox.
> Depending on how much information is being archived, the entire process could take a while.
Also, remember that you might have your Gmail address associated with other services as well, such as bank accounts, and other websites, so make sure that you keep a track of these accounts and update the information accordingly, before deleting your Google account.
Deleting your Google account
> Go to your Google account settings, and under the “Account Preferences” option, click on “Delete your account or services.” Then tap on “Delete Google account and data.”
> You will see an option to backup your data here as well, followed by a comprehensive list of all the content you will be losing access to when you delete your Google account.
[post_ad]
> At the end of the page, there are two acknowledgements you will have to accept before you can tap on the “Delete Account” button to permanently delete your Google account.
Deleting specific services only
> There you will see a list of services that you can individually remove.
> If you delete your Gmail account, you will have to add an alternate email address that will now be linked to the other Google services that you are still using.
Recover a recently deleted account
> Go to the password assistance page.
> Select “I’m having other problems signing in.”
> Then follow the instructions on the page to see if you can recover the account. Keep in mind that it might not be possible. Further, if you have deleted Gmail and have added another non-Google email address to be able to access other Google services, recovering your Gmail username will not be possible.

< How to Unlist Your Number From Truecaller Database
> How to download facebook videos on android phone
> How to stop Android apps running in the background
> How to Update Samsung Galaxy S6 marshmallow
Don’t forget to Share it with your friends via Facebook & Google+ and Twitter, And if you like the article, How to delete and Recover Google or Gmail account and you may even Subscribe for New post, to get directly in your mail inbox.
Go to link Download
Sunday, November 27, 2016
How to check whether a game will run on your computer or not
How to check whether a game will run on your computer or not

First you need to visit this site, see the left side that says "Find out if you can run that game on your PC"? click the button underneath it that says "Can YOU run it?"
Now to test your computer for compatibility. From the drop-down list, select the game that you wish to run. After you selected your game, click the "Can you RUN it" button. This will take you to a new page.
This next page will analyze the data, if you are a Windows Vista user then UAC(User Account Control) will pop up and ask for permission, click yes as this is not harmful. Now your results will appear...It appears that I failed...:(
Well now you know how to check to see if you can run your game without having to drive all the way to the Local Generic Superstore near you, buy the game, wait 45 minutes to install it, find out that it wont run, and then run back to the store to return it. So I hope that I helped, and saved you the hassle of the return.
Go to link Download
Friday, November 25, 2016
How to Solve Error Code 2 140 21 or 2140 21 Canon Printers
How to Solve Error Code 2 140 21 or 2140 21 Canon Printers

How to Solve Error Code 2,140,21 or 2140,21 Canon Printers
This error appears when the scanner is used.
- "Printer is in use or an error has occurred. Check status. Scanner driver will be closed. Code :2,140,21"
- On Windows: go to "devices"
- Click on "Printer"
- Click on "Stop printing".
- Reinstate the driver of the printer.
- Sometimes, replacing the cartridge could solve the problem
- If are not fix Call Canon +1-855-517-2433 (Toll Free)
Go to link Download
Thursday, November 24, 2016
How to move or rearrange iPhone home screen app icons anywhere without jail breaking
How to move or rearrange iPhone home screen app icons anywhere without jail breaking
 |
| Makover web application |
| iPhone home screen edit mode |
| customized apple home screen |
Go to link Download
Sunday, November 20, 2016
How To Boot Your Device Or Tab Into Safe Mode For Troubleshooting
How To Boot Your Device Or Tab Into Safe Mode For Troubleshooting

There are times you install some applications on your android device and suddenly it begins to malfunction or refuse to boot up. Safe mode is a great tool that you can use to troubleshoot these issues. Safe mode boots your phone running only the apps that came with the phone - that means no third - party apps. From safe mode, you can uninstall any app if you want to.
Unfortunately, not all phones have the same method to enter safe mode. Most Jelly Bean devices use the first method below, but some devices with older versions of Android and some newer devices (like the Galaxy S 4 and HTC one) use the alternate method further down the page.
How To Boot Safe Mode
1. Hold down the physical power button on your device.
2. Long-press the power off option that appears

If it works for you, dont forget to comment here and remember to share with your friends and families/like us on facebook. You can also subscribe via-email and be sure to get regular updates day by day. Have fun.
Go to link Download
Saturday, November 19, 2016
How to Check BlackBerry Original Or Fake
How to Check BlackBerry Original Or Fake

The number of BlackBerry phones in circulation could be exploited by unscrupulous who wish to seek as much profit by selling fake BlackBerry. But do not worry, because we can distinguish between genuine or fake BlackBerry through a few methods below. We tried a little give tips to recognize or distinguish whether the Blackberry that we have or that we want to buy is a genuine Blackberry from RIM or Blackberry either Original or fake, here are some tips:
1. Check IMEI and PIN
You can see this Blackberry IMEI and PIN in a way that the homescreen menu, select Options then select Status and press the same key ALT + Shift + H it will show the IMEI number and PIN. Make sure the PIN and IMEI numbers match those in place and the battery box.
2. Check Data Lifetime
To check this go to menu -> Options -> Status, then type BUYR. When a new BlackBerry that is visible only zero, but if the message Exceeding 120K and Voice Usage Exceeding 60 Minutes, you should think twice, because the BlackBerry device has already been used.
3. Check Boxes Blackberry
Note the box along with the accessories, and that the IMEI number listed in the same box on your mobile phone. Note the IMEI sticker, plastered neatly and make sure there is no suspicious things such as fade, or IMEI stacked stickers (stickers cover the other).
Hopefully few simple tips to distinguish genuine or fake BlackBerry above useful for you who want to buy BlackBerry phones.
Go to link Download
Tuesday, November 15, 2016
How to Install Or Remove Third Party Keyboard in iOS 8
How to Install Or Remove Third Party Keyboard in iOS 8

- The next step is to enable the keyboard and this is as simple as installing it.Go to the setting app.Under General > keyboard > Keyboards, you will see a separate section listing any and all Third-Party Keyboards you may have downloaded. click on it and it gets activated.

- And keep also this in your mind that each custom keyboard will have its own settings that you will have to configure in the app itself. Once its activated, launch any app that needs keyboard and press the globe next to the spacebar until it switches to the new keyboard .then your new keyboard gets installed and you are ready to use it.
- And if you like to go back to the previous original keyboard, tap on that globe again which takes you back to your previous keyboard. But if you have installed more than one keyboard then you have to go through all the keyboard before coming to the one you want. Some keyboard needs added permissions, which informs you in that case.

Go to link Download
Thursday, November 10, 2016
How to recover deleted sms from phone or sim
How to recover deleted sms from phone or sim
Have you deleted SMS messages that you wish had not gotten deleted? You will be happy to know there are a number of different software that can help you recover the messages you need and want, but not all of them are free and you need to purchase the software. However, if you own a Nokia phone you might be in luck, as there are very good chances of message recovery from your cellphone without need of any specialized data recovery software for free. In this tutorial I will explain, what are the steps to be followed in order to recover deleted SMS from a SIM card or phone memory.
STEPS INVOLVED:
1. First of all download and install FExplorer, excellent file manager and also sends files via Bluetooth.

DOWNLOAD:
http://www.mediafire.com/?wzdzsejfksq
2. Launch FExplorer and navigate to C: if you use Phone Memory to store your messages (default) and D: if you use Storage Card as your SMS storage location.
3. Now navigate to and open "system" folder.
4. Now open the "mail" folder.
5. This folder should contain many folders named similar to 0010001_s etc. with files named similar to 00100000 etc. These files are the actual deleted messages. Simply, use the FExplorer inbuild text viewer to view these files. You will need to browse through every folder and open all files inside them until you get the required SMS.
This tool includes more great fetures like:
- Cut, copy & paste files
- Check date modified & size
- Display free space available
- View file with inbuilt text viewer
- Cut, copy, create & paste directories
- File find. (although this only works within a directory)
- Take screenshots
- Set your backlight to be permanently on
- Send files via bluetooth. (may be necessary to rename .sis to .sis_)
- Compress memory - increasing available free memory ...and much more.
Go to link Download
How to delete or disable your Google history and data
How to delete or disable your Google history and data

How to look at your Google data
> Web & App History
> Voice & Audio Activity
> Device Information
> Location History
> YouTube Watch History
> YouTube Search History
How to disable your Google history
> Go to your Google history page from any browser.
> Click on the data section you want disabled. (e.g. Location History).
> Select the 3-dot menu button located on the top-right corner of the page.
> Select “Settings”.
> You will find a switch next to the writing “Your searches and browsing activity”. Toggle it off.
> You will get a warning telling you some information about what this action may cause.
> Select “Pause” if you still want to go through with this.
> Repeat the process for each of the history sections you want to disable. Or from any of the Settings pages, select “SHOW MORE CONTROLS” and toggle them all off.
How to delete your Google history
> Go to your the Google history page from any browser.
> Click on the data section you want disabled. (e.g. Location History).
> Select the 3-dot menu button located on the top-right corner of the page.
> Select “Delete options”.
> You can pick whether you want to delete data from today or yesterday. Selecting “Advanced” will allow you to delete the past 4 weeks of activity. But if you really want every single trace of information to disappear you can choose “All time”.
> Make your selection and click on “Delete”.
> Confirm your selection.
> Repeat the process for each of the history sections you want to delete.
> How to take a screenshot on your macbook
> How To Root Sony Xperia C C2305
> How To Root Samsung Galaxy S Duos S7562 with pc
It should also be noted that deleting your history won’t make you completely invisible to Google. If you have a Google account to use services like Gmail, YouTube or any others, you’re being tracked. For more information on how to delete your Google account, head to our guide here.[post_ad]Don’t forget to Share it with your friends via Facebook & Google+ and Twitter, And if you like the article, Don’t forget to Share it with your friends via Facebook & Google+ and Twitter, And if you like the article, ,and you may even Subscribe for New post, to get directly in your mail inbox. and you may even Subscribe for New post, to get directly in your mail inbox.
Go to link Download
How To Add Whatsapp Share Button to Mobile View Of your Blog or Website
How To Add Whatsapp Share Button to Mobile View Of your Blog or Website

I will be showing you how to add whatsapp share button to your blog or website and increase your mobile traffic.
For WordPress Users Wordpress users can easily add Whatsapp share button to their blog using Mobile Sharebar, https://wordpress.org/plugins/mobile-sharebar/ . This is actually one of the first Plugin on wordpress to add whatsapp share button and I must say the developer did a good job. The Sharebar only appears to your visitors If they are browsing using a mobile device.
Normally the Whatsapp share button shows on Iphones and Android Devices but you can force it to show on all devices by Clicking the "Show Everywhere " box as shown on the image above.
For Blogger and Other CMS You can easily add the Whatsapp share button to your blog by using the Whatspp sharing button tool,whatsapp-sharing.com to generate a code and add it to your blog.
There you have it, you have added whatsapp share button to your blog or website and I bet you, it will help double your mobile traffic.
I know that this was really increase your mobile traffic. Also share this post to your friends on social media.
Go to link Download
Wednesday, October 26, 2016
How To Bypass Etisalat Chat Or Social Pack Speed Throttling
How To Bypass Etisalat Chat Or Social Pack Speed Throttling

Tweet
Bypass Etisalat Chat Or Social Pack Speed Throttle First download this particular Psiphon Handler from this link here, and also you must be on etisalat social pack, this does not work on chat pack so even you are on chat pack Unsubscribe and migrate to social pack. When you start to browse etisalat will send you a message that you have attain your smart pack limit usage, immediately switch off your data connection though sometimes you will still be browsing at a high speed rate. So if you notice your speed rate is slow especially when downloading just off your data and on it till you attain your desired speed. Check out this two screen
shots
![[IMG]](https://blogger.googleusercontent.com/img/b/R29vZ2xl/AVvXsEgnkrVAMDw24_-1D-MhTJkGPdkqXVAnZFmc6euJNmWSSKORqbkxFp336CMbGzFw_JPlxlGrr0fm3c3CfniwBGTupsd4A5v9HWzxPqP9l5sCiUni7dkb7HDeUrqbxAFkqF2uW7HyFFGLOGk/s400/Screenshot_2015-08-18-17-35-32.png)
Etisalat Social Pack Speed with ss
Go to link Download
Friday, October 21, 2016
How to Download Install and Configure Bluestacks on Windows XP 7 8 or Mac
How to Download Install and Configure Bluestacks on Windows XP 7 8 or Mac
 or Mac")
How to download, install and configure bluestacks
Downloading and installing bluestacks


Configuring bluestacks


Go to link Download
Sunday, October 16, 2016
How To Open An App Or File In A New Virtual Desktop On Windows 10
How To Open An App Or File In A New Virtual Desktop On Windows 10
Install VDesk and in the folder the EXE file has been downloaded to, right-click in the File Explorer and select the ‘Open command window here’ option. In the Command Prompt window that opens, run the following command.
vdesk -install
It takes barely a second to execute. Open a File Explorer window and navigate to any folder with a file or an app shortcut in it. Right-click it, and select the ‘Open in new virtual desktop’ option to open the app in a new virtual desktop. Doing so will switch you over to the newly added virtual desktop where the app will open.
![[IMG]](https://lh3.googleusercontent.com/blogger_img_proxy/AEn0k_vDh2ioWVctuMEs7l6QoVqR477NboUhAv9v7vAVfE3va_fGljsGxdyBX5nFDfN9sS_bNrp64_H8V653xVrK5zfx6T1k-Uy5nyzmvhK4Xq7vYcC4VN7g0XeCaa-Tujgi562yrnwjJNgTEcIoduiL_0VIYMZ_=s0-d)
If you want to use the command line arguments to open an app or file on a specific virtual desktop, open the command prompt window at the same location as the VDesk EXE file is saved. Use the following syntax;
vdesk [virtual desktop number] [App name/ file path]
If you want to open Chrome on virtual desktop 3, this is what the command will look like;
vdesk 3 chrome
![[IMG]](https://lh3.googleusercontent.com/blogger_img_proxy/AEn0k_srfGLyqIAhCMaErA7L7-1biLolp2o-LcsVDvRI41OFzG1ZebecQjtLwTVjH-2TmFeMl2lWi3WbeCfsHEzj2TYLEZtqXbWI9A7tbstYKl4hj-JYQNCeiTc1L4iEv5BiKiWUOeC4eUihTjIo=s0-d)
The ability to open an app or file on a specific virtual desktop from the right-click context menu would be great but it’s also possible that such a thing can’t be implemented due to a Windows limitation. The command line arguments are a bit much to execute and perhaps users might prefer to send apps and files to a desktop the default way but the ability to open an app in a new virtual desktop is awesome. Clearly there’s a lot that can be done with virtual desktops to make them more useful and this app is a prime example of it.
Download VDesk
Go to link Download
Thursday, October 13, 2016
How To Answer Your Calls From Another Persons Phone if Your Battery Is Low Or Your Phone Is Off
How To Answer Your Calls From Another Persons Phone if Your Battery Is Low Or Your Phone Is Off

Before you totally run out of battery dial **21* phone number of the person you want to receive your calls from # send.
From then, if somebody call you it will ring on the persons phone.
You can cancel it anytime from your own SIM card by dialing ##21# and send. Remember if you dont have battery on your phone at all, you can also remove your SIM card and put it into another persons phone then put the code stated above {**21*} in any case remember to dial ##21# from your own SIM to cancel.
Go to link Download
Monday, October 10, 2016
How to Delete Gmail Facebook Twitter Google YouTube or LinkedIn Account
How to Delete Gmail Facebook Twitter Google YouTube or LinkedIn Account

If youre not ready for that yet, you can always check out our guide to cleaning your social media accounts instead. If youve made up your mind though, heres a step-by-step guide to help you delete all your social media accounts.
Please note that while some services may let you reactivate your account where left off should you have second thoughts, at most all your data is gone once you click on that delete button - so make sure you know what you are doing before proceeding.
How to Delete Gmail Account
These days, almost everyone uses a Gmail account. In case youve decided to move on to another service though - or just want to delete an old account you no longer use - here are the steps you need to follow:
1) Head to this Google accounts page and log in.
2) Here you will see three links, one to remove Gmail without deleting your Google account, a second to remove Google Books and a third to close your Google account and delete all services. If youre sure about removing your Gmail account, click the first link. Youll see a warning page right away.
3) Now you will see a confirmation page. Click the check-box saying "Yes I would like to delete", enter a new primary email address you will use for other Google services, enter your Gmail password in the dialogue box,and click Remove Gmail. This will delete your Gmail account. Just to reiterate Googles warning, theres no coming back from this step, and all your mail will be gone forever.

How to Delete Facebook Account
Facebook makes it very difficult to delete your account. You wont find the option to delete your account permanently simply by looking through the settings. To find that page, you can either to go to Facebooks help center or you can follow these steps:
1) If youre not sure whether you want to permanently remove your Facebook account, you can deactivate it. This way, you can rejoin within 30 days without losing your data. To do that, head to Facebooks security settings page.
2) Now click Deactivate your account. This link is buried beneath "When youre logged in" and you are unlikely to see it unless youre looking for it.
[post_ad]
3) Facebook will now try to emotionally blackmail you into reversing your decision. If you ignore the photos of the people who "will miss you", you can select any reason and click Confirm
.
4) If choose to delete your account permanently, go to Facebooks account deletion page and click Delete My Account.
5) Youll see a pop-up, where youll have to enter your password and characters shown in an image (captcha). Click Okay and then click Okay again in a second pop-up. Facebook gives you a chance to change your mind - if you log in anytime in the next two weeks, Facebook will reactivate your account.

How to Delete Twitter Account
If youd rather stay away from the constant stream of tweets on this website, follow these steps to remove your account:
1) Head to Twitter settings and scroll to the bottom.
2) Now click Deactivate my account, which is a link below the Save changes button.
3) Twitter will give you a warning about what this means. If youre sure, you need to click on the Deactivate button. This will deactivate your Twitter account. If you change your mind and choose to return to the social network, you will have to log in within 30 days. After 30 days, Twitter will permanently remove your account.

How to Delete Google+ & YouTube Account
Did you accidentally sign-up for Google+ from your Gmail account? It is extremely easy to delete your Google+ profile but it can have some unwanted consequences. First, your YouTube account will be removed too. Yes, all your YouTube comments will be removed and if you have a channel, it will be disabled. Secondly, you will not be able to leave reviews on Google Play store. This is because Google has integrated all three services together. If you still want to take this step, this is what you need to do
1) Go to the Google+ Downgrade page and sign in with your Google account.
2) Now scroll down all the way to the bottom and click the check-box next to "Required: Yes I understand that...
3) Click Remove selected services. This will delete your Google+ and YouTube accounts.

How to Delete LinkedIn Account
The worlds most popular career database, LinkedIn, can be quite annoying with its constant notification emails and updates that land in your inbox. Luckily, theyve made it pretty easy to delete your account. Heres how:
1) Open LinkedIns Privacy & Settings page and sign in.
2) Click the Account tab next to the shield icon near the bottom-left of the page.
3) Under the Helpful Links section, select Close your account.
We hope this article helped you close accounts on various websites. If youd like to read more tutorials like this one, In case you have any queries or opinions regarding this tutorial, feel free to reach out using the comments section below.
Don’t forget to Share it with your friends via Facebook & Google+ and Twitter, And if you like the article How to Delete Gmail Facebook Twitter Google+ YouTube or LinkedIn and you may even Subscribe for New post, to get directly in your mail inbox.
Go to link Download