Monday, November 28, 2016
HOW TO HIDE A FILE OR A DOCUMENT WITHOUT USING ANY APP IN AN ANDROID SMARTPHONE
HOW TO HIDE A FILE OR A DOCUMENT WITHOUT USING ANY APP IN AN ANDROID SMARTPHONE
Create a folder with a name youd like, and add "." before other characters along the file name and save.
example
file name is Document, then itd now become .Document
Your smartphone should notify you that the folder will be hidden
2. CLICK OPTION TO HIDE OR UNHIDE THE FOLDER
;
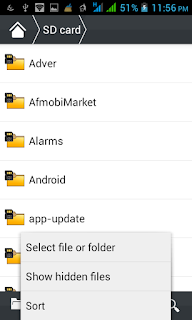
3.COPY THE FILES TO THE FOLDER YOUR CREATED
Copy the files youd want to hide to the folder you created and it will be hidden, take for instance pictures or videos you wouldnt like to be displayed in your gallery once they are moved to this folder you created it wont display there again
4. GO BACK TO STEP THREE IN ORDER NOT TO ALLOW PEOPLE ACCESS THOSE FILES FROM YOUR FILE EXPLORER
THATS ALL!!!!!!!!!!!!!!!!!!
Go to link Download
Friday, November 18, 2016
How to Create an Undeletable and Unrenamable folders in Windows
How to Create an Undeletable and Unrenamable folders in Windows
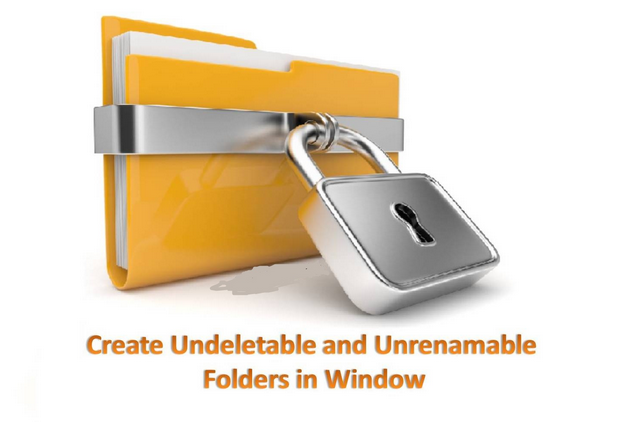
How to Create an Undeletable and Unrenamable folders in Windows
1. Go to start and search for Run.
2. Input cmd and hit enter.
4. Next, you’ll need to create the folder in root directory for it to work. Simply type input D: or E: and hit the enter button.
5. After that, input the command md con and hit enter to make directory.
6. You can also replace the word “con” with words like aux, lpt1, lpt2 up to lpt9, as it’s the name given to the folder
7. That’s it… folder created, go to the created directory and try deleting or renaming the folder, you’ll get an error message.
Once the folder is created, you won’t be able to delete the folder manually; you’ve to alter another process via command prompt. So, I’ll show you how you can delete the permanently created and unrenamable folder using command prompt.
How to delete the undeletable folder?
1. Open the command prompt program
2. Type D: ( only if the foler was created in D: drive) and hit enter
3. Type rd con (rd - remove directory)
4. Finally, open the directory and you’ll notice that the folder won’t appear.
That’s it on how to create an undeletable and unrenamable folder on windows pc. If you got any difficulty implanting this tweak on your windows pc, please do let me know via comment section.
Go to link Download
Friday, October 28, 2016
How to start an Internet Cafe business
How to start an Internet Cafe business
 | Want to have an Internet Cafe business? This article is for you. Internet Cafe is truly one of the most profitable business in the Philippines today. Imagine, it converts every minute of your life into money. Now people are thinking, how can we start an Internet Cafe business? Read on.... as we educate you on how to start this lucrative business. |
THE PLACE First things first, the place.
BROADBAND CONNECTION
TABLES AND CHAIRS
THE COMPUTERS
| |
Go to link Download
Sunday, October 23, 2016
how to root an andriod device and why you need to
how to root an andriod device and why you need to
Here is an Exclusive Tutorial on How to Root and Andriod Phone easily following Some Simple Steps, This is the easiest Tutorial on the Internet on How to Root Andriod Devices.

Just as the Symbian User think of How to Hack their Symbian Phone & Sign their Apps, How iPhone/iPad Users think of How to Jailbreak their Devices to Make Use of Some Apps and Beats Off their Limitation, This is a Major Reason why Andriod Users need to Root their Andriod Phones to enjoy their Device to the Fullest.
Let’s start with why you would want to root your Android smartphone. Sometimes apps require special permission that the Android OS, which is based on Linux doesn’t allow. These could be simple as taking a screenshot to higher level permissions to the core Android files. Rooting makes your phone faster, increases battery life, allows it to run more apps, custom software and ROMs which allow complete control over every aspect of your device by allowing superuser and admin level permission. Removing carrier bloatware is a particularly enticing application.
Hence, here’s a list of my top 10 reasons (in no particular order) that I consider worthy of rooting your device for, Check Here for Reason why you Should or Need to Root your Andriod Device Here, Lets proceed with the Tutorial for today.
Below is a Simple Procedure on How to Root your Adriod Device Perfectly... Check it Out.
Warning:- You must Back-up your Device before you Start the Rooting Steps.
1. Download SRSRoot to your PC Here [One of the World Best Rooting App].
2. Connect your Android phone or tablet you wish to Root to your computer using your Micro USB/USB cable.
3. Run the SRSRoot software on your computer.
4. Click on the ‘Root Device [All Methods]’ and wait for the Rooting process to complete.
Enjoy!!!!
Remember: SRSRoot is 100% guaranteed to successfully root Android phones and tablets and the process is completely risk-free.
Note:- SRSRoot is completely reversible by Click on the UnRoot Device Button on the SRSRoot Software Interface and is far safer than other treacherous methods of rooting and unrooting.
Go to link Download
Wednesday, October 19, 2016
How To Create Setup An FTP Account From cPanel
How To Create Setup An FTP Account From cPanel

Procedures to Creating An FTP Account Using cPanel


Go to link Download
How to Make an Autorun CD
How to Make an Autorun CD
If you want to make the same type of autorun CD than you have to open notepad file and write the following code in it.
[autorun]
OPEN=INSTALLSetup_filename.EXE
Here “Setup_filename.EXE” MUST be replaced with the name of the setup file. And also remember that it is not all of the setup files there are called “.exe” but some are called “.msi”
Now save it as a “.inf” file not as a “.txt” file. Burn your CD with the autorun.inf file included and set the CD in your CD-drive and waits for the autorun to begin or if nothing happens just double-click on the CD drive.
Go to link Download
Sunday, October 16, 2016
How To Open An App Or File In A New Virtual Desktop On Windows 10
How To Open An App Or File In A New Virtual Desktop On Windows 10
Install VDesk and in the folder the EXE file has been downloaded to, right-click in the File Explorer and select the ‘Open command window here’ option. In the Command Prompt window that opens, run the following command.
vdesk -install
It takes barely a second to execute. Open a File Explorer window and navigate to any folder with a file or an app shortcut in it. Right-click it, and select the ‘Open in new virtual desktop’ option to open the app in a new virtual desktop. Doing so will switch you over to the newly added virtual desktop where the app will open.
![[IMG]](https://lh3.googleusercontent.com/blogger_img_proxy/AEn0k_vDh2ioWVctuMEs7l6QoVqR477NboUhAv9v7vAVfE3va_fGljsGxdyBX5nFDfN9sS_bNrp64_H8V653xVrK5zfx6T1k-Uy5nyzmvhK4Xq7vYcC4VN7g0XeCaa-Tujgi562yrnwjJNgTEcIoduiL_0VIYMZ_=s0-d)
If you want to use the command line arguments to open an app or file on a specific virtual desktop, open the command prompt window at the same location as the VDesk EXE file is saved. Use the following syntax;
vdesk [virtual desktop number] [App name/ file path]
If you want to open Chrome on virtual desktop 3, this is what the command will look like;
vdesk 3 chrome
![[IMG]](https://lh3.googleusercontent.com/blogger_img_proxy/AEn0k_srfGLyqIAhCMaErA7L7-1biLolp2o-LcsVDvRI41OFzG1ZebecQjtLwTVjH-2TmFeMl2lWi3WbeCfsHEzj2TYLEZtqXbWI9A7tbstYKl4hj-JYQNCeiTc1L4iEv5BiKiWUOeC4eUihTjIo=s0-d)
The ability to open an app or file on a specific virtual desktop from the right-click context menu would be great but it’s also possible that such a thing can’t be implemented due to a Windows limitation. The command line arguments are a bit much to execute and perhaps users might prefer to send apps and files to a desktop the default way but the ability to open an app in a new virtual desktop is awesome. Clearly there’s a lot that can be done with virtual desktops to make them more useful and this app is a prime example of it.
Download VDesk
Go to link Download
Saturday, October 15, 2016
How to Install an Android OTA Update Without Losing Root Access
How to Install an Android OTA Update Without Losing Root Access

Why OTA Updates Don’t Play Nicely with Rooted Phones
What Is FlashFire?
How to Use FlashFire to Flash an OTA Update, Without Losing Root


What to Do if Flashing the OTA Doesn’t Work


Go to link Download
Thursday, October 6, 2016
How install Android Marshmallow on your AT T branded Priv when not using an AT T SIM
How install Android Marshmallow on your AT T branded Priv when not using an AT T SIM
Now that AT&T has officially released Android Marshmallow for the BlackBerry Priv, Im sure many of you out there who took advantage of those unlocked AT&T branded Priv deals but not actually using the device on AT&T are wondering how you can get in on the Marshmallow action as well. Heres how it can be done.

Now that AT&T has officially released Android Marshmallow for the BlackBerry Priv, Im sure many of you out there who took advantage of those unlocked AT&T branded Priv deals but not actually using the device on AT&T are wondering how you can get in on the Marshmallow action as well.
Previously, it was noted that BlackBerry was working on a solution but, there have been no status changes in that area yet. Luckily, though, you dont really have to wait for BlackBerry. Along with the official AT&T release, an autoloader file was released, which in this case can be used to install Android Marshmallow on your AT&T branded Priv when not using an AT&T SIM.
Read More »
Read more>> Source Link http://ift.tt/29EnK6j via CrackBerry.com - The #1 Site for BlackBerry Users (and Abusers!)
Go to link Download
Sunday, September 25, 2016
How To Get An Approved Adsense Account Within 4hrs
How To Get An Approved Adsense Account Within 4hrs

Without wasting your precious time visit the link below:
HOW TO GET AN APPROVE ADSENSE ACCOUNT WITHIN 4HRS
Go to link Download
Wednesday, September 21, 2016
How to put videos on your iPad without an internet connection
How to put videos on your iPad without an internet connection
Ill disclose here how to duplicate video records from your Windows PC or portable PC to your iPad, and they dont should be changed over into an extraordinary arrangement which the iPad can play. Well likewise demonstrat to you how you can download recordings without utilizing a PC by any stretch of the imagination, so you can watch them at whatever point you need, wherever you are - regardless of the fact that you have no web association.

Step by step instructions to put movies on an iPad: Videos application or an outsider application
On the off chance that you match up motion pictures or TV shows put away in your iTunes library, theyll show up in the local Videos application on your iPad. This is a consummately decent method for doing things, however in the event that your video isnt in an arrangement that iTunes can play, you cant add it to the library, nor sync it with your iPad. Likewise, you can just utilize one PC to adjust your iPad. On the off chance that you attempt to match up recordings from another PC running iTunes, youll get a notice that all your media will be erased first.The uplifting news is that there are heaps of applications accessible in the App Store on your iPad which can play recordings and permit you to "import" documents from any PC running iTunes. Most dont oblige you to first change over the video into a configuration the iPad can play locally (i.e. MP4). Rather, you can play basically anything you like, including AVI, DIVX, MKV and thats only the tip of the iceberg.
For instance, CineXPlayer HD costs two or three pounds yet will play most arrangements. It likewise backings separate subtitle records, which is helpful in case youre viewing a remote film that doesnt have subtitles implanted into the video itself.
There are different applications, including the free VLC player. Tragically, numerous such applications have needed to evacuate codecs taking after lawful solicitations and didnt really bolster encompass sound (AC-3 and others). This implies a video document with this sound configuration will play noiselessly: you would need to change over your video in a suitable application to downmix the encompass soudn to a stereo soundtrack first.
One free application which has astounding audits right now is PlayerXtreme Media Player by PentaLoop. This gives you a chance to exchange recordings by Wi-Fi, however for velocity and dependability well be utilizing a USB link for this aide. Clearly, introduce whichever application youre going to use before taking after the aide underneath.
Step 1. Interface your iPad to a PC with a late form of iTunes (attempt to utilize the most recent rendition if conceivable). iTunes ought to dispatch consequently and your iPad will appear on the left-hand side

Step 2. Click on the symbol speaking to your iPad and afterward tap on Apps in the menu on the left. Look down until you see the File Sharing area.

Step 3. Look down the rundown if vital and click on the suitable video application, for this situation well pick PlayerXtreme. On the privilege is a rundown of the records: its right now clear as we havent yet duplicated any recordings.

Step 4. Click the Add File... catch and explore to the video you need to put on your iPad. Select one or more and snap Open at the base of the dialog box. Bear in mind to choose any subtitle records which run with the recordings.

The movies will begin replicating to your iPad – an advancement bar is appeared in the sheet at the highest point of iTunes.
Once theyre exchanged, you can disengage your iPad, dispatch PlayerXtreme (or whichever video playback application youre utilizing) and the recordings will be there, prepared to watch.
Remember that playing video designs which arent locally bolstered by iOS will go through the battery speedier unless the application can utilize equipment increasing speed (which PlayerXtreme can).
Step by step instructions to put movies on an iPad: Use a video downloader application
On the off chance that you would prefer not to need to associate your iPad to a PC running iTunes, there are different approaches to get movies onto your iPad. One is to introduce a video downloader application, for example, Video Downloader Lite. Utilizing the applications constructed as a part of web program you can make a beeline for YouTube or another video spilling website and discover a video you need to watch.
When it begins playing, a pop-up window ought to seem giving you the choice to download or spare the video. You may need to sort in a name for it, or it may naturally take the name from the site page.
We have a different instructional exercise on downloading YouTube recordings to an iPad with orderly directions.
The most effective method to put movies on an iPad: get up to speed TV
BBC iPlayer and the All 4 application (Chanel 4) both permit you to download TV appears (counting movies) to your iPad. iPlayer now gives you 30 days to watch stuff you download, while with All 4 it relies on upon when the show was telecast in respect to what extent you have before the download lapses. Neither ITV Player nor Demand 5 permit you to download appears.
The most effective method to put movies on an iPad: Buy or lease from iTunes, Google Play Movies and TV or another administration
On the off chance that you dispatch the iTunes store on your iPad, then tap on Films at the base, youll locate an incredible choice of the most recent motion pictures accessible to lease or purchase. Leasing another film costs £3.49 in standard definition or £4.49 in HD. Fantastic movies are a pound less expensive. Purchasing one to observe more than once at whatever point you need costs £9.99 or £13.99 relying upon the motion picture.
Despite the fact that you can stream the movies promptly, a purchased or leased film will likewise be downloaded to your iPad so you can watch it without a web association.
At long last, on the off chance that you want to stay with the inherent Videos application and need to put movies from your PC onto your iPad, youll have to utilize the PC you use to match up and reinforcement your iPad.
At the point when your iPad shows up at the highest point of iTunes (in the wake of associating it with a USB link or utilizing Wi-Fi sync), click on the Films tab and you will see a rundown of the considerable number of movies youve imported into your iTunes library. Remember that they may show up in the TV Programs tab on the off chance that theyve been mistakenly labeled. This is likewise valid for TV Shows which are wrongly labeled as Films.
Tick the Sync Films box, then tick the movies you need to add to your iPad from the rundown. Then again, tick the crate alongside "Consequently incorporate all movies", and utilize the drop-down menu to pick an alternative from the rundown, for example, all unwatched.
You can introduce the Google Play Movies and TV application on the off chance that you favor and purchase or lease recordings that way. Lamentably, Netflix and Amazons gushing video administrations dont give you a chance to download substance to watch disconnected from the net..
Go to link Download
Tuesday, September 13, 2016
How To Create An App Mobile App Development
How To Create An App Mobile App Development
Do you want to develop an app for Android? These app development tutorial will let you know how to be a developer.
You have got an amazing idea to develop an app, however you require some help. You can learn find how to build an app for Android with this easy to understand guide for everybody from beginners to geniuses.
In this new world where smartphone usage is climbing exponentially, the chances to make a name for yourself, also a huge amount of money, by transforming your app thought into the truth are huge. So, if you are developing for Android here is a exercise to help you.
This tutorial will teach you how to build your first Android app. You will learn how to create an Android project and run a debuggable version of the app. You will also learn some fundamentals of Android application design, including how to build a simple user interface.
This tutorial is a short introduction for beginners for a guide How To Develop App For Android. The tutorial is focused around API Level 17 and operating system Android 4.2 (Jelly Bean). Our objective is to begin starting with no outside help and develop an app which will convert mp/h to km/h.

1 - What Do You Require?
- Basic knowledge of XML.
- Basic knowledge of Java.
- Basic knowledge of Eclipse.
- 2 to 3 hours of your time.
2 - Requirements
Before you can begin you require the Android SDK and an IDE. Android offers an unique bundle for that. It is known as Android SDK Bundle.Download the bundle pack, unzip (extract) and run the "SDK Manager.exe".
Start Eclipse.
3 - Create an Android Virtual Machine (Dalvik)
- Click on Windows at the route toolbar
- Open Android Virtual Device administrator

- Create a new Android Virtual Device.

- Make sure that Use Host GPU is enabled. This permits the AVD to use the Host GPU and this helps to render the AVD much quicker.
- After that you can start the AVD

4 - Create A New Project
Open "File"Select "New"
Then select "Android Application Project"
Choose a name for your app.

Configure your project.

Setup Launcher Icon.
Here you can pick a Launcher Icon that will be shown on your smartphone.

Now Create a new Blank Activity.

Configure your Activity with Name and Layout Name as shown in the figure.

After finishing the above steps, Eclipse looks very similar to this screen.

5 - Implement the Look and the Feel
Navigate in the package explorer to this - /res/design/ and open activity_main.xmlRight-click on "Hellow World" and erase it.
5.1 - Create static Attributes
- Select /res/values/strings.xml

- Add a new entry
- Select the Color entry, press OK and set the following values :-
Value - #eeeeee
- Name/value: "miles" / "to Miles"
- Name/value: "kmh" / "to km/h"
- Name/value: "calc" / "Calculate"
- <resources>
- <string name="app_name">TutorialApplication</string>
- <string name="action_settings">Settings</string>
- <string name="hello_world">Hello World!</string>
- <color name="myColor">#eeeeee</color>
- <string name="miles">to Miles</string>
- <string name="kmh">to km/h</string>
- <string name="calc">Calculate</string>
- </resources>
5.2 - Add Views
Select /res/layout/activity_main.xmlOpen Android Editor via double click.
Now you have two possibilities. You can create a new Views via drag and drop, or you can edit your XML source code. In this tutorial to develop an app we will add the Views through drag and drop.
So let us start developing our App. Firstly we have to add a Text Field for the input.

Drag this Text Field to your Application.
After that select the "Form Widget" section and drag a RadioGroup to your App and be sure that the RadioGroup has two RadioButtons. Now you can add a normal Button.

Switch from "Graphical Layout" to "activity_main.xml" and verify that your code appears to be like that
- Go to link Download