Showing posts with label menu. Show all posts
Showing posts with label menu. Show all posts
Thursday, November 3, 2016
How To Create New Files From The macOS Right Click Context Menu
How To Create New Files From The macOS Right Click Context Menu
Apps in Windows can add an option to the right-click context menu that lets you create a new file. You can create a new text file, a new MS Word file, or a new Photoshop file on the fly. The same option doesn’t exist in macOS but if you’re looking for a way to add it, New File Menu is an app you should check out. It’s a macOS app that costs $1.99 in the Mac App Store and it perfectly mimics the new file from context menu feature in Windows on macOS. The app works as a Finder extension and lets you choose which apps should appear in the right-click context menu.
Install New File Menu and enable it as a Finder extension. To do so, open the Settings app, go to Extensions and enable it.
![[IMG]](https://lh3.googleusercontent.com/blogger_img_proxy/AEn0k_suh6noALGZnv66LYTzGwTceYf4rzoRIzZkMAKrZEVLo92W3-oZhwHo_sKpKKj33y4Y_4iv3VAhnCegYWzLfVNdTaJSsAwIJX5vlwLUVaLTuwhsJHl3iZr9k0WmVuZeOOXW8xF2lkewtz6y5-evykq-Aw=s0-d)
Right-click inside a Finder window and you will see options to create a new text file, a new RTF document, a new Pages document, etc. The options are added regardless if you have the Pages or any of the MS Office apps installed. To customize which new file options appear in the right-click context menu, go to New File Menu’s preferences.
![[IMG]](https://lh3.googleusercontent.com/blogger_img_proxy/AEn0k_ttjLPR39sRTudxhkj-B6X2ifYIq_DhY656XIw_P-8ket3q3U3Za9-mz9oPXZExYfh3AwjaeMrt-fTwRqiYbpt7PBnTLVcF9cvlX_GwUHhB3VA4uo-5nb_g1UxMN1Foe8v0ZWqNjJ4LWa5Y39obDbpdZe_Pk4S_ref9lZY=s0-d)
The ‘Templates’ tab in New File Menu’s preferences lets you choose which apps should appear in the right-click context menu. You can also change the order the apps appear in.
![[IMG]](https://lh3.googleusercontent.com/blogger_img_proxy/AEn0k_t8eYpPTZTM7JTS77ENxVQV6h84mQYM_BHviuSpBoY4vTmIFXG8n3Vvl0DUjBDNONUT7LSWHZ6S5lhcPpaHZdmSjBVwcKuPVkbJ8YTNzgn52UPhzbXNpIQWOy9o0qebNY353n_qBRzkdL5Pf7OE-AePI7g=s0-d)
By default, New File Menu will only create a new file which is exactly what happens in Windows. The file is created but it isn’t opened and the app the file belongs to isn’t launched. With New File Menu you have the option to automatically open the file once it’s been created. To enable it, go to the General tab in the app’s preferences and enable the ‘Open file on creation finish’ option.
![[IMG]](https://lh3.googleusercontent.com/blogger_img_proxy/AEn0k_tneYx7CrdEqsge3zG7RAOPHGBEebcAMg_WBQ_PJ3Cf8603tHoYZcJ8Q4h_BVAvS8DVX4ruPHb9Nhc4mB0Xq3akLs6O8hBeCzeiYTzxMReVYk8R1ov0d7y6PkhyHY30h3NgN8-Bp1aaT0p2C81LVy8UC1P1=s0-d)
For $1.99, the app is awesome and the functionality it adds is exceptionally useful.
Install New File Menu and enable it as a Finder extension. To do so, open the Settings app, go to Extensions and enable it.
Right-click inside a Finder window and you will see options to create a new text file, a new RTF document, a new Pages document, etc. The options are added regardless if you have the Pages or any of the MS Office apps installed. To customize which new file options appear in the right-click context menu, go to New File Menu’s preferences.
The ‘Templates’ tab in New File Menu’s preferences lets you choose which apps should appear in the right-click context menu. You can also change the order the apps appear in.
By default, New File Menu will only create a new file which is exactly what happens in Windows. The file is created but it isn’t opened and the app the file belongs to isn’t launched. With New File Menu you have the option to automatically open the file once it’s been created. To enable it, go to the General tab in the app’s preferences and enable the ‘Open file on creation finish’ option.
For $1.99, the app is awesome and the functionality it adds is exceptionally useful.
Go to link Download

Tuesday, September 20, 2016
How To Add 3D Rotating Menu In Blogger Nairotech
How To Add 3D Rotating Menu In Blogger Nairotech
Nairotech Exclusively.. Today, we gon be dishing out a very lovely tutorial on Navigation (Horizontal) menu. After lots of discoveries we packaged this to suit every blogger template which doesnt need a Javascript or Javascript to function. It only needs Html and Css. You might also want to check our previous post on How To Edit Your Blog Easily With The New Blogger Template Editor
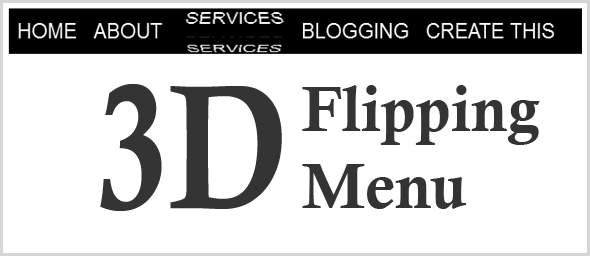
Steps To Add The Widget To Blogger
- Head to your Blogger dashboard
- Template >> Click Edit HTML
- Then find ]]></b:skin> & paste the below code justbefore ]]></b:skin>
/* 3d Flipping Menu By Nairotech.com */
.block-menu {
display: block;
background: #000;
}
.block-menu li {
display: inline-block;
}
.block-menu li a {
color: #fff;
display: block;
text-decoration: none;
font-family: Passion One,Arial,sans-serif;
-webkit-font-smoothing: antialiased;
-moz-font-smoothing: antialiased;
font-smoothing: antialiased;
text-transform: uppercase;
overflow: visible;
line-height: 20px;
font-size: 24px;
padding: 15px 10px;
}
/* animation domination */
.three-d {
-webkit-perspective: 200px;
-moz-perspective: 200px;
perspective: 200px;
-webkit-transition: all .07s linear;
-moz-transition: all .07s linear;
transition: all .07s linear;
position: relative;
}
.three-d:not(.active):hover {
cursor: pointer;
}
.three-d:not(.active):hover .three-d-box,
.three-d:not(.active):focus .three-d-box {
-moz-transform: translateZ(-25px) rotateX(90deg);
-webkit-transform: translateZ(-25px) rotateX(90deg);
-o-transform: translateZ(-25px) rotateX(90deg);
transform: translateZ(-25px) rotateX(90deg);
}
.three-d-box {
-webkit-transition: all .5s ease-out;
-moz-transition: all .5s ease-out;
-ms-transition: all .5s ease-out;
-o-transition: all .5s ease-out;
transition: all .5s ease-out;
-webkit-transform: translatez(-25px);
-moz-transform: translatez(-25px);
-o-transform: translatez(-25px);
transform: translatez(-25px);
-webkit-transform-style: preserve-3d;
-moz-transform-style: preserve-3d;
-ms-transform-style: preserve-3d;
-o-transform-style: preserve-3d;
transform-style: preserve-3d;
pointer-events: none;
position: absolute;
top: 0;
left: 0;
display: block;
width: 100%;
height: 100%;
}
.front {
-webkit-transform: rotatex(0deg) translatez(25px);
-moz-transform: rotatex(0deg) translatez(25px);
-o-transform: rotatex(0deg) translatez(25px);
transform: rotatex(0deg) translatez(25px);
}
.back {
-webkit-transform: rotatex(-90deg) translatez(25px);
-moz-transform: rotatex(-90deg) translatez(25px);
-o-transform: rotatex(-90deg) translatez(25px);
transform: rotatex(-90deg) translatez(25px);
color: #FFE7C4;
}
.front, .back {
display: block;
width: 100%;
height: 100%;
position: absolute;
top: 0;
left: 0;
background: black;
padding: 15px 10px;
color: white;
pointer-events: none;
-moz-box-sizing: border-box;
box-sizing: border-box;
}
.block-menu {
display: block;
background: #000;
}
.block-menu li {
display: inline-block;
}
.block-menu li a {
color: #fff;
display: block;
text-decoration: none;
font-family: Passion One,Arial,sans-serif;
-webkit-font-smoothing: antialiased;
-moz-font-smoothing: antialiased;
font-smoothing: antialiased;
text-transform: uppercase;
overflow: visible;
line-height: 20px;
font-size: 24px;
padding: 15px 10px;
}
/* animation domination */
.three-d {
-webkit-perspective: 200px;
-moz-perspective: 200px;
perspective: 200px;
-webkit-transition: all .07s linear;
-moz-transition: all .07s linear;
transition: all .07s linear;
position: relative;
}
.three-d:not(.active):hover {
cursor: pointer;
}
.three-d:not(.active):hover .three-d-box,
.three-d:not(.active):focus .three-d-box {
-moz-transform: translateZ(-25px) rotateX(90deg);
-webkit-transform: translateZ(-25px) rotateX(90deg);
-o-transform: translateZ(-25px) rotateX(90deg);
transform: translateZ(-25px) rotateX(90deg);
}
.three-d-box {
-webkit-transition: all .5s ease-out;
-moz-transition: all .5s ease-out;
-ms-transition: all .5s ease-out;
-o-transition: all .5s ease-out;
transition: all .5s ease-out;
-webkit-transform: translatez(-25px);
-moz-transform: translatez(-25px);
-o-transform: translatez(-25px);
transform: translatez(-25px);
-webkit-transform-style: preserve-3d;
-moz-transform-style: preserve-3d;
-ms-transform-style: preserve-3d;
-o-transform-style: preserve-3d;
transform-style: preserve-3d;
pointer-events: none;
position: absolute;
top: 0;
left: 0;
display: block;
width: 100%;
height: 100%;
}
.front {
-webkit-transform: rotatex(0deg) translatez(25px);
-moz-transform: rotatex(0deg) translatez(25px);
-o-transform: rotatex(0deg) translatez(25px);
transform: rotatex(0deg) translatez(25px);
}
.back {
-webkit-transform: rotatex(-90deg) translatez(25px);
-moz-transform: rotatex(-90deg) translatez(25px);
-o-transform: rotatex(-90deg) translatez(25px);
transform: rotatex(-90deg) translatez(25px);
color: #FFE7C4;
}
.front, .back {
display: block;
width: 100%;
height: 100%;
position: absolute;
top: 0;
left: 0;
background: black;
padding: 15px 10px;
color: white;
pointer-events: none;
-moz-box-sizing: border-box;
box-sizing: border-box;
}
- Save Template
NOW,
- Head straight to Layout in your Blogger Dashboard >> Select a Gadget (Blog header section)
- Then Select JavaScript/HTML & paste the below code.
<ul class="block-menu">
<li><a href="#" class="three-d">
Home
<span class="three-d-box"><span class="front">Home</span><span class="back">Home</span></span>
</a></li>
<li><a href="#" class="three-d">
About<span class="three-d-box"><span class="front">About</span><span class="back">About</span></span>
</a></li>
<li><a href="#" class="three-d">
Services
<span class="three-d-box"><span class="front">Services</span><span class="back">Services</span></span>
</a></li>
<li><a href="#" class="three-d">
Blog
<span class="three-d-box"><span class="front">Blog</span><span class="back">Blog</span></span>
</a></li>
<li><a href="#" class="three-d">
Create this
<span class="three-d-box"><span class="front">Create this</span><span class="back">Create this</span></span>
</a></li>
</ul>
<li><a href="#" class="three-d">
Home
<span class="three-d-box"><span class="front">Home</span><span class="back">Home</span></span>
</a></li>
<li><a href="#" class="three-d">
About<span class="three-d-box"><span class="front">About</span><span class="back">About</span></span>
</a></li>
<li><a href="#" class="three-d">
Services
<span class="three-d-box"><span class="front">Services</span><span class="back">Services</span></span>
</a></li>
<li><a href="#" class="three-d">
Blog
<span class="three-d-box"><span class="front">Blog</span><span class="back">Blog</span></span>
</a></li>
<li><a href="#" class="three-d">
Create this
<span class="three-d-box"><span class="front">Create this</span><span class="back">Create this</span></span>
</a></li>
</ul>
- Change the highlighted section above
- Save.
Like our Facebook Fanpage Here: http://www.facebook.com/nairotech

Go to link Download
Subscribe to:
Posts (Atom)