Friday, September 30, 2016
How To Fix Issues With iMessage After Updating To iOS 7
How To Fix Issues With iMessage After Updating To iOS 7
Ever since people have updated to iOS 7 there have been reports of a lot of bugs. Some users are reporting that the OS as a whole is very unstable where others are only experiencing issues using certain features of their device such as iMessage.

In fact there are hundreds of complaints from iPhone, iPod Touch and iPad users about iMessage after updating to iOS 7 on the Apple Support forums. You would think this would be to do with issues on Apple’s side, but it appears that isn’t the case, rather an issue with iOS 7 in general.
iOS 7.0.3 will be released soon to fix these issues, but until that time here is a quick solution that has worked for many.
Fix iMessage Issues After Updating To iOS 7
Step 1) - The first thing you will ned to do is launch the Settings app and going into the Messages section to disable iMessage.
Step 2) - Next go into the General section, followed by reset, and reset your device’s Network Settings.
Step 3) - Finally re-enable iMessage.
That wasn’t so bad was it?
What this will do is reactivate your iOS Device on the iMessage server, so any issues with sending or receiving iMessages should now be fixed.
Via
Go to link Download
Hotspot Shield Vpn Elite Edition v5 20 18 Full Crack
Hotspot Shield Vpn Elite Edition v5 20 18 Full Crack

Selain itu dengan menginstall Hotspot Shield Vpn Elite Edition ini ke komputer anda, maka anda akan merasa lebih aman ketika menjelajah internet, karena software ini akan memberi anda perlindungan yang maksimal dari malware, phising, spam site, serta situs yang membahayakan komputer anda.
Bagi anda yang sudah kenal dengan software ini dan mencari Hotspot Shield Vpn Elite Edition Terbaru 2016, silahkan langsung anda download Hotspot Shield Vpn Elite Edition ini sekarang juga.
Hotspot Shield Vpn Elite Edition Features :
- Protect Your privacy
- Protect your IP Address and surf the web anonymously
- Bypass Internet Censorship
- Bypass internet censorship and restrictions Instantly unblock YouTube, unblock Facebook, or unblock any site. Get access to geo-restricted sites and VOIP application from anywhere.
- Secure Your Internet
- Secure your data, online Shopping, and personal information online with HTTPS encryption.
- Enable Wifi security
- Enable WiFi security and prevent hackers from stealing your personal information
- Get Malware protection
- Protect your device from malware, phishing, spam sites, and malicious sites.
- Get data savings on mobile
- Download up to twice the content for the same bandwidth cost with Hotspot Shield data compression technology.
Download
Go to link Download
How To Browse On Blackberry Without BIS Subscription
How To Browse On Blackberry Without BIS Subscription

Sometimes, our Blackberry BiS expires and we dont really have enough cash to get back on,
but we just want to browse and seek information online with our normal mb(10mb,20mb data plans) or even with our little credit.
Yes, i will show you how to configure your blackberry to browse without BIS Data Plan.
These Guidelines Will Help You Achieve That:
Goto OPTION >>> enter ADVANCE OPTION then >>>Locate TCP/IP
First, you have to mark APN Settings Enabled then you put the APN(Access Point Network) of the network u are using
ACCESS POINT NETWORK FOR VARIOUS NETWORKS
MTN: web.gprs.mtnnigeria.net
ETISALAT: etisalat
AIRTEL: internet.ng.airtel.com
Then you scroll down and mark APN Authenticaton Enabled
Now put the username and password of the network APN u are using....
Mtn :username and password is web
Etisalat: username and password is etisalat
Airtel is: username and password is internet
Eg; I am using airtel

Wen you are done. Press your blackberry key and save
Workinq fine on all opera 2go and whatsapp
Enjoy!
Go to link Download
How to Clean Up Your Digital Music Collection
How to Clean Up Your Digital Music Collection

Music is such an important part of most peoples lives, and the advent of the Internet and iTunes has really changed the way we interact with our music. Whether we’re in the car, at the gym, or relaxing after a hard day of work, music can work magic.
Today, it’s not uncommon to have thousands of songs on your music playlist. In fact, many people have so much music that it’s literally out of control!
Today’s digital players offer a wealth of ways to store and organize music, but if you’re not careful, it can quickly become a nightmare. Ask yourself: How many duplicate songs do you have in your collection? How many songs are listed as "track unknown” or are missing cover art that lets you identify them quickly?
If this describes you, then you may be interested in a great new plug-in service called TuneUp that’s coming to the rescue of millions of music lovers. In fact, TuneUp is now the #1 plug-in for iTunes, though it’s also compatible with Windows Media Player.
TuneUp was created in 2007 by a music lover who was fed up with his own disorderly music library. Once he created a few plug-in tools to organize and enhance his playlist, he wanted to share it with all music lovers, so everyone could enjoy their music experience to the fullest.
The app is incredibly easy to use, with one-click access to simple tools that get the job done.
How it Works
The first step is to CLEAN up your tracks that contain unknown artists, misspellings, and other irregularities with your album. CLEAN uses acoustic fingerprint technology to quickly fix inaccurate data by matching its fingerprint to Gracenote’s MusicID™ database. This database contains over 90 million indexed tracks, and is the largest collection of music metadata in the world.
--> Next, TuneUp’s DeDuper tool will locate all the duplicates in your music collection. It will display them in bulk for easy removal with a single click of the mouse, or you can review them individually by the original file location.
Finally, don’t settle for missing album covers replaced by ugly gray music notes. TuneUp’s Cover Art scans and identifies all your albums with missing or incorrect cover art. You’ll be offered multiple cover arts to choose from, in case you prefer an import cover or a domestic release. In no time, you’ll have brand new cover art to enjoy and identify your songs by.
How many times have you kicked yourself when you found out that one of your favorite bands was in town and you missed the show? Perhaps the best feature of TuneUp is its concert feature. It can make sure you’ll always be the first to know when your favorite band is coming to play in near you. It combs through your entire music collection, and if it sees you own a song by an artist performing at an upcoming concert, it will provide you with full details and even offer you a chance to purchase tickets quickly and easily.
And, more than just upcoming concert info, TuneUp also brings you music-related content from all over the Web about your favorite artists. For every song you download, you’ll be able to view videos, artist bios, news, brand merchandise, and buy concert tickets to upcoming shows.
TuneUp offers a free trial of the TuneUp Bundle; download it now and start cleaning up your messy music collection today.
Click here to get your free trial.
Go to link Download
How to Install Adobe Flash Player on Android Phones
How to Install Adobe Flash Player on Android Phones
1. Make sure you can sideload apps (more info about sideloading). Go to Settings > Applications > and check “Unknown sources” for Android 2.2 or 2.3, and Settings > Security for Android 4.1
2. Now we have to procure the .apk installation file of flash. Download the latest version here.
3. Move the .apk to your phone and install it
4. Now pop open your stock browser: If you are on Android 3.0 or later, go to Menu > Settings > Advanced > Enable plug-ins For Android 2.2 or 2.3, go to Menu > [more] Settings > Enable plug-ins
5. You should now have Flash working on your device. Check this link on your phone to confirm that Flash is up and running. Finally, once it’s working, you may want to uncheck the “Unknown sources” option once again to keep your phone or tablet secure.
Go to link Download
How To Change Nimbuzz Id Password
How To Change Nimbuzz Id Password
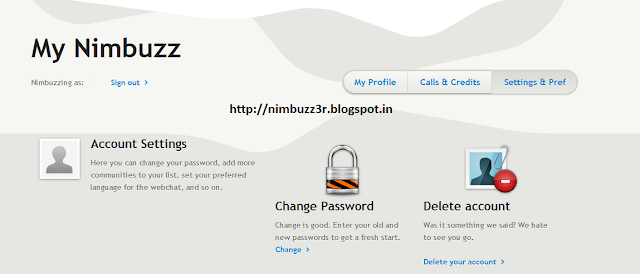
Change Nimbuzz id password using simple and easy way. Nimbuzz is not 100% secure from hacking and you may need to use strong password to avoid being hacked. You can change the Nimbuzz id password easily by follow the below steps.
1. Goto the following website Link.

1. Goto the following website Link.
2. Write your Nimbuzz User Id and Password and login to Nimbuzz.
3. Select Setting & Pref option.
4. Click on Change Password on the page.
5. Write your Old Password, New Password and Confirm Password.
6. Write the Captcha and click on Change Password.
Thats it and your old Nimbuzz id password is changed to new password.
Go to link Download
How To Check WAEC And NECO Result On Your Mobile Phone
How To Check WAEC And NECO Result On Your Mobile Phone

For WAEC result: Go to message and type WAEC leave a space and type the registration number, space year of the exam, space pin number of the scratch card and send it to 3232.
For NECO result: type NECO give a space type registration number space year of the exam space pin number of the scratch card and send to 32327.
Go to link Download
How to Disable Driver Signature Enforcement in Windows 10 8 1 and Windows 8 in 2016
How to Disable Driver Signature Enforcement in Windows 10 8 1 and Windows 8 in 2016
When you install drivers on your computer (from manufacturers, OEM, Windows Update or 3th-party driver download software, etc.), some of the drivers can work properly, while some may not. The working driver must be the signed driver that includes a digital signature, and the digital signature is an electronic security mark that can indicate the publisher for the driver, as well as all related information if someone has changed the original contents of the drive package.
All drivers and system files must be digitally verified by Microsoft, and Windows won’t run the unsigned drivers on both 32-bit or 64-bit system. This is the “driver signature enforcement”. To increase security,
Microsoft has introduced the driver signature enforcement in Windows OS, including Windows Vista, Windows XP, Windows 7, Windows 8, Windows 8.1, and Windows 10. This restricted feature has strict limitations on driver signing, especially in Windows 8, 8.1, and 10. Windows will alert you if a driver is not signed or is not certificated with one of the messages like.
here is a solution for you to temporary turn off Driver Signature Enforcement to install unsigned driver:
Once your Computer has rebooted you will need to choose the Troubleshoot option.

Then head into Advanced options.

In the Advanced Options window, choose Startup Settings.

Click the Restart button on the Startup Settings screen to reboot your computer again.

Click the Restart button on the Startup Settings screen to reboot your computer again.

After restart in Startup Settings windows, press the F7 key on your keyboard to select “Disable driver signature enforcement“.

Your PC will then reboot. Proceed to install your unsigned drivers. During the installation procedure, Windows will inform you that can’t verify the publisher of this driver software. Just ignore the warning message and choose “Install this driver software anyway” to complete the installation.
Keep in mind that after the next restart, Driver Signature Enforcement will be automatically enabled again to prevent new drivers from being installed, but Windows will keep using any unsigned drivers you’ve already installed.
But please if this will help you, share this to your friends via social networking sites.
FOR HELP: 08067611897...
Go to link Download
How to Change the iPhone Become Lawas iPod Touch
How to Change the iPhone Become Lawas iPod Touch
Sell ??old iPhone when you want to upgrade to a new model of iPhone is probably the most easy solution that you can take . But did you know that your old iPhone does not need to be sold because you can make it as an iPod touch , although without a data plan .
How to Change the iPhone Become Lawas iPod Touch

There are a number of steps that you need to do before making an old iPhone as an iPod touch , without a data plan . What is it ?
1 . SIM Card
Youll need a SIM card is the first card that you used to use to turn your old iPhone . You can use any SIM card with a note card is the card that was used to activate an old iPhone . Its a little complicated if you are no longer using the SIM card , but you still have the choice to look at eBay .
After getting a SIM card in question , please lakukang the steps below :
- Insert the SIM card into the slot your old iPhone .
- Connect your iPhone to the computer and launch iTunes .
- ITunes will recognize it as a new device and will activate it . Once activated , you can simply use it as an iPod touch !
You can use your old iPhone without SIM card but later on you will continue interrupted by a pop - up every time after reboot . Moreover , without a SIM card , you will not be able to restore your iPhone . For that you need to install the SIM card and not have to worry about data plan monthly pulses truncated unused alias .
2 . Turn off Cellular , Turn on WiFi
Because iPod Touch that you just created does not possess a data service plan or subscription internet data and also can not be used to send messages and call , you certainly do not need to activate the cellular radio feature . Instead , your iPod touch will depend on WiFi so make sure the WiFi feature is active . Perform the following ways :
- Open the Settings app , tap Cellular option .
- There is a toggle on the upper side to turn off the cellular radio . Tap on the toggle until the color turns gray .
- Go back to the Settings screen , tap WiFi .
- WiFi toggle Navigate towards ON
- Select the home network from the list and enter the password .
In this way , your old iPhone has turned into an iPod touch . You can use it to listen to thousands of songs , download and install apps and games , and even to see the maps when connected to WiFi . In short, the iPod touch is an iPhone that has no phone function .
In addition , you made ??the iPod touch can be used as a backup phone if your primary iPhone damaged or faulty . That is, by not selling the old iPhone then you can use it at any time without having confusion immediately buy a new iPhone . Good luck ;)
Go to link Download
How to Link Your Website With Facebook
How to Link Your Website With Facebook
When you have a website up and running, you may want to link it to your Facebook account. Here’s how:
EditSteps
- spaceplay / pauseescstopffullscreenshift + ??slower / faster (latest Chrome and Safari)??volumemmute??seek. seek to previous12…6 seek to 10%, 20%, …60%1Create a fan page. If you already have a Facebook account, ensure you create a fan page as opposed to creating a separate ‘business’ Facebook account as Facebook does not allow multiple accounts for one person. If you do set up two accounts and Facebook discovers this, they may ban both accounts.
- spaceplay / pauseescstopffullscreenshift + ??slower / faster (latest Chrome and Safari)??volumemmute
How To Post Blog Posts Automatically To Facebook Using Hootsuite
Read more »How To Post Blog Posts Automatically To Facebook Using Hootsuite
My fellow bloggers always send me mails and messages on how I use hootsuite to drive traffic to my blog, I always explain it to them but some will still be confused on how to use it effectively so i decided to write a tutorial on it so that they can fully understand it and those that have not heard of it too can use it.
So lets get started. You can use Hootsuite to drive traffic to your website or blog by connecting it with your Facebook, Twitter or GooglePlus accounts so that you can schedule posts which will be posted automatically on this social media platforms.
Now you are ready use to Hootsuite, go to :www.hootsuite.com on your browser and sign up if you are a new user or log in if you already have an hootsuite account. After you finish setting up your Hootsuite account and you logged in you will see the screen below.
Click on Add Social Networks, a new window will pop up as seen below :
You can connect only one social network if youre still using the free account but if you upgrade to Hootsuite Pro, you can connect as many as you want. See the screen below after I connected my Facebook account.
In the screen above you can see the Facebook groups I belong to but you I can only add 2 groups because I am still using free account, you should now add the two groups you want to be posting in.
Now we are done with the connecting ish, lets now link our Feeds to Hootsuite to so that it can do the work for us automatically.
Go to Publisher and click on RSS Feeds
A new window will pop up click on RSS/Atom so that you can connect your Feed to Hootsuite so that anytime you post it will automatically posted in your groups.
Now click on that Plus icon below RSS/Atom
Thats the screen you will see above.
Fill the form as explained below:
Feed Url: Type in your blog address
Network to send feed items to: Select your Facebook profile or one of your groups.
Check this feed for new posts every: You can select every one hour, two hours and so on.
When new posts are found, send up to: You choose 1, 2 3 and so on.
Save your feed when you are done.
After you save the above, anytime you publish on your website/blog, Hootsuite will always be updating your Facebook for you with your latest blog posts.
In next tutorial, I will share with you, how to schedule your blog posts to be published on Facebook, Twitter etc using Hootsuite.
Are you also using hootsuite? Kindly share your experience.Go to link Download
How To Root And Get Access To Google Play Store On Nokia X2 Dual Sim RM 1013
Read more »How To Root And Get Access To Google Play Store On Nokia X2 Dual Sim RM 1013

I got Rooted for my Nokia X2 and successfully install the supersu. Everything is attached below. Cheers!- Download & sideload the towelroot apk
- Run it and tap on "make it rain" to root
- Download & sideload the Supersu
- Run it > continue > Normal and reboot your device
CONGRATS! Now Your X2 is successfully rooted. Next Is To Get Google Play Store N ServicesStep to install Play Store:- Download and extract This File
- Copy the folder to your device / sdcard
- Install any Root Explorer app, we only need to use this to copy files
- Go to copied folder, copy all the files
- Go to /system/app and paste them there
- Reboot your device
- Enjoy!
OR U Can Use The Below App To Install Drivers,Root And Install Google Play>>>>Download HEREGo to link Download
How to Reset Your Forgotten Password In Windows
Read more »How to Reset Your Forgotten Password In Windows
Guys Today we will Learn How to Reset your Forgotten Password In Windows. Often People Tend To Forget their Password of Their Windows Password.
Forgetting any passoword is not fun, but luckily Here is the simple trick which i will show you to Reset your Forgotten Password.
REQUIREMENTS :
1. Windows Installation Disk.
2. A simple Command Line.
Follow Below Simple Steps :
Step 1: Insert Your windows disk And Boot Your Pc.
Step 2: Select " Repair Your Computer " From the lover Left Corner. Check the below Pic. Step 3: Follow on Till you get the below screen , You need to click on Command Promt.
 Step 4: Now The Real Trick,Type The below Command to backup the original Sticky keys File.copy c:windowssystem32sethc.exe c:
Step 5: Now Copy The Command Prompt Executable on top of the sticky keys executable :copy c:windowssystem32cmd.exe c:windowssystem32sethc.exeFollow The below Pic For More Idea on It. Step 6: Now Reboot Your PC.
Step 7: After Rebooting your pc, You will see a login Screen, All You need to do is Hit Shift Key 5 Times, You will get a Command Promt.Step 8 : Now to Reset Your Password just replace The Username and passoword with your own In Below line.net user Freak MyNewPassword
Thats all Now you can Login.
you probably want to put the original sethc.exe file Back, Then You have to just reboot into the installation CD, Open the Command Promt Again and Copy The c:sethc.exe file back toc:windowssystem32sethc.exe.Go to link Download
Thursday, September 29, 2016
How To Send Message From Your Phone To E mail
Read more »How To Send Message From Your Phone To E mail
Go to message box, text the e-mail address of the person give a space followed by your message, then send to 3333. Charges is N15 per sms.
E.g johneze83@yahoo.com- how are you. Send to 3333.
We Love Comments!Go to link Download
How to create Website Blog Extension for Browsers
Read more »How to create Website Blog Extension for Browsers
In this post i will tell you how to create a blog or a website extension for browsers.
To create extension Click here. Then Go To Build Your Own.
 Then Just Enter you blog/website URL and click Build.Then a code will appear.Paste on to you blog page/website page.refresh your blog/website scroll up and down a pop will appear for extension.
Go to link Download
Subscribe to: Posts (Atom)

