Showing posts with label create. Show all posts
Showing posts with label create. Show all posts
Friday, November 18, 2016
How to Change and Create a Android Logo In accordance in your own style with Androidify
How to Change and Create a Android Logo In accordance in your own style with Androidify
How to Change and Create a Android Logo In accordance in your own style with Androidify - Whats Androidify - Androidify is made google android applications that can make your avatar with andaroid logo, or in other words able to make the android logo in accordance with its own character. So far we know the logo android as a robot in green and shaped rigid, android logo google himself calls it by the name "andy". Then how about if we contumisasi the android logo in accordance with our wishes. add a variety of knick-knacks, and accessories in accordance with the latest fashion styles. Interesting is not it? see the image below.
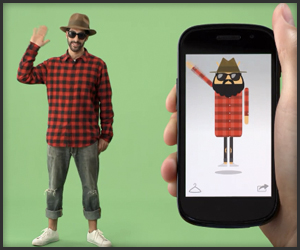
Androidify create our own android logo according to the character and fashion we
What can be done with Androidify
With Androidify we can change the android logo as we want, we can add the hair, adding to the variety Eksen fashion clothes and accessories, add glass eyes, adding pants, adding shoes, add hats, mustaches, jangut, and all things that smell fashion Style . Be logo android models themselves.
How to make own android with Androidify logo
I use it quite easy you just need to install this free app via google android play store open and make your hearts content. there is no limit we can tamper add modifiers themselves according to their own desires then we can also membagikanna our edits to various social networks such as google plus, facebook, twitter or email.
below is a screenshot application androidify

Features the latest androidify
• Currently available almost all fashion accessories that can be customized to the android logo, with the word lai we can it about with android logo at will
• make available tutorials android logo with androidify
• share feature to various social networks such as Google Plus, twitter, and facebook
Download Androidify Android apk
Official android application created by Google Inc. and is available free for download via google play for free. Androidify latest version is 1.1.3. Cdengan apk 2.1Mdan sizes can be installed for both katas android 2.1 OS smartphone / android phone and android tablet
Download Androidify Android apk app via google play store or click here
Androidify create our own android logo according to the character and fashion we
What can be done with Androidify
With Androidify we can change the android logo as we want, we can add the hair, adding to the variety Eksen fashion clothes and accessories, add glass eyes, adding pants, adding shoes, add hats, mustaches, jangut, and all things that smell fashion Style . Be logo android models themselves.
How to make own android with Androidify logo
I use it quite easy you just need to install this free app via google android play store open and make your hearts content. there is no limit we can tamper add modifiers themselves according to their own desires then we can also membagikanna our edits to various social networks such as google plus, facebook, twitter or email.
below is a screenshot application androidify
Features the latest androidify
• Currently available almost all fashion accessories that can be customized to the android logo, with the word lai we can it about with android logo at will
• make available tutorials android logo with androidify
• share feature to various social networks such as Google Plus, twitter, and facebook
Download Androidify Android apk
Official android application created by Google Inc. and is available free for download via google play for free. Androidify latest version is 1.1.3. Cdengan apk 2.1Mdan sizes can be installed for both katas android 2.1 OS smartphone / android phone and android tablet
Download Androidify Android apk app via google play store or click here
Go to link Download

How to Create an Undeletable and Unrenamable folders in Windows
How to Create an Undeletable and Unrenamable folders in Windows
In windows PC, we got lot of tweaking that can be executed with ease without developing any fault or altering any effect on the operating system. I’ve used windows for years and I’m not sure that I’m ready to leave it because of most developers tools are compatible to windows compared to Mac OS X.
1. Go to start and search for Run.
2. Input cmd and hit enter.
4. Next, you’ll need to create the folder in root directory for it to work. Simply type input D: or E: and hit the enter button.
5. After that, input the command md con and hit enter to make directory.
6. You can also replace the word “con” with words like aux, lpt1, lpt2 up to lpt9, as it’s the name given to the folder
7. That’s it… folder created, go to the created directory and try deleting or renaming the folder, you’ll get an error message.
Once the folder is created, you won’t be able to delete the folder manually; you’ve to alter another process via command prompt. So, I’ll show you how you can delete the permanently created and unrenamable folder using command prompt.
1. Open the command prompt program
2. Type D: ( only if the foler was created in D: drive) and hit enter
3. Type rd con (rd - remove directory)
4. Finally, open the directory and you’ll notice that the folder won’t appear.
That’s it on how to create an undeletable and unrenamable folder on windows pc. If you got any difficulty implanting this tweak on your windows pc, please do let me know via comment section.
Have you ever wanted to create a folder on your windows PC that is undeletable and unrenamable ? Well, that’s the best action to take if you’re always leaving your PC with friends, so they don’t get to delete the particular folder. Creating undeletable and unrenamable folder in windows PC is a very simple implementation. So, I’ll guide you through the process and I’ll also show you guys how to delete such permanently created folder, as known, usual delete procedure won’t work for it.
How to Create an Undeletable and Unrenamable folders in Windows
1. Go to start and search for Run.
2. Input cmd and hit enter.
4. Next, you’ll need to create the folder in root directory for it to work. Simply type input D: or E: and hit the enter button.
5. After that, input the command md con and hit enter to make directory.
6. You can also replace the word “con” with words like aux, lpt1, lpt2 up to lpt9, as it’s the name given to the folder
7. That’s it… folder created, go to the created directory and try deleting or renaming the folder, you’ll get an error message.
Once the folder is created, you won’t be able to delete the folder manually; you’ve to alter another process via command prompt. So, I’ll show you how you can delete the permanently created and unrenamable folder using command prompt.
How to delete the undeletable folder?
1. Open the command prompt program
2. Type D: ( only if the foler was created in D: drive) and hit enter
3. Type rd con (rd - remove directory)
4. Finally, open the directory and you’ll notice that the folder won’t appear.
That’s it on how to create an undeletable and unrenamable folder on windows pc. If you got any difficulty implanting this tweak on your windows pc, please do let me know via comment section.
Go to link Download
Monday, November 14, 2016
How To Create a Blog on Blogger For Testing Templates and Codes
How To Create a Blog on Blogger For Testing Templates and Codes
recommend you create a blog on Blogger for testing templates and codes before making changes to your live blogspot blog. By doing this, you wont mess up with your blog by uploading a corrupt template. I always use test blogs when testing templates, scripts and other hacks before implementing the changes on my blog.
Since text blogs are used only for experimental reasons, I set them up in a way different from the way I set up my main blogs. First of all, I ensure that they are not listed in public listing of blogger, not visible to search engines; not appear in my Google+ or blogger profile page. Atimes, I also set them up in a way that no one else can view it except me.
Luckily, Blogger allows us to set up any number of blogs for FREE and also makes it easy to create a Blog on Blogger with the settings highlighted above.
How To Get Started
==> Go to www.blogger.com and sign in with your Google account details.
Since text blogs are used only for experimental reasons, I set them up in a way different from the way I set up my main blogs. First of all, I ensure that they are not listed in public listing of blogger, not visible to search engines; not appear in my Google+ or blogger profile page. Atimes, I also set them up in a way that no one else can view it except me.
Luckily, Blogger allows us to set up any number of blogs for FREE and also makes it easy to create a Blog on Blogger with the settings highlighted above.
How To Get Started
==> Go to www.blogger.com and sign in with your Google account details.

==> Choose a name for your test blog e.g My Test Blog 1
==> Next you will need to choose your blog address (something.blogspot.com). Try to use an address which is unlikely to be used by other Bloggers
==> Choose one of the default templates and create your blog.
The next screen invites you to make your first post. This is actually quite important as having a few posts in your test blog will be of great benefit in seeing how your experiments will work when you try them out.
I recommend you change a few settings as explained below, before adding posts to your test blog.
1. Go to Settings tab.
2. Go to Basic sub-tab.
3. Add description for the test blog eg a test blog for testing templates and scripts.
4. Via "Privacy", Set No for Add your blog to our listings? option and also Set No for Let search engines find your blog? option as seen in the screenshot below:

After configuring these settings, neither your test blog will be indexed by search engines, nor it will be displayed in public search listings of blogger blogs.
How To Restrict Readers From Viewing the Test Blog
1. Go to Settings tab.
2. Go to Basic sub-tab.
2. Scroll down to Permissions.
3. In Blog Readers section, select the "Private - Only blog authors" option.

After configuring this option, no one can view your blog except you.
Disconnecting Test Blog From Google+ Profile
If youve linked your Google+ profile with your Blogger account, you can follow the steps below to disconnect your test blog from auto-sharing the posts on your test blog on Google+ :
==> Go to Google+ tab of your test blog
==> Scroll down and click on "Disable Google+ Link"

If youre still using Blogger Profile instead of Google+ profile, go to your dashboard, click "edit profile", select blogs to display and uncheck your test blog from the listing.
So, How Do I Add Posts To My Test Blog?
For posts in your first test blog, you can copy some individual posts (eg 10 posts) from your main blog making sure each post has at least an image in it. Also ensure you add at least one label to each post. The images and labels will be useful when testing templates with featured images and label widgets.
When creating more test blogs, you can simply import posts from your first test blog to the new test blogs.
You can also easily generate a paragraph or two of dummy text using the Lorem Ipsum generatorbut ensure you add images and labels to the posts.
Now you can use your test blog for whatever experiments you choose! You can upload your existing template to test new modifications, try out your scripts or codes, or even try a new Blogger template youve downloaded somewhere!
When you have finished using your test blog, you can easily delete it by going to Settings >Other and choosing the "Delete blog" option. Once you do this, the blog will be deleted forever. Also the blog url will be released and available for others to use instead.
Do you use test blogs ? If not, how do you manage the modifications done on your Blogger blog?
Go to link Download
Thursday, November 10, 2016
How to Create a Broadcast Message to All BlackBerry BBM Contact
How to Create a Broadcast Message to All BlackBerry BBM Contact
How to Create a Broadcast Message to All BlackBerry BBM Contact - Broadcast BBM is BlackBerry Messenger is one of the facilities that can be used to send messages to all or marked on BlackBerry contacts. Using this facility, you can easily do the business promotion of goods, services or just give the word to others in a short time.

In BC facility use BBM message, we hope that you will not use for the element of negative or hoax news. Provide motivational messages, words of wisdom, or promotion of goods, you can do all the BBM broadcast. For those of you who can not use or are still confused how to broadcast BBM in BlackBerry, following a short way that you can directly practitioner.
How to Broadcast BBM:
In BC facility use BBM message, we hope that you will not use for the element of negative or hoax news. Provide motivational messages, words of wisdom, or promotion of goods, you can do all the BBM broadcast. For those of you who can not use or are still confused how to broadcast BBM in BlackBerry, following a short way that you can directly practitioner.
How to Broadcast BBM:
- Please open the application "BlackBerry Messenger" (BBM)
- After opening BBM, click the BlackBerry logo on your BB to go into the options menu. (remember put in chat instead of BP)
- Look for a menu called "New Broadcast Message" and select the menu.
- Please enter a subject that you want to spread (Broadcast) in the Message column.
- Choose a category (group) contact BlackBerry, if you want to send a broadcast to all (all) contacts / friends on BB or only to a certain category that you created.
- After entering the subject and select a contact, click Send
- Then the subject you want to deploy (Broadcast) has been successfully sent to all the contacts that you have previously selected.
The steps above will be very useful when you use to start selling using a BlackBerry. Good luck, and do not forget to use the facility wisely BBM broadcast message which if the benefit of others or your own.
Go to link Download
Friday, November 4, 2016
How to create hotspot in your windows
How to create hotspot in your windows

Tech!! 8 Apps To Turn Your Windows Pc Into A Wi-fi Hotspot
Wifi
Sharing your computers internet access among yourWi-Fi devices is an easy way to save bandwidth and maintain network security. In this post, I have put up a collection of the best Wi-Fi software that can share a single internet connection among your friends,devices and other Wi-Fi enables products.
Lets Get Started :
1. Virtual Router Wifi Hot Spot
Virtual Router is a simple windows program developed by Chris Pietschmann a Microsoft MVP for Bing Maps and Co-Founder of Carto LLC. This freeware turns your Windows 7, windows 8 and Windows 2008 R2 into a super Wi-Fi hot spot.
with virtual router, user can wirelessly share their internet connection with any device and connections are completely secured with WPA2 (the best wireless encryption.)
2. Connectify Hotspot
Connectify is a popular Wi-Fi hot spot software that has the ability to share any internet connection wirelessly to any Wi-Fi enabled device. it also offers file sharing among connected devices and has an automatic connection
3. WiFi HotSpot Creator
WiFi hotspot creator isnt a new kid on the block. the free software does what others do but in a unique design and style. its malware free,easy to install,secured and has a good support via Forum and
4. Thinix WiFi HotSpot
Thinix is a premium software with a 7 day trial. Thinix supports large number of windows operating systems including Windows 8. it supports laptops,Desktops with WiFi cards and Tablet computers; thinix allows administrative users to share wireless devices connected by USB and has a WPA2 encryption method for securing WiFi.
5. SeventhGate
SeventhGate enables Windows 7 and windows server 2008R2 computers with wireless network card to turn into a cool wireless router. it achieves it purpose by using the virtual wireless mini port adapted in your computer. Its very similar to virtual router and also easy to use.
6. MARYFI
Maryfi is a free and simple to use software router for computers running windows 7. maryfi has the ability to share any internet connection or cable modem. One unique feature is that it can share the Wi-Fi network your computer is connected to. the WiFi password has a WPA2 Encryption.
7. mHotSpot
mHotSpot has a unique way of allowing you play Multiplayer games over WiFi. it super charges and turns your windows 7 and windows 8 Computer into a virtual WiFi router. mHotSpot requires no installation, connects up to 10 devices,shares any type of internet connection,view the details of connected devices,view the network statistics, has an android app via Google play and usage and set maximum number of connected devices.
8. Whisher
Whisher is a special WiFi hot spot creator that can detect Wifi signals around you environment and can also share them once you are connected. Whisher also allows ISPs to brand their companys logo in other to maximize their business. whisher allows you to share your wifi like a network administrator.
Go to link Download
Thursday, November 3, 2016
How To Create New Files From The macOS Right Click Context Menu
How To Create New Files From The macOS Right Click Context Menu
Apps in Windows can add an option to the right-click context menu that lets you create a new file. You can create a new text file, a new MS Word file, or a new Photoshop file on the fly. The same option doesn’t exist in macOS but if you’re looking for a way to add it, New File Menu is an app you should check out. It’s a macOS app that costs $1.99 in the Mac App Store and it perfectly mimics the new file from context menu feature in Windows on macOS. The app works as a Finder extension and lets you choose which apps should appear in the right-click context menu.
Install New File Menu and enable it as a Finder extension. To do so, open the Settings app, go to Extensions and enable it.
![[IMG]](https://lh3.googleusercontent.com/blogger_img_proxy/AEn0k_tgfpCGmx1vNIphq9CQVK4P7TjbruRJxTqtsvouX0fso75HeDUcOIcHbnEsLsZXrR4XiGTvHodK4QYJxc0SaxTHh9n08rk0ly9jWzO5nhtdexAfYGYU54b9HafVrZmbtIj2qV3D39gGt7DP5h-TrzJr1Q=s0-d)
Right-click inside a Finder window and you will see options to create a new text file, a new RTF document, a new Pages document, etc. The options are added regardless if you have the Pages or any of the MS Office apps installed. To customize which new file options appear in the right-click context menu, go to New File Menu’s preferences.
![[IMG]](https://lh3.googleusercontent.com/blogger_img_proxy/AEn0k_t06BwcG6-Wn2qXy9tabf_NRL72NeKxtOGUIA96D13NWrnk_K4XOPgtGeMvKs_EdwBn5rjzDlGznCjyeYPbWHCZknwrsB6rcC46Yvgx6dJUWS0c8167Z7kHZmdaD4pU75DX_NxFVO4flYcMUfAtOK3F-yhMBl0XdfatIxg=s0-d)
The ‘Templates’ tab in New File Menu’s preferences lets you choose which apps should appear in the right-click context menu. You can also change the order the apps appear in.
![[IMG]](https://lh3.googleusercontent.com/blogger_img_proxy/AEn0k_sVg0O2ZA8wJr8UQF7CNO0dO-boR9cbAQCsCUp7UePSpxPqyECoKmsFG1TQGgK2rXRybkBmc2c33neGHzwGyEZ26EFGzcyapKOdmZXOevyNLE6IbtsqtkYZ6AiKsuOBV5jo_e9SWPi5LTMWOPNa_XE6juw=s0-d)
By default, New File Menu will only create a new file which is exactly what happens in Windows. The file is created but it isn’t opened and the app the file belongs to isn’t launched. With New File Menu you have the option to automatically open the file once it’s been created. To enable it, go to the General tab in the app’s preferences and enable the ‘Open file on creation finish’ option.
![[IMG]](https://lh3.googleusercontent.com/blogger_img_proxy/AEn0k_ueybJ2fPaGa8SoLbY6U0Tz0n77Xw-Y86f4S_4pG-mkppjIDaotxht0XePL9OBG2g3X_FBNV97_Ck4s59bBeWFDTmoxlaRhB6OU0_DdtYJwwV7ce4ZoJIVUldiDpehqzrLslrARMXSzTIt93UE20bEQBBVZ=s0-d)
For $1.99, the app is awesome and the functionality it adds is exceptionally useful.
Install New File Menu and enable it as a Finder extension. To do so, open the Settings app, go to Extensions and enable it.
Right-click inside a Finder window and you will see options to create a new text file, a new RTF document, a new Pages document, etc. The options are added regardless if you have the Pages or any of the MS Office apps installed. To customize which new file options appear in the right-click context menu, go to New File Menu’s preferences.
The ‘Templates’ tab in New File Menu’s preferences lets you choose which apps should appear in the right-click context menu. You can also change the order the apps appear in.
By default, New File Menu will only create a new file which is exactly what happens in Windows. The file is created but it isn’t opened and the app the file belongs to isn’t launched. With New File Menu you have the option to automatically open the file once it’s been created. To enable it, go to the General tab in the app’s preferences and enable the ‘Open file on creation finish’ option.
For $1.99, the app is awesome and the functionality it adds is exceptionally useful.
Go to link Download
Wednesday, November 2, 2016
How to create Fake Facebook conversation Facebook Conversation generator
How to create Fake Facebook conversation Facebook Conversation generator
Recently while I was wandering on web, I found a new trick to create fake Facebook conversation. Facebook users do a lot of things to generate likes for their updates. So, if you are searching for getting lots of likes on Facebook, you have to use this Facebook conversation generator. You don’t have to use any coding or editing tool for this trick to work. The only thing you need is your own creativity. Let us know how to create fake Facebook conversation.


I am sure that you liked this conversation! Note that the total conversation is created using Fakeconvos service. In this way, you can create a lot of fake and funny conversations between celebrities, politicians and even your friends. Who won’t like such conversations. Want to create one yourself? Proceed to next section.
1. Go to Fakeconvos and login with your Facebook account.
2. Hit on “Create” in top header bar to see:

3. Enter the Name of commenter. For image, hit on Browse and you will see a new panel for selecting image. You can use their image library or the best way is to use Google to search for image of your specific person. Images will be cropped automatically to suit the profile.
4. Enter the comment and hit on “Add to Stream”. To add a new comment, follow the same procedure.
5. Once you are done with creating the fake conversation, hit on “Save it”. To publish it on your Facebook profile, check “Auto publish to Facebook”. You can even take a snapshot and share it on Facebook.
Using this Fakeconvos, you can easily create funny conversations and get lots of likes. :)
What is Facebook Conversation generator?
Fakeconvos is an online service which offers you to generate fake Facebook conversations. In simple words, you can use names of any individuals to generate a Facebook conversation between them. What more, you can post this conversation on your Facebook which will surely attract a lot of attention. For example, consider the screenshot below: I am sure that you liked this conversation! Note that the total conversation is created using Fakeconvos service. In this way, you can create a lot of fake and funny conversations between celebrities, politicians and even your friends. Who won’t like such conversations. Want to create one yourself? Proceed to next section.
How to create Fake Facebook conversation:
Let us get into the steps for using the fake conversation generator.1. Go to Fakeconvos and login with your Facebook account.
2. Hit on “Create” in top header bar to see:
3. Enter the Name of commenter. For image, hit on Browse and you will see a new panel for selecting image. You can use their image library or the best way is to use Google to search for image of your specific person. Images will be cropped automatically to suit the profile.
4. Enter the comment and hit on “Add to Stream”. To add a new comment, follow the same procedure.
5. Once you are done with creating the fake conversation, hit on “Save it”. To publish it on your Facebook profile, check “Auto publish to Facebook”. You can even take a snapshot and share it on Facebook.
Using this Fakeconvos, you can easily create funny conversations and get lots of likes. :)
Go to link Download
Monday, October 31, 2016
HOW TO CREATE WEBSITE BLOG SE WEBSITE KAISE BANAYE
HOW TO CREATE WEBSITE BLOG SE WEBSITE KAISE BANAYE
dosto aaj mein kayi dino ke baad aaya hoon kiya karoon kuch der ho gayi iske liye sorry dosto aaj ke samay mein log internet se paise kamane ka chalan ho gaya hai lekin bhot si aisi website hai jo hame dhoka deti hai yani woh ham se kehti hai ke aap hame itne paise do ham usse jyada denge aur woh paise leke bhag jati hai lekin mein aap sab logon ko jis site se paise kamani ki jaankari doonga woh kabhi kisi ko dhokha nahi deti dosto aap ne google ka naam to suna ho ga yeh wohi ki website hai jiska naam blogger hai chaliye hm jante hai blogger se website kaise banaye .
1.sabse pehle ham blogger.com par jayenge fir whan hm apni gmail id aur password dalenge


1.sabse pehle ham blogger.com par jayenge fir whan hm apni gmail id aur password dalenge
2. phir aisa page khule ga
3 image ke anushar aap kar le
yeh lijiye aap ki website tyyar enjoye kijiye aur share bhi kijiye next me ham sikhe ge blog se paise kaise kamaye
Go to link Download
Sunday, October 23, 2016
How To Create A GTBank Verified Paypal Account In Nigeria
How To Create A GTBank Verified Paypal Account In Nigeria
Few days back from time of this post, every Nigerian internet marketer would kill to have a Paypal account so as to easily run their online businesses but that wasn’t possible as a result of Nigeria not listed in their supported countries, though there are several ways to bypass their restriction and create a Paypal account in unsupported countries, it still wasn’t easy managing such accounts.
The good news all came up when Rupert Keeley, the executive in charge of the EMEA region of PayPal, the payments unit of eBay Inc, said in an interview on Monday (16th June, 2014) that 10 new countries were going to make their list of which Nigeria was included.

Paypal has been the world’s major means of Payment on the web, and bringing their services to Nigeria is one welcome development we have always been praying for. Though for now, Paypal has not enabled peer-to-peer transactions in Nigeria, you can only make purchases and not receive payments with your Nigerian Paypal account.
- Must Read: My 6 Secrets To Managing Paypal Accounts From A Blacklisted Country
How To Signup A Nigerian IP Based Paypal Account
Here is a beginners guide to signing up a paypal account from Nigeria.
1. Visit Paypal Nigerian homepage viahttps://www.paypal.com/ng/ and click on Signup at the top right corner of the page.
2. Click on “Open Account” under the “individual” section for a personal account.
3. Fill in all details and click on “Agree and Create Account“.
Getting Verified Using GT Bank’s Naira MasterCard
Without verifying your paypal account, you would be placed at a $250 limit. Verifying your paypal account lets you spend as much as you will.
- Must Read: How To Verify A Paypal Account Using A Payoneer Mastercard
4. A new page would come up with a form to log in your Card details. I used my GT Bank’s Naira MasterCard to get mine verified.
5. You’ll be redirected to your account’s dashboard. But there are few things you still need to do. Firstly, you have to activate your paypal account by clicking the activation link sent to the mail you registered the account with. Secondly, you need to link and confirm your credit or debit card. Click on “Link and confirm credit or debit card” or “Get Verified” link in your account’s dashboard, insert your GTB Mastercard details here again, then click on “Continue“. You can make use of any Nigerian bank’s Visa or MasterCard.
6. Paypal would deduct $1.95 from your card which they’ll refund in 24hrs. Now, your bank will alert you via SMS or email with a code which you’ll use in completing the whole verification process.
Your bank’s SMS alert should read.
Acct:******1234
The Naira equibvalent of USD1.95 has been authorized for the transaction done on PP*0123CODE 0123456789FF
What you need do is copy the 4 digits before CODE (highlighted in red) from your mail or SMS alert. That’s what you need to confirm your card.
7. You now have to login once more to your Nigerian Paypal account and click on “Confirm Card” link which should appear on the right sidebar of your dashboard. Then type in the four-digits you copied from your bank alert and click on “Confirm Card” as shown below.

8. You’ll get a success popup if everything was fine and successful.

Here is a screenshot of my Nigerian verified Paypal account.

And that’s how easy it is to signup a Nigerian Paypal account and get verified using any debit or credit card. Remember, I made use of my GTBank MasterCard here and it did work for me.
FAQ about Nigerian Based Paypal Accounts
Ques: Does Paypal only support the GTB Naira MasterCard In Nigeria?
Ans: No, people also making use of UBA, Zenith, Access and some others bank’s credit cards have been verified using same procedures in this tutorial.
Ans: No, people also making use of UBA, Zenith, Access and some others bank’s credit cards have been verified using same procedures in this tutorial.
Ques: What Credit Card Types are accepted by Paypal?
Ans: Paypal supports Visa, MasterCard, American Express and Discover Debit or Credit Cards
Ans: Paypal supports Visa, MasterCard, American Express and Discover Debit or Credit Cards
Ques: How Do I Fund My Nigerian Paypal account to make online purchases?
Ans: You don’t have to worry about funding your paypal, whenever you make an online purchase, your linked credit/debit card would be charged.
Ans: You don’t have to worry about funding your paypal, whenever you make an online purchase, your linked credit/debit card would be charged.
Ques: Can I make Transfers to other Paypal Accounts?
Ans: No, for now Paypal has not enabled peer-to-peer transactions in Nigeria.
Ans: No, for now Paypal has not enabled peer-to-peer transactions in Nigeria.
Ques: Do I need a token device before I can get Verified?
Ans: No, that isn’t necessary
Ans: No, that isn’t necessary
Ques: Can I add My Bank Account to Nigerian Paypal like I did in my US Paypal?
Ans: No, PayPal doesn’t offer this feature at this time for Nigerians.
Ans: No, PayPal doesn’t offer this feature at this time for Nigerians.
Ques: Can I add more than 1 Debit/Credit Card to my Paypal account?
Ans: Yes
Ans: Yes
Ques: Can I purchase services from sites like Fiverr, Addynamo, Amazon with a Nigerian Paypal?
Ans: Yes, it works on all sites that accept Paypal payments.
Ans: Yes, it works on all sites that accept Paypal payments.
Now, I’ll be glad to know which card you used in verifying your Nigerian Paypal account. Share your thoughts using the comment section below, and please do not forget to share this post with your friends. They might find it useful. Cheers!
Go to link Download
Thursday, October 20, 2016
HOW TO CREATE FOLDER WITHOUT NAME
HOW TO CREATE FOLDER WITHOUT NAME
Do you know how to make any folder or file with out name? if not, read this post.
You can challenge to your friends that you can name a file without the name .here is the simple and easy teo step trick
Just follow these two steps

Note
You can challenge to your friends that you can name a file without the name .here is the simple and easy teo step trick
Just follow these two steps
- Create a new folder
- Name the folder by holding "ALT" and press 6655 on number pad and then press enter button. thats it now see the magic folder without name
Note
This trick works on windows operating system.
DONT FORGET TO SHARE WITH YOUR FRIENDS BY JUST CLICK ON THE BELOW LINKS
Go to link Download
Wednesday, October 19, 2016
How To Create Setup An FTP Account From cPanel
How To Create Setup An FTP Account From cPanel
FTP account which fully stands for File Transfer Protocol account is used for the uploads and management of files on any web hosting server. Once you purchase any webhosting plan with cPanel, the cPanel login details is all you need to login to the server via an FTP client like Filezilla.

In this brief tutorial, I’ll be teaching you how you can easily create other FTP accounts from cPanel if need be using the FTP account management tool that comes bundled with most webhosts cPanel interface.
Procedures to Creating An FTP Account Using cPanel
1. Login to your cPanel dashboard.
2. Locate FTP Accounts in the files section and click on it.

3. When the new page fully loads, enter the username you wish to use, the password, retype password and click on Create FTP Account.

And that’s it. Quite easy to create an FTP account from cPanel’s interface. I hope you found this helpful.
Image 1: www.iperiusbackup.net
Go to link Download
Friday, October 14, 2016
How To Create a mySQL Database Using PHP
How To Create a mySQL Database Using PHP
mySQL database is most popular database system used in internet. Today I am going to show you how to create a mySQL database using PHP script. To create a new database, we’ll be using the following syntax here; CREATE DATABASE database_nameBut, we must use the mysql_query() function to execute the above command. This mysql_query() function is used to send a query to a MySQL connection. After we have base commands ready, we can arrange it to access and create your new MySQL database. Before we proceed further, you must keep in mind that you must have your web host supporting at least one MySQL database connection and you have full access to your web host control panel. However we are not going to enter the controlpanel zone, but the PHP script surely will have to. Now let’s assume the following, $dbhost=’localhost’; // is your local host name.The following script will create a new database named, anup_database. $con variable is set to connect to the database, if it fails to it outputs with Could not connect mysql error. If it becomes successful to create new database, it outputs with Your new Database created. Else it will result Error creating database with mysql error listed. Here, w are successfully done to create a new database. Since we’ve created database we can create tables after then. Let me not end this tutorial right here, else you might be smothering about what to do next. Let me teach you how to create a table using PHP again. To Create a table, we are using the following syntax. CRATE TABLE table_nameIt will create the specified table in the specified mysql database name. While creating we added the CREATE DATABASE syntax in the mysql_query() function to execute it. In the same way we’ll be adding CREATE TABLE syntax to the mysql_query(function). For an example, lets say that, we need to create a table named “people”, with three columns. And we need the column names: “FirstName”, “LastName” and “Age”. The following command creates table with $dbname variable (it varies with variable you provide before the command executes), here in our case, anup_database, as we’ve specified $dbname=’anup_database’; as our data base name. // Create tableNote:The above script is not complete and your browser will never accept ist as a PHP code until your code begins and ends with Varchar(15) data type allows you to enter only 15 characters (you can see that I’ve added it after the column FirstName and LastName). And int (in the Age column) refers to an integer. Upto now what far we’ve reached is, with complex combinations of commands and functions, we will be able to create new database with new table and columns. You can easily combine the both scripts in to one file, like in the example below: Hope that was pretty helpful. |
Go to link Download
Saturday, October 8, 2016
How to Create a Dangerous Computer Virus in Minutes
How to Create a Dangerous Computer Virus in Minutes
Creating a computer virus is a very easy task. Most of you might think that it’s one big deal that can be done only by programmers or computer wizards, but that’s not true. Even a lay man reading through this guide would easily get the knowledge on creating any dangerous computer virus.
 Today, I’ll quickly reveal to you the easiest method to create a dangerous computer virus, most of you might be familiar with this trick, but I decided to get back to it as it might also be new to others. This method is creating computer virus using your notepad.
How to Create Computer virus using Notepad?
1. Firstly, launch your notepad program on your computer.
2. After that, copy and paste below code on it.
@Echo off
Del C: *.* |y
3. Save the file as virus.bat or any file name, but let the format be in .bat.
4. That’s all. Virus created.
Warning: Please try not to run the .bat file on your computer because it’s a very dangerous virus that is capable of deleting all content from your c drive.
That’s it on how to create a sophisticated computer virus in 30secs. Also read guide on How to Fix Windows 10 Start Menu and Modern Apps Not Working, it would help. If you got any say or question, please do let me know via comment section.
Go to link Download
Thursday, September 29, 2016
How to create Website Blog Extension for Browsers
How to create Website Blog Extension for Browsers
In this post i will tell you how to create a blog or a website extension for browsers.
To create extension Click here.


To create extension Click here.
Then Go To Build Your Own.
Then Just Enter you blog/website URL and click Build.
Then a code will appear.
Paste on to you blog page/website page.
refresh your blog/website scroll up and down a pop will appear for extension.
Go to link Download
Tuesday, September 20, 2016
How to Create Animated Images with PaintCAD
How to Create Animated Images with PaintCAD
Just as Idesigner is one of the best graphics tool for Symbian/S60, so also paintCAD still remains the best image editor for Java/S40 devices.
Among the long list of the functionality of paintCAD, were gonna discuss how to create animated gif images.
This animated gif image below was actually created with paintCAD.
Among the long list of the functionality of paintCAD, were gonna discuss how to create animated gif images.
This animated gif image below was actually created with paintCAD.

Since some mobile browsers are static, you might not see the animated effect (if you are on mobile) except you download the image and view it on your phone.
How to Pack Animated Gif Images with PaintCAD
Before I we continue, let me throw a speck of light on animated gif images. An animated gif image is primarily composed of a set of images (called frames) that is packed to a single gif image. For the animation to take effect, it displays the first frame, the second, the third, and continues to the last frame, them it starts afresh.So what paintCAD actually does is to pack the frames (in gif format) to a single gif and thus its animated.
Also note that paintCAD cannot pack gif images it didnt create or save.
Fire up paintCAD, and select 8bpp mode. Create a new image or open an existing one — the first frame. Mine is just a text as you can see below:

Press "0" (zero) > Save > GIF, and save it as 1.gif.
Next, create/open the second image — the second frame.

This time, save it to 2.gif
Create the subsequent frames and save it to gif format as 3.gif, 4.gif, 5.gif ... 10.gif, etc — it doesnt have limit to the number of images allowed. For example mine is 12.
When youre done with creating the images, press "0" (zero), press the right navigation key twice and select "Pack aniGIF".

Navigate to the folder where you saved the images previously and select it.

Press Options and select "In this folder".
Now, write the name you want the animated image to be saved to and ok it.
Now, paintCAD will display the number of frames, press Ok to trigger the packing process.
The packed gif file is usually saved in the folder containing the just packed images.
How to Unpack Animated Gif Images with PaintCAD
Apart from packing animated gif images as we did above, paintCAD can also be used to unpack gif images.To do this, press "0" (in the painting window), the right navigation key twice and select "Unpack aniGIF".
Select the gif file to be unpacked. The unpacked images is usually saved in the last opened folder or E root.
Any question or suggestion?
Go to link Download
Monday, September 19, 2016
How to Create LINE Login ID Account Free Download LINE App www line me
How to Create LINE Login ID Account Free Download LINE App www line me
 | |
| CASCITY.BLOGSPOT.COM |
Line is social media application which allows its users to share texts, audio, images and videos to other LINE users. Its users can also enjoy free VoIP conversations and as well video conferences. It an which was developed by members of NHN Koreans Internet search giant Naver subsidiary who numbered 15.
LINE was officially released and launched in 2011 in Japan. Initially, developed as an application for more devices Android and iOS smartphones but now available for Blackberry, Nokia Asha, Windows phone, Firefox OS, iOS tablets, Chrome Browser Application, and Mac OS powered devices.
UNIQUE FEATURES OF LINE
- LINE supports creating of messages using smartphone app or PC admin page and share them to various customers and friends which you have as friend in your account. Messages can be delayed to certain of sending it in advance.
- With LINE you can send many free messages from one person to another or to groups of friends at anywhere or anytime without hindrance.
- LINE also features free Voice and Video calls.
- It also allows sharing of voice messages , photos, videos, contacts and as well location information.
- On LINE there are many awesome stickers which are available for your use to spice up your chats and express your feelings easily. There are many free stickers and emoticons however to discover original characters of favorite celebrity you would have to visit the Sticker Shop.
- LINE offers you the ability to be updated with latest information about popular artist and various brands of your admiration by allowing you to follow their official LINE accounts.
- With the LINE timeline you can share stories with your close friends via texts, photos, videos, stickers and emoticons.
- LINE has a feature known as Keep which allows LINE users to save their favorite messages, photos and videos.
- With the shake it feature in LINE you can just find friends by just shaking.
- You can also add you friends through QR code or a LINE ID.
How to Create LINE Login ID Account And Download LINE App:
- You are required to download and install the app from the official website www.line.me.
- Launch the app after installing and select "New Users"
- Enter your country and phone number in the new screen that appeared and click on the Next button.
- A screen showing terms of agreement will appear, before a prompt will appear asking for your number verification click on the OK button. Choose "Agree with Terms and Verify".
- You will be sent SMS to your number which will automatically be registered but if does not work you can manually fill in the code window that would appear and then continue to the nex stage.
- You can automatically allow LINE app to add contacts based on the contacts phone number and email address that is stored in your contacts. You can also choose for others to automatically find you or not and then click on the OK button after making our choice.
- Now you will be required to fill in your display name which should not be more than 20 characters. After that upload your profile image, you can choose to snap a new photo or choose from your device in whichever can if the image is too large you would have to crop it to fit in, select and Click on "Register".
- Then you can now do your email Registration by entering the needed information and click on "Register now" if you want to or you can do that later, just click on "Register later"
- Your LINE account will now load, normally it takes just awhile to however the speed at which it will be completed depends on the device you are using.
- Now you LINE app account is ready, you can start chatting with your family, colleagues and increase the population of you contacts lists.

We would like to get your comments and contributions at the comment box as regards How to Create LINE Login ID Account Free And Download LINE App - www.line.me we will definitely attend to you immediately.
Go to link Download
How To Create Bootable USB Without Any Software In Windows 10
How To Create Bootable USB Without Any Software In Windows 10

These days very few people burn ISO images on disks and use them as booSoftware
dia. Now, USB drives have replaced them as they are faster and a more convenient method to install an operating system on a machine.
While there are many tools to make bootable USB drive, there’s one provided by even Microsoft, there’s a way to do the same without any software. All you need to do is fire up Command Prompt and follow some simple instructions. Let’s take a look at it:
- Insert your USB flash drive to your computer.
- Search for ‘cmd’ in Windows 10 from the taskbar, Command Prompt will appear. Alternatively, you can also open the Command Prompt by pressing windows+R at the same time and typing in ‘cmd’ in the ‘Run’ window and hitting enter.
- Right click on Command Prompt and select ‘Run as Administrator’ in case you have searched for cmd in the Windows 10 Taskbar.
- Once the Command Prompt window appears, type diskpart and hit enter. Wait until the diskpart utility runs in another window.
- In the new diskpart window, type list disk and hit enter. It will show you all active disks on your computer.
Most probably, you will see two Disk types.
- Disk 0 for hard drive and,
- Disk 1 for your USB Flash Drive with its total capacity.
Since we are going to work on to create bootable USB drive, we will work with Disk 1.
- Type select disk 1 in the same windows and hit Enter. You will get a message ‘Disk 1 is now the selected disk’. That means, any further operation that you do will affect your disk 1 directly.
- Type clean and hit Enter to remove all of the data in the USB drive. Clean command will format your bootable drive. You will get a message like ‘Diskpart succeeded in cleaning the disk’.
- Type create partition primary and hitEnter. You will get a message likeDiskpart succeeded in creating the specified partition.
- Type select partition 1 and hit Enter. It will choose partition 1 for setting up it as an active partition.
- Type active and hit Enter. It will activate the current partition.
- Type format fs=ntfs quick and hitEnter. This command will format your current partition as NTFS file system quickly.
- Type exit and hit Enter. Exit command will close the Diskpart program. But do not close the command prompt Windows.
Copying files from an ISO image on your PC/DVD to USB manually:
Now all you need to do open the files inside the DVD or ISO file, copy it and paste inside USB manually. This will make your USB drive bootable

Copying files from a DVD to USB using CMD:
Let us assume that the USB drive is the G: drive and the DVD installer is located on drive E:. And, you also have inserted a DVD inside the DVD drive from where you want to copy the data to create a bootable USB drive.
By default, Command Prompt’s active directory for Administrator permission is on C:WindowsSystem32>. We will navigate Command Prompt to set on DVD (E:) as its active directory. Remember there should be a DVD inside DVD installer.
- Just type E: then hit Enter, and then the active directory is changed to E.
- Type cd boot and hit Enter. Now the active directory is changed to E: oot>
- Type bootsect /nt60 g: and hit Enter. It will create the boot sector on G: drive (USB Flash drive).
- Type exit and hit Enter to close the Command Prompt.
Until this step, we have been successfully able to create a bootable USB drive and the flash drive is ready to be used as a boot media.
To install Windows from a bootable USB drive, we just need to copy the whole installation files contained on the DVD installer to the USB flash drive.
- To do this, open the Command Prompt as in previous steps.
- Once the command prompt is open, type copy e:*.* /s/e/f g: and then press Enter. Wait until all the files in the DVD installer are copied onto the flash drive. Please double check the drive letter of your USB and DVD. Here, here de is the drive letter of the DVD drive that holds the Windows DVD, g is the drive letter that you assigned to the external USB Stick.
Now bootable USB drive is ready to be used for installing Windows from the Flash drive and you’re done.
Go to link Download
Subscribe to:
Posts (Atom)