
Showing posts with label posts. Show all posts
Showing posts with label posts. Show all posts
Thursday, November 3, 2016
How to Auto Publish Blogger Posts to Twitter
How to Auto Publish Blogger Posts to Twitter
Do you want to auto-publish your blogger posts to Twitter? Twitter is s a free online social networking platform which can also bring lot traffic to your Blogger site. In this article, we will show you how to Auto-Publish Blogger Posts to Twitter

Auto Publish Blogger Posts to Twitter using IFTTT
IFTTT better known as IF This Then That. It is a free web service that allows you to connect and organize your different accounts at just one place.Step#1 Creating a Free Account at IFTTT
The very first thing you need to do is to sign up for IFTTT account.
After creating a account at IFTTT, it will show you how it works. It will ask you to follow few instructions before you can access your IFTTT dashboard.
For example, take a look at the screenshot below:

After following a couple of instructions, it will ask you to select channels that interests you. Since, we are working for Twitter, we will go on to choose it as our channel. But, you need to select two more channels to move on to the next step so select as per your liking and press "Continue".

STEP#2 Creating a New Recipe
Now we need to create a process that IFTTT calls "Recipe", Click on the "My Recipes" link present at the top of the dashboard.

Now click on "Create a Recipe" button and proceed to the next step.

Step#3: Creating the "This" Trigger:
A recipe consists of two things "This" and "That", in the first portion of creating our recipe we will work on "This". It is like if you have a new blog post then it will be published on twitter, or any other social site. So, simply click on the blue "this" link as it is shown in the screenshot below:

Now IFTTT will show you a list of channels that you can connect. It will act as the trigger like if your Blogger blog has a new post then [do something]. So, select Blogger from the list or search it in the search box.

IFTTT will now ask you to connect to your Blogger account, simply click on the "Connect" button to continue.

A window will pop on your screen asking you to verify your Blogger account, follow the instructions and verify your account.
You must be logged in to your Gmail Blogger account before you can verify it. So, make sure you are logged in to the correct account. After logging in, press the "Allow" button to proceed to the next step.

After pressing the "Allow" button, it will show you the list of your Blogger blogs. Select a blog that you would like to use and press "Update".

IFTTT, will not try to connect to Blogger and once it is done it will show you a message that "Blogger is connected successfully". Now, click on Continue to next step’ button.
Now IFTTT will provide you a list or triggers that you can use. You can choose a trigger that fires whenever you publish a new post on your Blogger blog or when you publish a post on Blogger in a specific Label.
Since, we want to publish our all posts so we will choose "Any New Posts" and proceed to the next step.

Step#3: Creating the "That" Trigger:
Now we have completely setup the "This" statement now we need to work on "That" statement, so click on "Create Trigger".

Click on "That" link, in which we will basically define the type of actions that our recipe will perform after you publish a new post on your Blogger account.

Now you will see a huge list of services that you can auto-publish your blogger posts. Since, we are working for Twitter we will choose twitter. However, you can also choose any other social channel as well like Facebook, Google+, Linkden and etc.

Now you need to connect your twitter account so whenever a new post is published on your Blogger Blog, it can also get auto-publish on your connected twitter account.

You just need to authorize the IFTTT App to access your twitter account and publish tweets on your behalf. Simply, press the "Authorize" button.
IFTTT, will not try to connect to Twitter and once it is done it will show you a message that "Twitter is connected successfully. Now, click on Continue to next step’ button.

Now IFTTT, will provide you the number of actions that it can perform whenever a new post is made to your blogger site, either post a tweet, post a tweet with image and etc.
For now, we will choose "Post a Tweet", and move to the next step.

From here you can decided how your tweet will look like. It can hold your Blogger post title, post URL, Image URL, and etc. But tweets are happen to be short so we will go with just post title and post URL. After customizing how your tweet will appear, press "Create Action".

Now we are coming towards ending of our recipe for auto-publish Blogger posts on twitter. Simply, name your recipe and press the "Create Recipe" button to complete the process.

Finally, your recipe is created. Now whenever you will publish a new post on your Blogger blog, it will automatically publish a tweet on your twitter account with the title and URL of that particular post.

You can visit "My recipes" page to see your all list of recipes. You can always edit, stop, or resume any recipe as per your liking.
We hope this tutorial have helped you in learning how to auto-publish Blogger posts to twitter. In coming days, we will teach you to create more recipes for different social networking websites. Till then, feel free to subscribe to us on Facebook, Twitter or Google+.

 About the Editorial Team
The Editorial Team of MyBloggerLab consists of a group of Professional Blogger geeks Led by Syed Faizan Ali (Founder of MyBloggerLab).


Recommended Guides For You::

How to Fix Mixed Content Errors in ...

How to Enable Free HTTPS SSL Certif...

How to Test your Robots.txt File wi...
Comment With:

OR

Choose Wisely!
Newer Articles
Older Articles
JOIN OVER 55,000 BLOGGER USERS
Who get latest updates from MyBloggerLabGo to link Download
Friday, October 28, 2016
How To Add Related Posts Widget For Blogger With Thumbnails
How To Add Related Posts Widget For Blogger With Thumbnails
Today topic is "How You Can Added Related Posts Widget For Blogger With Thumbnails". When you add this widget your blog looks beautiful. It helps your readers to go through the similar posts they were reading and so this widget helps to decrease your bounce rate by increasing blog page views.
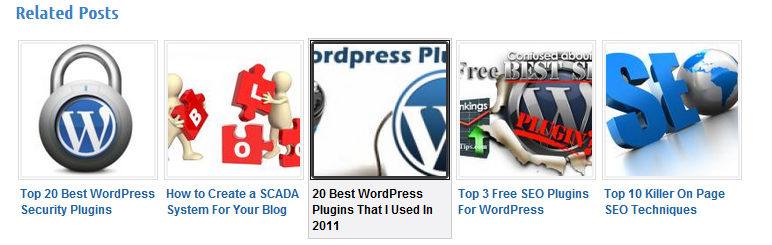 In this post we will go through the steps of adding the Related Posts Widget with thumbnails for Blogger. Ready to added it to your template? Go through the steps by steps below. Lets sarts.
How To Add Related Posts Widget For Blogger With Thumbnails
Now youve done all the proccess correct, congrat youve been added the related post widget successful into your blogger post.
Enjoy and dont forget to share this tutorial to your friends and other communities.
- How to Added Your blog Sitemap widget automatically
How To Add Related Posts Widget For Blogger With Thumbnails
- Firstly Go To Blogger Dashboard.
- Back up your existing Template before making any changes!
- Make sure to check the "Expand Widget Templates " box.
- Find </head> Using CTRL+F
- Copy the code below and paste it just after </head> tag.
<!--Related Posts with thumbnails Scripts and Styles Start --><b:if cond=data:blog.pageType == "item"><style type="text/css">#related- posts {float:center;text- transform:none;height:100 %;min-height:100% ;padding-top:5px;padding- left:5px;} #related-posts h2{font- size: 1.6em;font-weight: bold;color: black;font- family: Georgia, &# 8220;Times New Roman&# 8221;, Times, serif;margin- bottom: 0.75em;margin-top: 0em;padding-top: 0em;}# related-posts a{color:black;} #related-posts a:hover {color:black;} #related-posts a:hover {background-color:# d4eaf2;}</style><script type=text/javascript>var defaultnoimage=" http://1 . bp.blogspot.com/_ u4gySN2ZgqE/ SosvnavWq0I/ AAAAAAAAArk/ yL95WlyTqr0/s 400 / noimage.png";var maxresults=5;var splittercolor="#d4eaf2";var relatedpoststitle="Related Posts";</script><script src=http:// beautifulbloggerwidgets. googlecode.com/files/ related_posts_with_ thumbnails_min.js type=text/javascript/></ b:if><!--Related Posts with thumbnails Scripts and Styles End -->
- Now find the following code below:
<div class=post-body>
- If you cant find it, then search for this below one by using Ctrl+F.
<data:post.body/>
- Copy the code below and paste it just after <data:post.body/> tag and save your template.
<!-- Related Posts with Thumbnails Code Start --> <b:if cond=data:blog.pageType == "item"> <div id=related-posts> <b:loop values=data:post.labels var=label> <b:if cond=data:label.isLast != "true"> </b:if> <script expr_src="/ feeds/posts/default/-/ " + data:label.name + "?alt=json-in- script&callback=related _results_labels_ thumbs&max- results=6" type=text/ javascript/></b:loop> <script type=text/ javascript> removeRelatedDuplicates_ thumbs(); printRelatedLabels_ thumbs ("<data:post.url/ >"); </script> </div><div style=clear:both/> <!-- remove --></b:if> <b:if cond=data:blog.url == data:blog.homepageUrl>< b:if cond=data:post.isFirstPost> <a href=http:// beautifulbloggerwidgets. blogspot.com/ ><img style="border: 0" alt="Blogger Widgets" src=" http://2.bp.blogspot . com/-Hn8-zTJf3L0/ T9cqAcnrfJI/ AAAAAAAAAGM/5gBy5_ MPPBQ/s 1600 /blogger- widgets.png" /></a> </b:if></b:if> <!-- Related Posts with Thumbnails Code End -->Change the 6 value from max-results=6 with the number of posts you want to be displayed.
Now youve done all the proccess correct, congrat youve been added the related post widget successful into your blogger post.
Enjoy and dont forget to share this tutorial to your friends and other communities.
Go to link Download
Wednesday, October 19, 2016
How To Auto Publish Your Blog Posts To Facebook Timeline And Twitter Using Twitterfeed
How To Auto Publish Your Blog Posts To Facebook Timeline And Twitter Using Twitterfeed
In this post we are going to show you how to share the blog post automatically to facebook page timeline or how to import the blog into the facebook fan page using twitterfeed.
twitterfeed : is a free app on Facebook that allows automatic posting of blog posts to your Facebook Fan Pages timeline and your profile timeline through RSS Feeds. twitterfeed is also very handy for the sharing of Tweets, YouTube videos, Google+ posts, etc.
2.click signup

3.After signup,sign in into your account
4.click creater new feed, enter the new feed name like "extremetipz"

5.enter your blog url or rss feed
6.after that click step 2,Now you will have to select the platform you want to autopublish to eg twitter,facebook,app.net .

7.after selecting then autheticate your account with them and all done

thats all
twitterfeed : is a free app on Facebook that allows automatic posting of blog posts to your Facebook Fan Pages timeline and your profile timeline through RSS Feeds. twitterfeed is also very handy for the sharing of Tweets, YouTube videos, Google+ posts, etc.
How To Set up twitterfeed For Facebook Pages:
1. Go to http://twitterfeed.com2.click signup
3.After signup,sign in into your account
4.click creater new feed, enter the new feed name like "extremetipz"
5.enter your blog url or rss feed
6.after that click step 2,Now you will have to select the platform you want to autopublish to eg twitter,facebook,app.net .
7.after selecting then autheticate your account with them and all done
thats all
Go to link Download
Friday, October 14, 2016
How to enable Search Description for blog posts in blogger
How to enable Search Description for blog posts in blogger
This post is for people who use Blogger.

New functionality within Blogger
Blogger has recently introduced new functionality to its software for blogging. Within the new template there is now a new option to include a meta description for the blog AND each individual blog post.
To do this, you should:
Once youve done this, your indexed blog post will show up with the correct description. This is the one for yesterdays post
This is also the description which will show up if you promote your blog post on Facebook.
Extra! For those who want to know more about site description check out Googles Search Engine Optimisation Starter Guide (pdf). This is what it has to say about "best practice"
- It introduces you to the new functionality within Blogger which allows you to write an individual summary descriptions for each of their blog posts.
- It also explains how this improves the posts listing by search engines - and may well improve the number of visitors - via search - to your blog too
New functionality within Blogger
Blogger has recently introduced new functionality to its software for blogging. Within the new template there is now a new option to include a meta description for the blog AND each individual blog post.
Meta elements provide information about a given Web page, most often to help search engines categorize them correctly. They are inserted into the HTML document, but are often not directly visible to a user visiting the site.Wikipedia - Meta element
The meta description says what your blog or post is about - but doesnt appear on your blog. However it does appear in the listing for the post in a search engine index.
Various attempts by some to manipulate search engine rankings have led to some meta tags becoming much less influential than they used to be - keywords being a case in point.
However a meta description is still used by search engines, particularly if it accurately reflects the content of the post (eg text or the alt tags on an image)
Why describe your blog post in summary?
Prior to implementation of the new functionality, the snippets used for my blog posts which had been indexed were usually
However if YOU create a search description for your blog post, this means YOU - rather than Google or the other search engines - get to define how that post is summarised when indexed by a search engine. You are not left to the tender mercies or whims of the different search engines!
In other words, if you want people to visit your blog YOU can now define the best way of describing your post in Google. For all visits generated by a search, this will improve the chances of people clicking the link in the search results and visiting your blog as a result and finding what they wanted. It may well improve traffic to your blog as a result.
However the description only works to best effect if it accurately describes the content of the blog post eg repeats words used in the text.
How to describe a blog post
There are two stages to this.
Contents of ? button next to "Description"
You should:
Various attempts by some to manipulate search engine rankings have led to some meta tags becoming much less influential than they used to be - keywords being a case in point.
However a meta description is still used by search engines, particularly if it accurately reflects the content of the post (eg text or the alt tags on an image)
Why describe your blog post in summary?
Prior to implementation of the new functionality, the snippets used for my blog posts which had been indexed were usually
- either the first sentence of the post
- or the labels/categories identified for the post.
However if YOU create a search description for your blog post, this means YOU - rather than Google or the other search engines - get to define how that post is summarised when indexed by a search engine. You are not left to the tender mercies or whims of the different search engines!
In other words, if you want people to visit your blog YOU can now define the best way of describing your post in Google. For all visits generated by a search, this will improve the chances of people clicking the link in the search results and visiting your blog as a result and finding what they wanted. It may well improve traffic to your blog as a result.
However the description only works to best effect if it accurately describes the content of the blog post eg repeats words used in the text.
How to describe a blog post
There are two stages to this.
- The first stage only needs to be done once as it enables the description functionality and sets a description for the blog.
- The second stage relates to the description of the blog post and needs to be done for every individual post you want to describe.
Stage 1: Enable the meta description functionality in Blogger
Set the blogs search descriptionHelp users choose to click on your blog in search results by writing a compelling summary of what your blog is all about. Learn more.Contents of ? button next to "Description"
You should:
- view the dashboard of your Blogger blog
- Go to "Settings"
- Click "search preferences"
- Find "Meta Tags". This should indicate the default option - ie the description is disabled.
- Click "edit" button re. "Description"
- Click "Yes" button to enable search description functionality
- Create a meta description for your blog in l50 characters or less. (Use Letter Count - set to the character option if you want to check.) This is the description which will appear on your home page - see example below.
- Click save changes button
When I travel, I sketch. When I sketch on my travels I record it here. Plus information about places I visit and links for those who want to know more
 |
| Menu of post settings in Blogger AFTER search description has been enabled (in Stage 1) |
Stage 2: Create a search description in Blogger
In the Blogger Post edit view, you can insert a search description when you create a post or edit it.To do this, you should:
- view your dashboard for your Blogger blog
- Go to "posts"
- EITHER create a new post OR select a post to edit
- View the Post Settings on the right hand side of the edit view. This includes Search description (as illustrated on the right) - but only if you have acted on Stage 1 above. Otherwise the setting is missing.
- Click on Search Description and a window box appears
- Enter a brief and accurate (meta) description of the post in the window. This will be the text used in a search engine listing.
- Try and make sure you use 150 characters of plain text or less (recommended by most reputable sources).
- click done
 |
| Example of a search description for an individual Blogger blog post |
 |
| Meta search description for yesterdays blog post |
Extra! For those who want to know more about site description check out Googles Search Engine Optimisation Starter Guide (pdf). This is what it has to say about "best practice"
Go to link Download
Friday, September 30, 2016
How To Post Blog Posts Automatically To Facebook Using Hootsuite
How To Post Blog Posts Automatically To Facebook Using Hootsuite
My fellow bloggers always send me mails and messages on how I use hootsuite to drive traffic to my blog, I always explain it to them but some will still be confused on how to use it effectively so i decided to write a tutorial on it so that they can fully understand it and those that have not heard of it too can use it.
So lets get started. You can use Hootsuite to drive traffic to your website or blog by connecting it with your Facebook, Twitter or GooglePlus accounts so that you can schedule posts which will be posted automatically on this social media platforms.
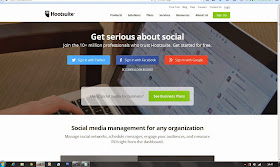
Now you are ready use to Hootsuite, go to :www.hootsuite.com on your browser and sign up if you are a new user or log in if you already have an hootsuite account. After you finish setting up your Hootsuite account and you logged in you will see the screen below.

Click on Add Social Networks, a new window will pop up as seen below :

You can connect only one social network if youre still using the free account but if you upgrade to Hootsuite Pro, you can connect as many as you want. See the screen below after I connected my Facebook account.

In the screen above you can see the Facebook groups I belong to but you I can only add 2 groups because I am still using free account, you should now add the two groups you want to be posting in.
Now we are done with the connecting ish, lets now link our Feeds to Hootsuite to so that it can do the work for us automatically.
Go to Publisher and click on RSS Feeds

A new window will pop up click on RSS/Atom so that you can connect your Feed to Hootsuite so that anytime you post it will automatically posted in your groups.

Now click on that Plus icon below RSS/Atom

Thats the screen you will see above.
Fill the form as explained below:
Feed Url: Type in your blog address
Network to send feed items to: Select your Facebook profile or one of your groups.
Check this feed for new posts every: You can select every one hour, two hours and so on.
When new posts are found, send up to: You choose 1, 2 3 and so on.
Save your feed when you are done.
After you save the above, anytime you publish on your website/blog, Hootsuite will always be updating your Facebook for you with your latest blog posts.
In next tutorial, I will share with you, how to schedule your blog posts to be published on Facebook, Twitter etc using Hootsuite.
Are you also using hootsuite? Kindly share your experience.
So lets get started. You can use Hootsuite to drive traffic to your website or blog by connecting it with your Facebook, Twitter or GooglePlus accounts so that you can schedule posts which will be posted automatically on this social media platforms.
Now you are ready use to Hootsuite, go to :www.hootsuite.com on your browser and sign up if you are a new user or log in if you already have an hootsuite account. After you finish setting up your Hootsuite account and you logged in you will see the screen below.
Click on Add Social Networks, a new window will pop up as seen below :
You can connect only one social network if youre still using the free account but if you upgrade to Hootsuite Pro, you can connect as many as you want. See the screen below after I connected my Facebook account.
In the screen above you can see the Facebook groups I belong to but you I can only add 2 groups because I am still using free account, you should now add the two groups you want to be posting in.
Now we are done with the connecting ish, lets now link our Feeds to Hootsuite to so that it can do the work for us automatically.
Go to Publisher and click on RSS Feeds
A new window will pop up click on RSS/Atom so that you can connect your Feed to Hootsuite so that anytime you post it will automatically posted in your groups.
Now click on that Plus icon below RSS/Atom
Thats the screen you will see above.
Fill the form as explained below:
Feed Url: Type in your blog address
Network to send feed items to: Select your Facebook profile or one of your groups.
Check this feed for new posts every: You can select every one hour, two hours and so on.
When new posts are found, send up to: You choose 1, 2 3 and so on.
Save your feed when you are done.
After you save the above, anytime you publish on your website/blog, Hootsuite will always be updating your Facebook for you with your latest blog posts.
In next tutorial, I will share with you, how to schedule your blog posts to be published on Facebook, Twitter etc using Hootsuite.
Are you also using hootsuite? Kindly share your experience.
Go to link Download
Thursday, September 22, 2016
How to Add Related Posts Below Your Blog Posts Using nRelate Blogger
How to Add Related Posts Below Your Blog Posts Using nRelate Blogger

Adding related posts beneath your blogs post pages has been very effective for every blogger. This tutorial is on "How to add "nRelate" related posts widget to your blogs". "nRelate" related posts widget is very easy to customize according to your blogs color scheme. You can also decide whether to show thumbnails or simple links as your related posts. Follow the following steps to add "nRelate" related posts widget to your blogs.
Note: I recommend registering to nRelate in order to customize your widget.
How to add nRelate widget?
- Go to nRelate website and click Partner Login
- Now hover over Install button and click Blogger. A field would appear where you have to provide you blog link where you want to add nRelate widget. Then click submit.
- Now click Advance version (to be able to edit the plugin later)
- Next it would ask you whether you want to add it to your post pages only or on main blog page too, I recommend you add it to your post pages.
- Next it would open up a widget called Add page element. There are 2 sections. Click on the section that says Edit Content as shown below.
- You have to delete the code in Red as shown below.
<style type="text/css">@import url(http://static.nrelate.com/common_b/0.01.0/nrelate-panels-default.min.css);</style><div id=nrelate_related_placeholder/></div>Click Add Widget button and its all done. :) Hope that was easy to follow.
Go to link Download
Saturday, September 17, 2016
How To Add Recent Posts Widget With Thumbnails On Blogger NairotechBlog
How To Add Recent Posts Widget With Thumbnails On Blogger NairotechBlog
Recent posts widget is quite a lovely widget that can be used to beautify & add spice to your Blogger & Wordpress Site, these widget stands out from other Recent post widget because it shows the date in which the post was published, no. of comments and read more link.
Let get to the real deal for Today......
Steps To Install Recent Post Widget On Your Blog
- Navigate your blogger dashboard
- Click on Layout > Add a Gadget > HTML/JavaScript
- Copy and paste the following code in the content box.
< style type=text/css>
img.recent_thumb {padding:1px;width:55px;height:55px;border:0;
float:left;margin:10px;}
.recent_posts_with_thumbs {float: left;width: 100%;min-height: 70px;margin: 5px 0px 5px 0px;padding: 0;font-size:12px;}
ul.recent_posts_with_thumbs li {padding-bottom:5px;padding-top:5px;min-height:65px;}
.recent_posts_with_thumbs a {text-decoration:none;}
.recent_posts_with_thumbs strong {font-size:10px;}</style>
<script style=text/javascript src=http://www.webaholic.co.in/other/recent-posts-widget-with-images.js></script>
<script style=text/javascript>
var numposts = 6;
var showpostthumbnails = true;
var displaymore = true;
var displayseparator = true;
var showcommentnum = true;
var showpostdate = true;
var showpostsummary = true;
var numchars = 98;</script>
<script src=http://www.YOUR-BLOGGER-URL.blogspot.com/feeds/posts/default?orderby=published&alt=json-in-script&callback=showrecentpostswiththumbs></script>
img.recent_thumb {padding:1px;width:55px;height:55px;border:0;
float:left;margin:10px;}
.recent_posts_with_thumbs {float: left;width: 100%;min-height: 70px;margin: 5px 0px 5px 0px;padding: 0;font-size:12px;}
ul.recent_posts_with_thumbs li {padding-bottom:5px;padding-top:5px;min-height:65px;}
.recent_posts_with_thumbs a {text-decoration:none;}
.recent_posts_with_thumbs strong {font-size:10px;}</style>
<script style=text/javascript src=http://www.webaholic.co.in/other/recent-posts-widget-with-images.js></script>
<script style=text/javascript>
var numposts = 6;
var showpostthumbnails = true;
var displaymore = true;
var displayseparator = true;
var showcommentnum = true;
var showpostdate = true;
var showpostsummary = true;
var numchars = 98;</script>
<script src=http://www.YOUR-BLOGGER-URL.blogspot.com/feeds/posts/default?orderby=published&alt=json-in-script&callback=showrecentpostswiththumbs></script>
You Are Done!
Please, Share this with friends and use our subscription links below.
Hope This Helps, Pals?
Go to link Download
Tuesday, September 13, 2016
How To Add Default Featured Image To WordPress Posts and Categories
How To Add Default Featured Image To WordPress Posts and Categories
If you publish a post without setting a featured image, an empty box will be displayed next to the post if your WordPress theme supports featured image and has no fallback option.
If you wont want the empty box to be displayed, then you need to set a default fallback image when no featured image is found. This can also be very useful when you forget to set a featured image for your post.
In this article, I will show you how to add a default featured image in WordPress using a plugin.
First thing you need to do is install and activate the Default Featured Image plugin.
Once installed and activated, the plugin adds an option under Settings » Media to choose a default image.

Upload your default image and save settings. This image could be any image, for example an image of your site logo on a plain background.
That’s all.
Now, when your theme looks for a featured image and does not find one, it will display the default image.
If you would like to set a fallback Featured Image based on post category, using this same plugin, read the conditional featured images tutorial.
I hope this helps.
Go to link Download
Subscribe to:
Posts (Atom)
Post a Comment