Monday, November 21, 2016
How To Delete Call Logs On the Samsung Galaxy S6
How To Delete Call Logs On the Samsung Galaxy S6

By default, call logs are saved on Samsung Galaxy S6, including duration of call and other details. For most users, this is not good enough and for others, they simply want to get rid of it so it can be viewed by other persons.
A guy who has a girlfriend, but regularly calls other girls will definitely want to delete his call log so his girlfriend doesn’t find out… hoho.
In either case, the solution is here.
Delete Call Log On Samsung Galaxy S6
Launch the Phone app
Access the Log tab on the left side of the screen
Select More button just at the top
Tap Edit
Now, use the checkbox to delete a single entry or select “All” to delete all Call log entries on Samsung Galaxy S6. Note that the process to delete call log on Samsung Galaxy S6 will also work for Galaxy S6 Edge.
Go to link Download
Thursday, November 17, 2016
How To Root Samsung Galaxy S5 International Korean Canadian USCC and T Mobile US Models
How To Root Samsung Galaxy S5 International Korean Canadian USCC and T Mobile US Models

As we have discussed earlier by the process of rooting you will be able to get admin rights over your Samsung Galaxy S5, you can install custom ROM, run rooted apps, undervolt or overclock the processor and even remove all the bloatware your carrier put on the phone. A popular programmer from XDA named Chainfire has created an expolit to gain root on several different versions of the Galaxy S5 including T-Mobile, Sprint, and various international models. Now just download the kit and use the included flashing program to exploit and youll be in a new world of custom modifications, tweaks and ROMs
How to root Samsung Galaxy S5
Note: This method only works on Windows so you need a Windows computer to complete this procedure.
Download the version of CF- Auto Root for your specific device from the developers post and save it on your desktop.
SM-G900F (International Qualcomm): CF-Auto-Root-klte-kltexx-smg900f.zip
SM-G900L (Korea): CF-Auto-Root-kltelgt-kltelgt-smg900l.zip
SM-G900R4 (US Cellular): CF-Auto-Root-klteusc-klteusc-smg900r4.zip
SM-G900T (T-Mobile US): CF-Auto-Root-kltetmo-kltetmo-smg900t.zip
SM-G900W8 (Canada): CF-Auto-Root-kltecan-kltevl-smg900w8.zip
Other models
CF-Auto-Root is not yet available for all models - one stock firmwares for these models become available, let me know, and Ill make the corresponding CF-Auto-Roots.
After downloading the file
2. Extract the CF-Auto-Root.zip file by right clicking it and choosing extract All.
3. Right-click Odin inside the newly extracted folder and select Run as Administrator.
4. Click the PDA button in Odin and choose the .tar.md5 file also in the CF-Auto-Root extracted folder.

5. Turn off your phone
6. Hold down the volume down, power and home buttons until you see a screen come up.

7. Tap the volume up button to continue.

8. Connect the phone to your PC via USB.

9. Make sure Re-Partition is NOT checked in Odin.

10. Click the Start button and wait for it to flash and restart.

Done. After restarting Your Samsung Galaxy S5 is rooted!!
Go to link Download
Wednesday, November 16, 2016
How do i root my samsung galaxy s6
How do i root my samsung galaxy s6

How to root samsung galaxy s6 verizon
First, if you haven’t already got the USB PC drivers for your Samsung device, then head to this link to download them.
SuperSu download links:- The package you’ll need to root your device will depend on the country you reside in the different packages are listed below:
samsung SM-G920F zerofltexx zeroflte LRX22G.G920FXXU1AOD9 Download
samsung SM-G920I zerofltedv zeroflte LRX22G.G920IDVU1AOC6 Download
samsung SM-G920T zerofltetmo zerofltetmo LRX22G.G920TUVU1AOC9 Download
Once that’s downloaded, head on to the instructions below to Root your Galaxy S6.
Instructions to Root the Galaxy S6:-
1) Download and unzip the CF-Auto-Root-….zip file
2) If you end up with a recovery.img and cache.img file, you’ve extracted twice. You need to end up with a .tar.md5 file – don’t extract that one
3) (USB) Disconnect your phone from your computer
4) Start Odin3-vX.X.exe
[post_ad]
5) Click the PDA button, and select the tar.md5 file
6) Put your phone in download mode (turn off phone, then hold VolDown+Home+Power to boot – if it asks you to press a button to continue, press the listed button).
7) (USB) Connect the phone to your computer
8) Make sure Repartition is NOT checked
9) Click the Start button
10) Wait for Android to boot
11) Done
You should now see SuperSU installed in your app launcher and able to grant any apps that require root the appropriate permissions. For the root to work, the device must reboot into recovery. Most devices will do this automatically after flashing these files, but in case that does not happen, please boot into recovery manually..
Don’t forget to Share it with your friends via Facebook & Google+ and Twitter, And if you like the article How do i root my samsung galaxy s6 and you may even Subscribe for New post, to get directly in your mail inbox.
Go to link Download
Friday, November 11, 2016
How to connect Samsung S6 Galaxy Edge to TV
How to connect Samsung S6 Galaxy Edge to TV
 |
| Samsung Galaxy S6 Edge |
Read also: How To Move Or Rearrange IPhone Home Screen App Icons Anywhere-Without Jail Breaking?

Alternative method to connect Samsung Galaxy S6 Edge to TV using chromecast:

Frequently asking question:
Go to link Download
Wednesday, November 9, 2016
How to Root the Samsung Galaxy S4 GT I9505 » Tutorial » Step by Steps
How to Root the Samsung Galaxy S4 GT I9505 » Tutorial » Step by Steps

Well, with this you can get the rights to access the Android directories so that we can delete some system applications among many other things (such as installing applications that are not on Google )
Why to root my Samsung Galaxy S4?
Tutorial how to root the Galaxy S4 in 3 simple steps
- What do we need to root the S4?
Step 1 - Preparing the files
In our computer ODIN and unzip the file CF-Root with a type program WinRAR to a folder, for example, called Root-S4.Step 2 - Prepare ODIN
Already having all the files together in one folder, we will turn off our device and close Samsung KIES, in the event that it was open on our computer. opened ODIN by double clicking the file . exe and once opened, press "Reset" . In the PDA box we add the file CF-Root. ODIN window as shown in the following picture:
Step 3 - Turn on the S4 download mode
Before turning our device to restart in download mode, check that the USB Debugging is enabled. We are going to Settings -> Developer Options -> Activate USB debugging . Initially we will not have access to this option, but we can change if we are to About phone and number Compilation times we repeated clicking.The device into download mode so we must press the button once Volume Down + Home + On / Off. We will get a screen to accept we have to press volume up. Once done, you only have to connect the phone to your computer via USB. The Odin program will recognize through the window ID: COM . At this point we can now press Start.
As I discussed earlier, we leave the Root file for GT-i9500:
See also : Install Samsung Galaxy S4 Launcher on your Android
If you have any questions, you can do it from your comments. If you liked this article do not forget to share with your friends on Facebook, Twitter and Google Plus, the buttons that you see below.
Go to link Download
Sunday, November 6, 2016
How to install apk file in Samsung galaxy S6
How to install apk file in Samsung galaxy S6
 |
| Samsung Galaxy S6 |
- Step 1: select settings from under home screen menu
- Step 2: Open settings to allow applications from unknown source (Settings>lock screen and security>unknown source)
- Step 3: If you don’t have apk files,Download APK File from Google Play Store in Computer
- Step 4: Move file from computer to S6 via data cable or Wi-Fi
- Step 6: Now tap access my file in Samsung galaxy S6>local storage>open saved apk file in phone memory
- Step 7: Now you are taken to installation setup of applications
Frequently asking question:
Go to link Download
Thursday, November 3, 2016
HOW TO FIX SOME SAMSUNG PHONES PROBLEM
HOW TO FIX SOME SAMSUNG PHONES PROBLEM

Samsung Battery Drains Quickly Fixed

Not making it through the day on a single charge is something that comes to many phones with age. If you find that your S4 is just not holding its charge for as long as it used to, it is possible that there is a problem with your battery, but it is more likely that apps are to blame.
You can check which of the apps you have installed are responsible for eating through your battery by opening up Settings. Tap More followed by Battery and you will see a graph that illustrates how your battery has been draining, as well as details of which apps are the culprits.
If you spot apps here that you are not using any more, you can simply uninstall them, but it may also be an indication that you need to remember to manually terminate certain apps when you stop using them. Just press and hold the home button to bring up your Recent Apps list and then swipe away any apps you want to close.
Youll probably notice that there is an entry for Screen very near the top of the list, if not at the very top. If you tap this you will be able to see just how long your screen has been on while your phone has been unplugged. To help reduce the battery draw your screen has, tap the Display button and try adjusting the Brightness ad Screen timeout settings to something a little lower.
Longer battery life can also be achieved by enabling Power Saving Mode. Head to the My Device section of Settings and you can switch on the feature that will limit processor speed, turn off haptic feedback and automatically adjust screen brightness. Its also a good idea to turn off any phone features you are not using -- like Air View, NFC and so on.
Swipe down from the top of the screen and tap the button to the far right. In the list of Quick Settings, disable any options you do not need by tapping them.
Samsung/Android Phone gets hot Fixed

The biggest concern here is that there could be something physically wrong with the battery, and it is overheating -- this in turn can lead to battery drain problems or worse. One way to check for battery problems is to remove it from your phone and place it on a flat surface. If it spins freely when you rotate it (try turning it over as well), the bulge that makes this possible is indicative of a problem that needs to be addressed. It could be a simple matter of buying a replacement battery, but its worth taking your phone into an authorized repair shop to get it checked out.
If your battery seems to be physically OK, its worth checking that your phone and all of its apps are fully up to date. To ensure that you have all of the latest updates for your phone, head to the More section of Settings and tap About Device.
Now tap Software Update followed by Update. Download anything that is detected and you can then check for updates for your apps. Fire up the Play Store app, head to My apps and hit Update All to grab any available patches. Having the latest versions of your apps is always a good way to save battery life.
Unexpected restarts on Samsung Mobile
Having your phone restart randomly can be extremely annoying, and it is usually indicative of some other sort of problem. It could be that there is a physical problem with your battery -- such as the connections being bad -- but the fault could also lie with software. As described above, it’s a good idea to check for phone and app updates to make sure that this is not the cause of restarts.microsd galaxy s4 closeup A dodgy memory card can lead to all manner of problems.
If you have opted to expand your storage by adding a memory card, this could also be the source of your problems. Try removing the microSD card to see if the restart problem vanishes. If you find that your phone functions normally when there is no memory card inserted, its time to invest in a new card.
How to fix Samsung Camera Problems

Many Galaxy S4 owners report problems with the camera app. The precise nature of the problem can vary, but symptoms include the app closing unexpectedly, images not displaying properly, and issues with taking photos. As mentioned above, a faulty memory card can lead to other unexpected problems, so its worth removing the card you are using at the moment or replacing it with another one to see if that helps.
You can also try clearing app caches to see if that helps. Open Settings, tap More and open the Application Manager. Swipe across to the All section and locate the entry for the Camera app. Tap it and then tap both the Clear cache and Clear data buttons in turn. Its worth repeating this with the Gallery app.
Samsung Phone Wi-Fi connection problems Fixed

When youre at home, you may well have noticed that your phone sometimes seems to have trouble connecting to your wireless network. This is usually the case when the Wi-Fi signal is weak, but it can crop up at other times as well.
You may find that you are plagued with messages informing you that your internet connection has been disabled because of slow speeds. While this may sound counterintuitive, try disabling mobile data -- you may just find that it helps. Swipe down from the top of the screen and toggle the Mobile Data setting to off.
Another option is to disable Wi-Fi Power Save mode. Fire up the dialer and type the code *#0011# to enter Service Mode. Tap the menu key and select the Wi-Fi option. Under the Wi-Fi Power Save Mode heading, tap the On button so that it changes to Off. Press the back button to return to the home screen.
General slow down on Samsung Devices
Your S4 probably feels a little slower than it did when you first bought it. Thankfully, there are lots of ways in which you can help to speed things up again, including doing a factory reset.
I hope this helps, ensure to share it Family and friends. One love
Go to link Download
Tuesday, November 1, 2016
How to Hard Reset Samsung Galaxy S4 and Galaxy S5 Pattern Problem
How to Hard Reset Samsung Galaxy S4 and Galaxy S5 Pattern Problem

How to Hard Reset Samsung Galaxy S4 with Hardware key button
1. Make sure the battery of Samsung Galaxy S4 charge properly
2. Turn off Samsung Galaxy S4. Press and hold together : Power Button + Volume Up + Home Button.
3. If the button at number 3 not work, you can try with press and hold together Power Button + Volume Up Button until the phone vibrate and release only Power Button (do not release Volume Up + Home button).
- How to install PES 2012 on your Android phone
5. If we see the menu at LCD screen, choose Wipe Data/Factory Reset with Volume Button to select and use Power Button to ok or enter, You can Download New OperaMini v7.6.apk.
6. The Samsung Galaxy S4 will doing the process of restoring to factory default. See the below picture it also guide you on how to do it successfully.

You Can Also Hard Reset Samsung Galaxy S4 with Secret Key Code Security:
- How to speed up your android phone
2 . Make sure the battery of Samsung Galaxy S4 not empty.
3. dial or press number to call: *2767*3855#.
RELATED POST:
- How to hard reset Nokia X, X+ and XL android
- How to format and reset sony Xperia
You can Watch the on Youtube now
Is this tutorials helpul for you if yes, share it to your friends.
Enjoy.
Go to link Download
Wednesday, October 19, 2016
How to Root and unlock Samsung Galaxy Tab 10 1 P7500
How to Root and unlock Samsung Galaxy Tab 10 1 P7500
- First root your tab (cant be unlock on 3.2)
- Turn debugging on
- Use Z3X 3G Tool v12.4 and press unlock. Simple

Here is how to root your Galaxy Tab 10.1:
This method is done on Windows. I recommend this way as its the easiest. If you dont have Windows, borrow from a friend.
?Downloading Files and Installing Drivers?
Download the root.zip from here.
Extract the zip file by right clicking and selecting "Extract All," or by using an extracting program of your choice.
Open the folder and double click the driver file labeled "GT-p7510_USB_Driver_v1_3_2360_0-Escape.exe"
Install the driver. Its pretty much just Next, Next, Install, and Exit when its done.
?Connecting the Device?
Turn on USB Debugging by going to Settings>Applications>Development and checking USB debugging. Click Okay to confirmPower off the device by holding the power button and selecting Power offPut the device into Downloading modeHold the Vol Down button (the left Volume button) and then hold the Power button as well.
Keep holding until you see two icons. First youll see the Samsung Galaxy Tab 10.1 logo and then the icons will show up. Let go.
Press the Vol Up button (the right Volume button) to select Downloading mode.
Connect the device to your computer with the USB cable.
?Flashing a Custom Recovery?
Go into the same root folder as before.
Double click the root application named "Odin3_v1.85.exe"
Select PDA Double click the clockworkmod recovery file labeled "recovery-cwm_4.0.0.4-sam-tab-10.1.tar.md5" to select it. Click Start
Once it is complete, you can close the program
?Completing the Root?
Disconnect your USB cable
On your device, turn off USB Debugging by going to Settings>Applications>Development and unchecking USB debugging
Plug your USB cable back in
On your computer, go to the same root folder as before and transfer the zip file labeled "Samsung_Galaxy_Tab_10.1_root.zip" to your device. Dont put it inside any folder.
Confirm that it was transferred by clicking inside the device folder
Power off the device by holding the power button and selecting Power off
Put the device into Recovery mode
Hold the Vol Down button (the left Volume button) and then hold the Power button as well.
Keep holding until you see two icons. First youll see the Samsung Galaxy Tab 10.1 logo and then the icons will show up. Let go.
Press the Vol Down button (the left Volume button) to highlight the left icon.
Press the Vol Up button (the right Volume button) to select Recovery mode.
You should see that you are in ClockworkMod Recovery. If not, start over
Use the volume buttons to highlight "Install zip from SD card" and hit the Power button to select it.
Use the volume buttons to highlight "Choose zip from SD card" and hit the Power button to select it.
Use the volume buttons to highlight "Samsung_Galaxy_Tab_10.1_root.zip" and hit the Power button to select it.
Use the volume buttons to highlight "Yes - Install..." and hit the Power button to select it.
When it finishes, the last line should say "Install from sdcard complete."
Use the volume buttons to highlight "*****Go Back*****" and hit the Power button to select it.
Hit the Power button to select "reboot system now".
Your device will reboot.
Youre now rooted!
************************************************** ***
********** Big Thanks to XDA contributor djR3Z *************
************************************************** ***
Source: [GUIDE] How to Root the Samsung Galaxy Tab 10.1 [Video Walkthrough]
100% working solution and tested by me.
If it helps you Click THANKS.....

Go to link Download
Sunday, October 9, 2016
HOW TO CONNECT SAMSUNG GALAXY S7 TO TV
HOW TO CONNECT SAMSUNG GALAXY S7 TO TV

If you want to know how to connect a Samsung Galaxy S7 to a TV, the following guide will help you to connect your smartphone to a TV.
If you have right software you can easily connect your Smatphone to Tv.There are two ways to connect Samsung galaxy to TV, choose one which is feasible to you and follow those steps.Connecting Samsung Galaxy S7 To TV using Wireless Connection
Go to link Download
Thursday, October 6, 2016
How To Root Samsung Galaxy S Duos S7562 with pc tutorial
How To Root Samsung Galaxy S Duos S7562 with pc tutorial
This tutorial is to explain how to root Samsung Galaxy S Duos S7562. Before proceeding with the tutorial, if you are a newbie must check this tutorial..

How to root samsung galaxy s duos step by step
1. First make sure your mobile have the battery percentage level of minimum 70 to 80%.
2. Next enable the USB debugging mode by following the path Settings > Applications > Development > USB Debugging – Check box).
3. Next make sure you have backed up all the important data’s using appropriate backup applications.
Procedure:
1. First, download and install the Samsung KIES on your computer. In case if it is already installed, just ignore this step.
2. Next, download and extract the root files on your computer. After extracting you will be able to see the given below files.

3. After that connect your phone to the computer using USB cable and copy the SuperSU-v1.80.zip file to your SD card.
4. Then Power OFF your Samsung Galaxy S Duos S7562 smartphone and allow it to enter into the download mode.

5. To enter into the download mode press and hold the Volume Down button, Home Button and Power Button at the same time for 4-7 seconds.

6. While you are in download mode, you will see a yellow triangle like in the given below picture. Continue the process press the Volume Up Key.

7. Now, open the Odin3 (which you have already extracted in the Step#2) on your computer. Then connect your phone to the computer. [post_ad]

8. Once you have connected, Odin will automatically detect your phone and show the “added message.”

9. After that click the “PDA” button and select the recovery.tar file that you have extracted in the second step.

10. Now, click the “Start” button in Odin to start the flashing process.

11. After that you will see a Green Pass Message in Odin. Now, you can disconnect your phone from the computer. During this process, your device will restart automatically.

12. After that again Power OFF your phone and enter into the recovery mode. For that, you need to press and hold the Volume Up button, Volume Down button, Home button and Power button for few seconds until you boot into the recovery mode.[post_ad]
13. In the Recovery menu, select the “Install zip from SD card > Choose zip from SD card > Install SuperSu v1.80.zip”.
14. Once flashing is finished, select Go Back > Reboot System Now option from the recovery menu.

Must Read– > How to install and use Adobe Flash player on Android devices
Must Read– > Download HTC One M8 Stock ROM Firmware Flash File
Don’t forget to Share it with your friends via Facebook & Google+ and Twitter, And if you like the article best way to root samsung galaxy s duos and you may even Subscribe for New post, to get directly in your mail inbox.
Go to link Download
Thursday, September 22, 2016
How To Root the Samsung Galaxy S II
How To Root the Samsung Galaxy S II
Samsung Galaxy S II has amazing features and specifications. It has high demand in market and attract customers due to its high performance. To spend life time with your Samsung Galaxy S II you must have knowledge how to use Samsung Galaxy S II in well manner way. If you want to root your Samsung Galaxy S II then this article may help you. You may have try many methods of rooting but not all work. I am explaining simple method with you to root Samsung Galaxy S II which can be used for all version not specific one. So follow given below simple and easy method to root your Galaxy phone.

Important Note:
1. Download Samsung Kies form below link and install it on your computer.
Download Kies
2. Turn off your phone.
3. Hold down the Volume Up and Volume Down buttons at the same time and plug in your phone through USB cable while you have turn off the phone.
Download Odin v1.8.5
7. Download the Recovery file for your phone and save it on computer. Downloading links for recovery files for some devices are given below.
T-Mobile Galaxy S II Recovery
Sprint Galaxy S II Recovery
AT&T Galaxy S II Recovery
Galaxy S II i9100 Recovery
8.Plugged in device and open Odin.Then follow instruction as Open Odin>>PDA button>>Choose Recovery file you just downloaded.
9. Select Start and it should flash the recovery to the device and reboot it.
III. Root the Device
1. Mount the USB storage to transfer files when your phone is reboot.
2. Download the Superuser zip file from below link and save it to your computer.
Download Superuser
3. Place the Copy of Superuser .zip file in your device’s sd card. Copy ZIP files and never extract it.
4. Unplug the device from the computer and turn it off.
5. Turn the device back on by holding down the volume down, volume up button, and the power button. Hold the volume button till recovery screen comes up and device vibrate.
6. When recovery screen appears, use the volume buttons to scroll down to install zip from sd and then select the superuser .zip file.
7. Once it flashes, move back, then reboot system now.
8. If superuser icon appear in your device’s app drawer its mean you have done.
9. That’s all by above given steps you able to root your device.Share this information with your friends.Stay blessed.
See Also: How To Get Accepted Into CPA Networks
Go to link Download
Monday, September 19, 2016
How To Clean Up All Kinds Of Android Cache In The Samsung Android Phone
How To Clean Up All Kinds Of Android Cache In The Samsung Android Phone

And back to the home page of RE browser, and find the data folder, and pull down after enter it. Delete the all the files in “log” folder after you find it. Sometimes there is system errors existing for your phone, which can produce error files of about 1.4 M.
Next, move to the exciting moments. Find the data folder in the RE’home page and pull down to find the “dalvik-cache”. You will find a lot files which end with “dex”. Why do you need to clear this kind of dex files? Dex files will exit gradually after installing apps and games. You can use the RE browser to how much space they take. Is that amazing?

The next step is to click the virtual function keys on the most lower-left corner, Click on the "multi-select mode", then "Select All", click "Delete" button. Then you have to exit the RE browser quickly to power your phone off. Or it will exit system errors.
Check the dex files. Yes, they exit again! But the deleted dex files disappear forever. It can save a lot space by cleaning these useless garbage files.
Go to link Download
Tuesday, August 30, 2016
How to Change QualComm Device IMEI Samsung Without a PC
How to Change QualComm Device IMEI Samsung Without a PC
Disclaimer: Note that changing of IMEI is illegal in some countries, and I will not be held responsible for any consequences that befall the changer.
Remember to write down your original IMEI number and keep it safe. Also, backup your original IMEI incase anything goes wrong, you can easily revert back.
Materials Needed
1. Your device must be rooted
2. Xpose installer, download it here
3. Imei Changer, Play Store Link
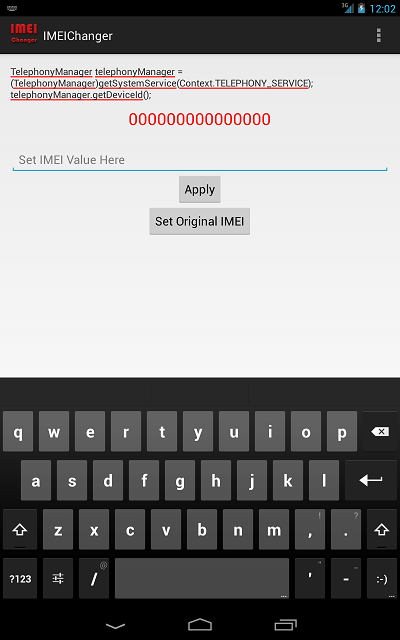
EXPOSED IMEI Changer - see screenshot above...
Now Follow the Steps below Carefully
1. Install Xpose installer and launch it
2. Click on Framework, click on install/update
3. When all is done, reboot your device
4. Install imei changer>>open xpose installer and click on modules, make sure IMEI changer is ticked then click on imei changer to launch the app
5. Generate your blackberry imei with IMEI Generator APK Version and input it in the space provided, then click Apply
6. Reboot your device and dial *#06# to confirm if your imei was successfully changed.
Best of luck.
Dont Forget To Add your View, Comments on this Post.
Always Like and Share Posts, You can Make use of the Share Buttons below.....
Go to link Download