Showing posts with label move. Show all posts
Showing posts with label move. Show all posts
Thursday, November 24, 2016
How to move or rearrange iPhone home screen app icons anywhere without jail breaking
How to move or rearrange iPhone home screen app icons anywhere without jail breaking
Apple’s iOS operating system is bit difficult to customize than Android. Generally, Apple users can arrange applications. But customization can be done without having blank page ore gaps between apps. For further options, it can be possible only through jailbreak.
First of all thanks for Gabriel Whaley, William Stoy and Eric Aragon for developing a fully modify home screen without jailbreak. With the help of their simple web application, any iPhone user can easily adjust home screen layout. This feature supported only from iPhone 5 as well as later released Smartphone’s-except iPad and iPad touch.
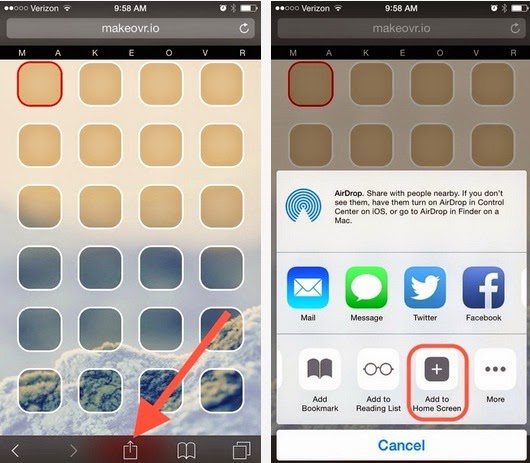
To begin with, access makover.iothrough safari browser in your Smartphone. The website leads with step-by-step method. In which you need to select wallpaper provided by makeover or use own wallpaper.
 |
| Makover web application |
If you don’t want to use makeover wallpaper, apply your own walls and just tap/ hold any app icon’s to edit. Now move any app icon to new blank page and capture a screen shot by pressing (sleep + home buttons).
 |
| iPhone home screen edit mode |
Rearrange app icon’s can be only after uploading screenshot. Now users can create invisible placeholders in-between apps via web application (makeover). Once modifying your own home screen, share your own home screen in social or upload by tapping add to home screen option.
 |
| customized apple home screen |
Also read : how to download YouTube videos directly in iPhone and iPad?
Finally, this is how to rearrange apple app icons with gap in-between. If you don’t like it! Remove placeholders using delete options. Feel free to share this tips on socially and connect with us for more updates on Apple.
Go to link Download

Thursday, October 13, 2016
HOW Move data to a new smartphone using the BlackBerry Desktop Software for Mac
HOW Move data to a new smartphone using the BlackBerry Desktop Software for Mac
Before you begin: Install the most recent version of the BlackBerry® Desktop Software from www.blackberry.com/desktop.
- Connect your current BlackBerry® smartphone to your computer with a USB cable.
- On your computer, in the Applications folder, click the BlackBerry Desktop Software icon.
- On the Device menu, click Switch device.
- If you have a second USB cable, connect your new smarthone to your computer. Otherwise, you can connect your new smartphone in step 7.
- Do any of the following:
- To install updated BlackBerry® Desktop Software on your new smartphone, if available, select the Update software for my new device, if available checkbox.
- To tranfer any third-party applications that are compatible with your new smartphone, select the Copy compatible third-party applications checkbox.
- Click Start.
- If you didnt connect your new smartphone to your computer in step 4, disconnect your previous smartphone and connect your new smartphone. Click OK.
When the summary screen appears, your smartphone data has been imported to your new smartphone.
Go to link Download
Thursday, October 6, 2016
How to Move a Blogger Blog to Your Own Domain
How to Move a Blogger Blog to Your Own Domain
:

What a week this has been for this tech blog! I finally moved it from blogspot subdomain to
a custom domain. I have been wanting to do this since a long time (ever since this blog
started getting some attention) , I somehow couldnt manage to do so because of the fear of losing search traffic. Googles recent move to redirect blogspot.com to country specific sub domains helped me solidify my decision to the extent of finally moving. I made a lot of other changes as well and have listed as much of them as possible as they might help some of you who are also planning to make the move. I have listed them in the order in which I made them.
1) Registered ROYALQUEST.com .
2) Changed my domains settings to hide personal information from being displayed in the
who is database.
3) Modified my domains CNAME and A records to correctly point to Googles servers. Check this page from Blogger for details regarding this step.
4) Generally, it takes some time for your domain registrar to completely update the settings mentioned above. So, if you immediately point your new domain to your blog, users will see a 404 error. To avoid this, I created a new blogspot blog and modified its settings to point to my new domain.
5) When my domain correctly started loading the temporary blog, I modified this blogs settings to link it to the new domain. Now my new domain was correctly loading my blog.
While doing this, I made sure to select redirecting the non www version to the www one.
6) Downloaded my blogs template and opened the downloaded XML file in Wordpad. I then used Wordpads Find and Replace function to replace each occurrence of dannykuzo.blogspot.com with www.royalquest.com and uploaded the modified template. This automatically changed all navigational links to use the new domain.
7) Some widgets still had links pointing to the blogspot subdomain. I changed them manually.
8) Went to Google Webmaster Tools , added my new domain and submitted the full sitemap. Normal Blogger feeds show only 20 URLs, so in order to submit all the URLs, I submitted a custom queried feed that includes 500 URLs. Normal Feed: /atom.xml
Feed I Submitted: /atom.xml?redirect=false&orderby=updated&max-results=500
9) Bing also brings considerable amount of traffic to this blog. So, I added the new domain to Bing Webmaster Tools and submitted the same sitemap.
10) Blogspot uses 301 permanent redirects to redirect visitors to new domains. This should have normally allowed Google to immediately index my new blogs URLs but it did not. So, I resubmitted my old blogs complete sitemap in Google Webmaster Tools. As the Blogspot blog had some authority in Google, GWT quickly processed the sitemap and immediately noticed that all those posts had moved to the new domain. This notified Google to index my content under the new domain and after almost 12 hours, my old blogspot URLs started getting replaced by the new ones.
11) Notified readers of the move on Facebook and Twitter.
12) After making the move, my search traffic is way lower than normal. This should change and traffic should return to normal once search engines completely transfer my Blogspot subdomains trust and authority to this new one.
Some other changes I made
1) Used Feedburners MyBrand feature to transfer my FeedBurner feed to my own sub- domain.
2) Modified my social profiles to link to my new domain.
3) Earlier, my about page and categories on this blog were simple posts that included dates in the URL. This made them look ugly, so I shifted these to independent Pages and canonicalized the old pages to new ones.
Some Noticeable Benefits
It is too early to say this but ever since I moved to my own domain, the subscription rate has gone up considerably. It has also increased the percentage of users who are completing the subscription process.
Go to link Download
Friday, September 2, 2016
How To Move A WordPress Site From LocalHost WAMP to Internet
How To Move A WordPress Site From LocalHost WAMP to Internet
As a web designer/developer, that moment always comes when you have to upload your clients design to the internet, probably to a purchased hosting server so users can access your clients website from the internet. This can be easily done when you designed the webpages in just html (probably + CSS) files, but it could be a little tricky trying to move a website designed using the WordPress CMS on your localhost WAMP server.
Here is a run down on the various stages we are going to go through in order to successfully move our wordpress site or blog to the internet from WAMP.

Changing URL
We need to change the URL of our wordpress site from wordpress dashboard so that after moving our site, it would successfully load when we visit the domain we purchased from the webhost. Follow the below steps to achieve that.
1. Once logged into your wordpress dashboard which is loaded from localhost WAMP server on your PC, click on Setting > General from the left sidebar.

2. On the page that loads up, change the WordPress Address and Site Address you can find to your already purchased domain. In my case, i’m changing http://localhost/pf to http://www.xyz.com . Then Click on Save Changes at the bottom of the page.

After you must have done this, your site would no longer be accessible via the former URL on your PC (Might load up, but not correctly with the theme and other settings). Don’t worry, that’s what we need.
Backing up and Restoring the WordPress Files
Now it’s time to move your site files to your web server, firstly you have to compress your wordpress site into an archive so you could easily upload it to your servers.
3. You should know your way around your WAMP installation folder. I installed my wordpress site in D:wampwwwpf .
Go to your wordpress installation folder, select all files and compress to an archive using 7zip, preferably a .tar file.

Uploading to Server
4. Create an FTP account on your webhost cPanel server and upload the file to the domain directory. If the domain is not an addon domain, you must likely would have to upload the compressed file to public_html directory.
Note: Make sure you delete all files in this directory. Then extract or uncompress your uploaded file here by Right clicking on your upload and click on Extract from cPanel’s File Manager.
- Must Read: How to Create an FTP account on cPanel.
- How To Upload Files to Web Host server via FTP using Filezilla.
Backing Up and Restoring the WordPress Database
Now it’s time to backup your blog’s database. I’m assuming you know the database name you installed your wordpress site to on your pc. Follow the below steps to grab a copy of the database.
5. Visit http://localhost/phpmyadmin on your browser to access phpMyAdmin. Then select the wordpress’ database from the left sidebar.
6. Click on the Export tab, then click on Go to export the database to your pc.

Creating and Importing the Database into your webserver
7. Now log in to your cPanel’s dashboard, create a new MySQL database, User and connect the user to the database.
8. In your web-server’s cPanel, click on phpMyAdmin, and locate the new database you just created from the left sidebar, click on Import, click on browse your computer to select the sql file you backedup earlier, then click on Go at the bottom of the page to initiate the upload process.

9. Here’s what you get after a successful database upload. Now it’s time to link the already uploaded wordpress files to this MySQL database.

Connecting WordPress To New Database
10. Launch File Manager via cPanel, and navigate to the directory where you uploaded your wordpress file earlier (most likely the public_html path if the domain isn’t an addon to your hosting plan).
11. Edit the wp-config.php file and replace the database name, database user and password with the details you created while setting up the fresh database, then save.

Hurray! Load your live domain URL and your website should be live over the internet.
If you find any difficulties in the process, feel free to let me know using the comment section below.
Go to link Download
Subscribe to:
Posts (Atom)