Showing posts with label a. Show all posts
Showing posts with label a. Show all posts
Tuesday, November 29, 2016
How To Make A Number Unavailable To A Particular Person
How To Make A Number Unavailable To A Particular Person

Dial *35*0000* the person number # and send. From then on, the person will not be able to call you with that number. Dial *35*0000# to cancel it.
Note: if you have barred more than one person when you dial *35*0000# it will cancel everybody you barred.
Go to link Download

Monday, November 28, 2016
HOW TO HIDE A FILE OR A DOCUMENT WITHOUT USING ANY APP IN AN ANDROID SMARTPHONE
HOW TO HIDE A FILE OR A DOCUMENT WITHOUT USING ANY APP IN AN ANDROID SMARTPHONE
1. CREATE A FOLDER USING YOUR DEFAULT FILE EXPLORER
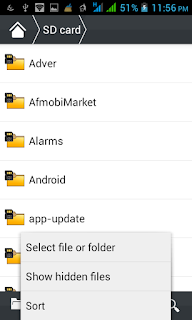
Create a folder with a name youd like, and add "." before other characters along the file name and save.
example
file name is Document, then itd now become .Document
Your smartphone should notify you that the folder will be hidden
2. CLICK OPTION TO HIDE OR UNHIDE THE FOLDER
;
3.COPY THE FILES TO THE FOLDER YOUR CREATED
Copy the files youd want to hide to the folder you created and it will be hidden, take for instance pictures or videos you wouldnt like to be displayed in your gallery once they are moved to this folder you created it wont display there again
4. GO BACK TO STEP THREE IN ORDER NOT TO ALLOW PEOPLE ACCESS THOSE FILES FROM YOUR FILE EXPLORER
THATS ALL!!!!!!!!!!!!!!!!!!
Create a folder with a name youd like, and add "." before other characters along the file name and save.
example
file name is Document, then itd now become .Document
Your smartphone should notify you that the folder will be hidden
2. CLICK OPTION TO HIDE OR UNHIDE THE FOLDER
;
3.COPY THE FILES TO THE FOLDER YOUR CREATED
Copy the files youd want to hide to the folder you created and it will be hidden, take for instance pictures or videos you wouldnt like to be displayed in your gallery once they are moved to this folder you created it wont display there again
4. GO BACK TO STEP THREE IN ORDER NOT TO ALLOW PEOPLE ACCESS THOSE FILES FROM YOUR FILE EXPLORER
THATS ALL!!!!!!!!!!!!!!!!!!
Go to link Download
Sunday, November 27, 2016
How to check whether a game will run on your computer or not
How to check whether a game will run on your computer or not

step 1Visit the website
First you need to visit this site, see the left side that says "Find out if you can run that game on your PC"? click the button underneath it that says "Can YOU run it?"
First you need to visit this site, see the left side that says "Find out if you can run that game on your PC"? click the button underneath it that says "Can YOU run it?"
step 2Test your computer
Now to test your computer for compatibility. From the drop-down list, select the game that you wish to run. After you selected your game, click the "Can you RUN it" button. This will take you to a new page.
Now to test your computer for compatibility. From the drop-down list, select the game that you wish to run. After you selected your game, click the "Can you RUN it" button. This will take you to a new page.
step 3Analyzing data and results
This next page will analyze the data, if you are a Windows Vista user then UAC(User Account Control) will pop up and ask for permission, click yes as this is not harmful. Now your results will appear...It appears that I failed...:(
This next page will analyze the data, if you are a Windows Vista user then UAC(User Account Control) will pop up and ask for permission, click yes as this is not harmful. Now your results will appear...It appears that I failed...:(
step 4Finish
Well now you know how to check to see if you can run your game without having to drive all the way to the Local Generic Superstore near you, buy the game, wait 45 minutes to install it, find out that it wont run, and then run back to the store to return it. So I hope that I helped, and saved you the hassle of the return.
Well now you know how to check to see if you can run your game without having to drive all the way to the Local Generic Superstore near you, buy the game, wait 45 minutes to install it, find out that it wont run, and then run back to the store to return it. So I hope that I helped, and saved you the hassle of the return.
Go to link Download
Saturday, November 26, 2016
How to Integrate a Remote SFTP Directory into Your Windows Explorer
How to Integrate a Remote SFTP Directory into Your Windows Explorer

Why Do I Want to Do This?
Opening up a devoted SFTP customer for the infrequent document exchange isnt a lot of a bother, however in the event that youre as often as possible getting to a remote index for purposes, for example, transferring downpour or NZB records to a watch registry, rolling out continuous improvements to documents on a web server, or generally much of the time bouncing all through the remote area, it can be a genuine agony to continually associate and reconnect the committed customer.
Today, were highlighting that it is so natural to incorporate secure remote access into Windows Explorer so that getting to and exchanging records is as straightforward as opening up My Documents.
What Do I Need?
For this instructional exercise youll require the accompanying things:
A Windows-based PC
A duplicate of Swish (free)
A SFTP record to test your association
A note on our routines: since Windows 2000, Windows has bolstered direct FTP access through Windows Explorer. You can basically sort ftp://username@example.com in any Windows Explorer location bar and afterward connect to your secret word to get to a remote FTP host.
The issue with this setup, however it works easily, is that FTP is intrinsically shaky, and aside from essential document exchanges of openly accessible information (like getting a Linux distro), it ought to be kept away from. Further exacerbating the entire security issue is that Windows has no inherent instrument for setting up a SFTP connection–this is the place Swish comes in.
Introducing and Configuring Swish

The establishment process for Swish is your run of the mill and straight forward establishment. Run the installer, acknowledge the permit understanding, affirm the establishment area, and let it tear.
After the application is introduced, it will show up as though not a mess has happened. With a specific end goal to see the expansion Swish has made to your framework, explore to My Computer. There you will see a section under "Other" for Swish:

Double tap on the passage to go into the Swish system registry. There are two catches not ordinarily found in Explorer "Include SFTP Connection" and "Dispatch key operators". Of essential significance to us it the SFTP association catch; in case youre interfacing with a server that uses open key verification, then again, youll additionally need to know about the "Dispatch key operators" catch as it executes Pageant, a free key specialists application included with Swish.

Snap "Include SFTP Connection" and round out the data for your host:

Snap make, and watch that another passage exists in the Swish catalog:

When you tap on a passage surprisingly youll be incited to support the SSH key for that association:

Click "I believe this key: store and join" and afterward, when incited, enter your secret key. You will just need to enter your watchword once; it will be put away alongside your affirmed SSH key for simple and quick future access to your remote registry.
In the wake of endorsing the key and entering your secret word, youre ready to go:
You now have appropriate and incorporated access to your remote SFTP index from inside of Windows Explorer. You can open documents, duplicate records, and generally work with your remote records as though they were nearby to your machine.
Have a cool Explorer reconciliation tip to share, SFTP related or generally? Join the discussion beneath to share your ti
Go to link Download
Friday, November 25, 2016
How to Add a PIN to Your Windows 10 Account
How to Add a PIN to Your Windows 10 Account
 |
| Windows 10 Pin |
You can enter a numeric PIN, or follow an example of motions on a photo, or with fitting equipment you can even utilize Windows Hello — a biometric sign-in system that sweeps your unique mark, your face, or your iris. In this article, well demonstrate to you proper methodologies to add a PIN to your record in Windows 10.
Why Using a PIN is a Better Option
On the off chance that a secret word is bargained somehow, the individual who has entered the framework may have entry to all stages that are connected to that watchword. Then again, if a PIN is traded off, they can utilize it just on that gadget; they cant utilize it to sign into your record on some other gadget.
Likewise, the individual must be physically present so as to enter the PIN, and this is not the same with a secret key. On the off chance that somebody takes your PC they cant sign in unless they know your PIN. Likewise, remember that the PIN login highlight is fundamental on the off chance that you need to exploit extra security highlights accessible in Windows 10, for example, Windows Hello, the iris peruser, or a unique finger impression scanner.
Furthermore, obviously, a PIN is much less demanding to enter on a touchscreen gadget like the Surface tablet.
Add a PIN to Your Account
Open the "Settings" application, and snap/tap on the "Records" symbol. Snap/tap on "Sign-in choices" on the left side, and snap/tap on the "Include" catch under "PIN" on the right side.

On the off chance that incited to check your record secret key, enter your neighborhood account watchword and snap/tap on "alright".

On the off chance that you have a Microsoft account, then enter your Microsoft account secret key and snap/tap on "Sign in". Subsequent to entering your secret key to affirm your character, enter the numbers in a dialog box. The base length is four digits (0–9 just; no letters or exceptional characters permitted), yet your PIN can be the length of you need. On the off chance that you have to check what youve set as of right now then select the symbol to the right half of the dialog box. This will quickly uncover the number youve entered.
The main criteria for picking a PIN is that it must be no less than four digits in length. There are no impediments on most extreme length or intricacy. Here are a few contemplations before you pick a PIN:
Utilizing more digits will make the PIN harder to figure yet ensure you can enter the PIN rapidly and precisely, generally theres little advantage over simply utilizing a secret key.
Utilizing a straightforward PIN (0000, 0123, 1111, etc) will make it simple to figure; pick arbitrary numbers.
Reusing PINs from your ledgers or charge card number ought to be maintained a strategic distance from. Likewise, abstain from utilizing the same PIN on distinctive gadgets.
Change the PIN for Your Account
Open the "Settings" application, and snap/tap on the "Records" symbol. Snap/tap on "Sign-in choices" on the left side, and snap/tap on the "Change" catch under "PIN" on the right side.

Enter your present PIN at the top, enter another PIN and snap/tap "alright".
In the event that you cant sign into Windows 10 with your PIN, youll be offered a connection that says "Sign-in choices." When you pick that, youre offered the greater part of the sign-in alternatives youve made in this way: picture watchword, PIN, Windows Hello, and consistent secret word.
Reset the PIN for Your Account
Open the "Settings" application, and snap/tap on the "Records" symbol. Snap/tap on "Sign-in alternatives" on the left side, and snap/tap on the "I overlooked my PIN" join under "PIN" on the right side.
Confirm your record watchword, and continue setting up another PIN. Keep in mind, in the event that you boot to Safe mode, youll have the capacity to sign in with your watchword, and not with some other sign-in choices. Closing this article, its very simple to setup a PIN and on the off chance that youve not yet empowered it on your gadget, do it
Go to link Download
Wednesday, November 23, 2016
how do a blog quickly indexed by google
how do a blog quickly indexed by google
The Verification steps to Google for a blog quickly indexed by google, are as follows :
Add your URL to Google
visit http://www.google.com/addurl/
Then fill the form provided :
Then fill the form provided :
Url column > Fill in the URL of your blog.
Comments > Fill in the keywords related to your blog
Caphca box > Fill an empty box with a letter of verification are available.
Click the button Add URL.
Done.
Adding and Verification Blog to Google Webmaster Tools
The most fundamental of the google webmaster tools is adding blogs and verification. The advantage is, your article will be quickly indexed by Google. to Add and Verify your blog to Google Webmaster Tools, please follow the steps below:
1. visit the Google Webmaster Tools.
2. Login with your account.
3. Click Add Site.
4. Enter the URL of your blog, Example: http://lingua-mysite.blogspot.com/
5. Click Continue.
6. Verify ownership, click Add a meta tag to your sites home page.
7. Copy the meta tag to your home page.
Comments > Fill in the keywords related to your blog
Caphca box > Fill an empty box with a letter of verification are available.
Click the button Add URL.
Done.
Adding and Verification Blog to Google Webmaster Tools
The most fundamental of the google webmaster tools is adding blogs and verification. The advantage is, your article will be quickly indexed by Google. to Add and Verify your blog to Google Webmaster Tools, please follow the steps below:
1. visit the Google Webmaster Tools.
2. Login with your account.
3. Click Add Site.
4. Enter the URL of your blog, Example: http://lingua-mysite.blogspot.com/
5. Click Continue.
6. Verify ownership, click Add a meta tag to your sites home page.
7. Copy the meta tag to your home page.
- Login to your Blogger
- click Design
- click Edit HTML.
- Place the meta tag code that you get, under the code < head > , then
9. Return to webmaster tools page Verify ownership.
10. Click Verify.
11. Done ... and now you can start to optimize your blog with Google Webmaster Tools.
Next step that you have to do,please Submit your blog to Google Sitemap.
11. Done ... and now you can start to optimize your blog with Google Webmaster Tools.
Next step that you have to do,please Submit your blog to Google Sitemap.
Go to link Download
Sunday, November 20, 2016
How To Install Android APK Files On A Kindle Fire Tablet
How To Install Android APK Files On A Kindle Fire Tablet
Have you been looking to install APK files on Kindle Fire? That’s not an issue that’s peculiar to you, alot other persons have found themselves in similar situation.
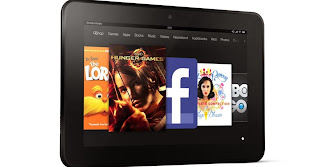
Here are easy steps to install APK files on Kindle Fire. The entire process should work like a charm for you, if you adhere strictly to the steps listed below.
Install APK File On Kindle Fire – Best Approach
- Locate Apps on Your Kindle Fire
- Access Settings >Applications
- Select Apps From Unknown Sources
- Download APK file of your choice from your Kindle Fire web browser [You can also transfer APK files from PC to Kindle Fire]
- After Downloading, SimplyInstall the APK file
Hint: The Install APK File can be found in Apps > Device
Warning: Ensure you download APK files from trusted vendors. Installing a malicious APK file can corrupt your Kindle Fire.
Hope this info helps? Feel free to share this post with your friends using the Share/Like buttons. Never miss any of my future post CLICK HERE TO SUBSCRIBE Once entered, you will have to check your inbox for a confirmation email containing a confirmation link. Once you VERIFY your email by clicking on the confirmation link in the message, you will never miss any future articles.Dont Forget To Add your View, Comments on this Post.
Always Like and Share Posts, You can Make use of the Share Buttons below.....
Go to link Download
Friday, November 18, 2016
How to Change and Create a Android Logo In accordance in your own style with Androidify
How to Change and Create a Android Logo In accordance in your own style with Androidify
How to Change and Create a Android Logo In accordance in your own style with Androidify - Whats Androidify - Androidify is made google android applications that can make your avatar with andaroid logo, or in other words able to make the android logo in accordance with its own character. So far we know the logo android as a robot in green and shaped rigid, android logo google himself calls it by the name "andy". Then how about if we contumisasi the android logo in accordance with our wishes. add a variety of knick-knacks, and accessories in accordance with the latest fashion styles. Interesting is not it? see the image below.
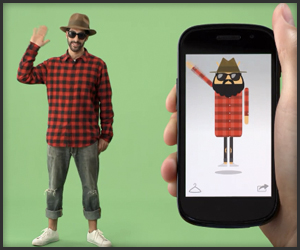
Androidify create our own android logo according to the character and fashion we
What can be done with Androidify
With Androidify we can change the android logo as we want, we can add the hair, adding to the variety Eksen fashion clothes and accessories, add glass eyes, adding pants, adding shoes, add hats, mustaches, jangut, and all things that smell fashion Style . Be logo android models themselves.
How to make own android with Androidify logo
I use it quite easy you just need to install this free app via google android play store open and make your hearts content. there is no limit we can tamper add modifiers themselves according to their own desires then we can also membagikanna our edits to various social networks such as google plus, facebook, twitter or email.
below is a screenshot application androidify

Features the latest androidify
• Currently available almost all fashion accessories that can be customized to the android logo, with the word lai we can it about with android logo at will
• make available tutorials android logo with androidify
• share feature to various social networks such as Google Plus, twitter, and facebook
Download Androidify Android apk
Official android application created by Google Inc. and is available free for download via google play for free. Androidify latest version is 1.1.3. Cdengan apk 2.1Mdan sizes can be installed for both katas android 2.1 OS smartphone / android phone and android tablet
Download Androidify Android apk app via google play store or click here
Androidify create our own android logo according to the character and fashion we
What can be done with Androidify
With Androidify we can change the android logo as we want, we can add the hair, adding to the variety Eksen fashion clothes and accessories, add glass eyes, adding pants, adding shoes, add hats, mustaches, jangut, and all things that smell fashion Style . Be logo android models themselves.
How to make own android with Androidify logo
I use it quite easy you just need to install this free app via google android play store open and make your hearts content. there is no limit we can tamper add modifiers themselves according to their own desires then we can also membagikanna our edits to various social networks such as google plus, facebook, twitter or email.
below is a screenshot application androidify
Features the latest androidify
• Currently available almost all fashion accessories that can be customized to the android logo, with the word lai we can it about with android logo at will
• make available tutorials android logo with androidify
• share feature to various social networks such as Google Plus, twitter, and facebook
Download Androidify Android apk
Official android application created by Google Inc. and is available free for download via google play for free. Androidify latest version is 1.1.3. Cdengan apk 2.1Mdan sizes can be installed for both katas android 2.1 OS smartphone / android phone and android tablet
Download Androidify Android apk app via google play store or click here
Go to link Download
How to Add a Shutdown Button to Windows 8 Start Screen
How to Add a Shutdown Button to Windows 8 Start Screen
Basically windows 8 is a new windows with new features. most people that are new to windows find it hard to shutdown saying they do not know where the shutdown buttons is!In todays tutorial, we will be showing you how to add shutdown buttons to windows 8 start screen

THATS ALL...
How to Add a Shutdown Button to Windows 8 Start Screen
(1) First of all launch Notepad. This can be done by pressing Win Key+R which will call up the run dialogue box and then type notepad and hit enter. Or you can even search for notepad from the start screen and then launch it.
- See more at: http://www.alltechbuzz.net/2012/12/add-shutdown-reboot-buttons-windows-8.html#sthash.6JgoeaUg.dpuf
- See more at: http://www.alltechbuzz.net/2012/12/add-shutdown-reboot-buttons-windows-8.html#sthash.6JgoeaUg.dpuf
1. First of all launch Notepad. This can be done by pressing Win Key+W. then click on Apps and then type NOTEPAD in the search box
2. Then copy and paste the below given text to notepad.
set WshShell = WScript.CreateObject("WScript.Shell")
strStartMenu = WshShell.SpecialFolders("StartMenu")
set oShellLink = WshShell.CreateShortcut(strStartMenu & "Shutdown.lnk")
oShellLink.TargetPath = "%systemroot%System32shutdown.exe"
oShellLink.Arguments = "-s -t 0"
oShellLink.WindowStyle = 1
oShellLink.IconLocation = "%systemroot%System32shell32.dll,27"
oShellLink.Description = "Shutdown Computer (Power Off)"
oShellLink.WorkingDirectory = "%systemroot%System32"
oShellLink.Save
Set oShellLink = Nothing
set oShellLink = WshShell.CreateShortcut(strStartMenu & "Log Off.lnk")
oShellLink.TargetPath = "%systemroot%System32shutdown.exe"
oShellLink.Arguments = "-l"
oShellLink.WindowStyle = 1
oShellLink.IconLocation = "%systemroot%System32shell32.dll,44"
oShellLink.Description = "Log Off (Switch User)"
oShellLink.WorkingDirectory = "%systemroot%System32"
oShellLink.Save
Set oShellLink = Nothing
set oShellLink = WshShell.CreateShortcut(strStartMenu & "Restart.lnk")
oShellLink.TargetPath = "%systemroot%System32shutdown.exe"
oShellLink.Arguments = "-r -t 0"
oShellLink.WindowStyle = 1
oShellLink.IconLocation = "%systemroot%System32shell32.dll,176"
oShellLink.Description = "Restart Computer (Reboot)"
oShellLink.WorkingDirectory = "%systemroot%System32"
oShellLink.Save
Set oShellLink = Nothing
Wscript.Echo "Created Shutdown, Restart and Log Off buttons"
(3) Now click on the Save As option in the File menu and in the File name enter Shutdown.vbs Dont forget to enter .vbs
(4) Next in the file type, select All files and click on the Save option.
(5) Then switch to the location where you saved the file and run the file once. The file will open for a second and then will automatically disappear.
(6) Now switch to the Start Screen and Voilla. You will see that the Tiles of Shutdown, Restart and Log Off have been automatically pinned there and now with one click you can Shutdown or restart your system.
set WshShell = WScript.CreateObject("WScript.Shell")
strStartMenu = WshShell.SpecialFolders("StartMenu")
set oShellLink = WshShell.CreateShortcut(strStartMenu & "Shutdown.lnk")
oShellLink.TargetPath = "%systemroot%System32shutdown.exe"
oShellLink.Arguments = "-s -t 0"
oShellLink.WindowStyle = 1
oShellLink.IconLocation = "%systemroot%System32shell32.dll,27"
oShellLink.Description = "Shutdown Computer (Power Off)"
oShellLink.WorkingDirectory = "%systemroot%System32"
oShellLink.Save
Set oShellLink = Nothing
set oShellLink = WshShell.CreateShortcut(strStartMenu & "Log Off.lnk")
oShellLink.TargetPath = "%systemroot%System32shutdown.exe"
oShellLink.Arguments = "-l"
oShellLink.WindowStyle = 1
oShellLink.IconLocation = "%systemroot%System32shell32.dll,44"
oShellLink.Description = "Log Off (Switch User)"
oShellLink.WorkingDirectory = "%systemroot%System32"
oShellLink.Save
Set oShellLink = Nothing
set oShellLink = WshShell.CreateShortcut(strStartMenu & "Restart.lnk")
oShellLink.TargetPath = "%systemroot%System32shutdown.exe"
oShellLink.Arguments = "-r -t 0"
oShellLink.WindowStyle = 1
oShellLink.IconLocation = "%systemroot%System32shell32.dll,176"
oShellLink.Description = "Restart Computer (Reboot)"
oShellLink.WorkingDirectory = "%systemroot%System32"
oShellLink.Save
Set oShellLink = Nothing
Wscript.Echo "Created Shutdown, Restart and Log Off buttons"
(3) Now click on the Save As option in the File menu and in the File name enter Shutdown.vbs Dont forget to enter .vbs
(4) Next in the file type, select All files and click on the Save option.
(5) Then switch to the location where you saved the file and run the file once. The file will open for a second and then will automatically disappear.
(6) Now switch to the Start Screen and Voilla. You will see that the Tiles of Shutdown, Restart and Log Off have been automatically pinned there and now with one click you can Shutdown or restart your system.
THATS ALL...
Then copy and paste the below given text to notepad. - See more at: http://www.alltechbuzz.net/2012/12/add-shutdown-reboot-buttons-windows-8.html#sthash.6JgoeaUg.dpu
Go to link Download
Tuesday, November 15, 2016
How to set up Outlook to wirelessly synchronize your contacts and calendar with a BlackBerry Z10
How to set up Outlook to wirelessly synchronize your contacts and calendar with a BlackBerry Z10
Before we begin, a very important note! Please ensure you perform a backup of your Outlook data using Microsoft Outlook and your BlackBerry Z10 smartphone using BlackBerry Link before proceeding.
Do you have a Microsoft account?
If you already have an account with Outlook.com, Hotmail or Windows Live, skip to the next step or optionally create a new account.
For those that don’t have a Microsoft account and use a different email provider in Outlook on your computer that does not support wireless synchronization of your contacts and calendar, register for a new Outlook.com account (or Hotmail or Windows Live if desired).
Tip: Within this post you’ll see me use the term PIM which represents your contacts and calendar
Download and install the Microsoft Outlook Connector
Provided you have a Microsoft account and Outlook installed on your computer, the next step is installing the Microsoft Outlook Hotmail Connector (this tool supports Outlook.com and Live accounts as well). Depending on which version of Microsoft Office you are using, the 32-bit or 64-bit edition, click one of the following links and follow the instructions to download and install the Outlook Hotmail Connector on your computer. If you aren’t sure which version of Microsoft Outlook you are using, try the 32-bit version first.
- Outlook Hotmail Connector (32-bit)
- Outlook Hotmail Connector (64-bit)
After installing the connector software, follow the steps below to add your account to Outlook 2010. If you are using Outlook 2007 or 2003, the steps are similar but if you need additional assistance on adding a new account, search the Outlook help file.
- Open Outlook 2010
- If a dialog appears stating “Would you like to add a Hotmail account” click Yes. If not, skip to next step.
- Enter your name, email address and password
- Optionally name the account by clicking Advanced and entering a name
- Click Ok
- If you do not get prompted to add a new account, click File followed by +Add Account
- Ensure E-mail Account is selected and enter your name, email address and password
- Click Next followed by Finish
Since you have added the new account to Outlook, you’ll notice that two accounts appear now when viewing your email, contacts and calendar. Since Outlook makes it easy to manage multiple accounts, the next step is copying your existing contacts and calendar data that is stored in Outlook on your computer, to the new account equivalents that appear within Outlook.
After doing this, your contacts and calendar will synchronize automatically with your Microsoft account and the only change you need you to make is use these new equivalents in Outlook going forward when you are on your computer.
If you need help copying your contacts or calendar data, review the Outlook Help file (press F1 on your keyboard to access it) as well as some of the tips I’ve listed below.
- Contacts – Switch your local Contacts view to List and use the Select All option (Keyboard shortcut: CTRL + A) followed by copying and pasting the Contacts entry to your new Outlook.com, Hotmail or Live account
- Calendar – Repeat the same steps using the List view
Go to link Download
Monday, November 14, 2016
How To Make Money online With A Blog
How To Make Money online With A Blog
In 2 years I went from not knowing what a blog was to making more money blogging than my day job.
The purpose of this article is to show you how to make money online with a blog. I suspect most people won’t stick with it long enough to make a full-time income, but even making an extra few hundred dollars a month isnt too bad either

This article is extremely long, but I wanted it to be a thorough and helpful resource for those wanting to start a blog or make some more money from the one they already have.
I should also mention that I really haven’t written about blogging or making money from blogs on just4bloggers yet, because I wanted to make sure that it was a viable option for making some cash. Now that I have found that it is, I decided to pour out everything I learned the last two years about it…
How it all started for me
About 2 years ago I was talking to a friend of mine about the idea of building websites full of free information to help people. After brainstorming a bit, I got a couple ideas of topics that I was passionate about: Proverbs and Personal Finance.
My first idea was to post a Proverb each day and comment on it. As I explained my idea further to him, he informed me that I would basically have a blog. I didn’t know what a blog was, but I thought, “oh, ok, sure.”
So, over the next few weeks I read as much as I could find about blogging and ultimately decided on creating a blog about Personal Finance from a Christian perspective. I had been very interested
in helping people with their money, so blogging seemed like a great way to reach people all over the world.
Over the next couple months, I started writing articles and officially launched just4bloggers in June of 2007. At this point I had thought about making money from the site, but had no idea how and honestly didn’t really think it was possible to make a living at it. I threw up an Adsense ad just to see what would happen and I still remember how excited I was when I saw that I had made my first 7 cents!
From there, I set a goal to make $100 by the end of 2007 which was pretty easy to accomplish – even without knowing anything. I should also mention that from June 2007 to June 2008 I spent about 4-6 hours each weekend writing articles and averaged about 4 new articles each week. And I spent a few more hours each week on site maintenance, emails, social media, etc. So in total I probably was spending about 10 hours each week working on the site.
Getting laid off
In July 2008 things got interesting. The large brokerage firm that I had worked 5 years for was bought out by a larger firm. I was told that my department would no longer be needed, so they handed me a severance check and I was on my way. By this point I was making some money from the blog, but not enough to even pay the rent each month.
After much prayer I decided against looking for another “day job” and decided to work full time on building the blog. Thankfully we had paid off most of our debt, and had my wife’s income as a support to buy us some time. I figured I would give it a shot for a few months and if it didn’t work out I would find another 9-5. From that point, the income generated from this website has increased each month and in February 2009 it exceeded my monthly income from my old day job.
I am still a little bit in awe and can’t believe that I am actually paying the bills from this website!. But, I thank God everyday that I get to do this – I really did not like working in Corporate America and am so thankful! It is hard work, but it doesn’t really seem like it when you are doing something that you are passionate about and love doing it.
Blogging basics
I am going to try to boil this down to the essentials. There are whole books written on this subject, so I am not going to try to cover everything here. If you are looking for a good book about blogging for beginners, I suggest reading Darren Rowse’s “31 Days To A Better Blog” . But for a quick, bottom-line version keep reading…
What is a blog?

Is it easy to start a blog?
It is very easy. Even if there are steps along the way that are confusing, there are plenty of resources to get the help you need. There are over 20 million blogs in existence, so it can’t be that difficult.
How much does it cost to blog?
There are many services that allow you to start a blog for free (see below). I suggest using one of the free services to get a basic feel for blogging and “get your feet wet.” Once you decide you want to stick with it and that you want to make money with your blog, I suggest moving up to a self-hosted blog (see below). Anyone who is really trying to make money with a blog will probably be more successful with a self-hosted blog. Getting a self-hosted blog may not be free, but still can be VERY inexpensive. You will need to pay for nothing more than a domain name ($10) and web-hosting (as cheap as a few bucks a month).
Getting a blogging platform
All 4 of the options listed are free. The first 3 options are the easiest, but the are also limited on features. If you are just trying to make an extra few hundred dollars from your blog, these options could work. But if you are really serious about trying to make good money from your blog, I recommend self-hosting your blog (which we talk about in the next section…).
Tumblr.com – This is probably the simplest blogging platform to use, but it also is the probably the least customizeable. So, it might be something good to start with, but it would be more difficult to build an income-generating website with it.
Blogger.com – Blogger is also very good, easy to set up, owned by Google, you can customize the theme, and the domain name includes “.blogspot.com” (in some people’s opinion a little less professional). Blogger continues to become more customizeable and currently has a lot more options than they did a few years ago.
WordPress.com – I like wordpress.com they are completely free, easy to set up, you can customize the theme, but other customizations are limited, domain name includes “.wordpress.com”.
WordPress.org – Wait, what is the difference between wordpress.com and wordpress.org? To put it simply WordPress.com is where you will go to set up a basic, easy blog with limited features. WordPress.org is where you will go to get a self-hosted wordpress blog. If you get to the point where you are serious about blogging and really want to make some money with it, you need to self-host your blog. Now I should mention that you don’t actually ever have to visit wordpress.org, if you use Hostgator as your host, they will be able to help you install wordpress on your selfhosted blog. Just follow the steps here.
How to setup a self-hosted blog
If you are going to be using one of the first three options above, you can skip this section.
If you are serious about blogging and are looking for the best way to customize your blog’s look and other features, then getting a self-hosted blog from WordPress.org is probably the best way to go. It is currently the top choice for most bloggers. It does require more work up front and does have small costs associated with it: buying a domain name ($10/year) and hosting your blog ($10/month).
One of the big advantages is that you can use your own domain name (i.e. yourblog.com). While this might not seem like a big deal, it is a lot easier for people to remember yourblog.com rather than yourblog.blogspot.com which is what you will be given if you use Blogger.
I will warn you, being a non-techie myself, this took me some time figuring out how to get my self-hosted site set up. WordPress.org has a great step-by-step guide for getting you set up. While it is more work on the front end, I am really glad I got good advice and did this at the beginning, than having to do it now.
Pick a Domain Name

2. Once you get it picked out, you need to find somewhere to purchase it. I bought my first few domains at GoDaddy.com  and have bought the remaining ones from my hosting companies. While GoDaddy is about one of the biggest names out there, I can’t say that I recommend them because of some of their advertising campaigns that they run. I now recommend just buying the domain and hosting from Hostgator as it will make the whole process simpler. But if you already have a host, then Namecheap is a good and cheap way to buy a domain.
and have bought the remaining ones from my hosting companies. While GoDaddy is about one of the biggest names out there, I can’t say that I recommend them because of some of their advertising campaigns that they run. I now recommend just buying the domain and hosting from Hostgator as it will make the whole process simpler. But if you already have a host, then Namecheap is a good and cheap way to buy a domain.Pick a host for your blog
The webhost is the company that you pay to store all of your files for your blog. There are also a million web hosting companies out there. I don’t suggest just looking for the cheapest one, because a lot of these companies are not very reliable and your site might be down quite a bit. I like to go with the bigger companies who have a longer track record and are more established.
They may cost a dollar or two more a month when you are starting out and it is well worth it. I have hosted my websites withDreamhost from the beginning, mostly because I knew a lot of people using them and I got a hosting package for about $7.00 a month.
I still host most of my websites at Dreamhost, but have moved this site to MediaTemple. The main reason was that since my livelihood now depended on the website I wanted a higher level of service from my hosting company. MediaTemple has been great in that regard, but as always it comes with a price. I am currently paying $150 a month for hosting with them.
 How I make money with this blog
When I go to family functions or social events I often get a blank stare when I explain what I do for a living. I think people understand the part that I write articles and put them on a website, but when it comes to making money from it, they don’t get it. In this section I will lay it out and hopefully it will help bring some clarity…
CPC Ad Networks
There are a few different ad networks that I use on CPF. The most successful one has been Google’s Adsense program . Basically what they do is read the article that I write and find ads that are relevant to it and display them next to the article. The great thing about it is that by having extremely relevant ads, it actually can be quite beneficial to the readers as well.
For example, if I write an article explaining what an IRA was, but didn’t mention where you could open one, Adsense would likely be displaying ads of places to open an IRA. So as a reader, if I read that article and decided that I did want to open an IRA, the ads would be providing options that the article did not. I am currently doing a few tests with another CPC network called Chitika. Apparently, you can use it in conjunction with Adsense. The jury is still out, but I am interested to see how it compares to Adsense. All things considered, I have found that if optimized correctly, Adsense really can work well. I will explain more about how to optimize it in sections below.
CPM Ad Networks
While Adsense pays on a click basis (CPC), I use other ad networks that pay by the total # of impressions (CPM). At the beginning, these networks didn’t produce much income, but as the traffic grows CPM networks seem to work well in conjunction with Adsense. I use (or have used) ContextWeb , AdClickMedia, Adbrite , Adify , BuzzLogic , and Casale Media . Each has their own strengths and weaknesses and may be suitable for one kind of a site and not another.
Affiliate Product Sales
Basically an example of an affiliate sale would be if you sold lawn mowers and I referred a customer to you, if they purchased you would pay me back a % of the sale for referring them. There are a million options for this on the internet now. The main programs I use are
- Amazon’s Affiliate program
- FlexOffers
- Commission Junction
- Shareasale
- E-Junkie
- LinkShare
Direct Ad Sales
I also sell ad space directly to advertisers. This hasn’t provided much income for me yet and may or may not even be worth my time. I know that in certain niche markets direct ad sales can work out very well, but thus far it hasn’t been a big money maker on CPF.
Warnings for those starting out…
Don’t quit your day-job
Even if you know a lot about making money with a blog (which just be reading this article, you have a tremendous advantage over me when I started) it is going to take a while. This is not a get-rich-quick scheme But Get Rich Sure !, it is more of a work-for-free-for-a-long-time-and-then-reap-your-reward type plan. The beautiful thing is that I can now say that it does work if you are diligent and open to learning from your mistakes. But either way, convention wisdom says, build your blog part-time and when you start making more from it than your day-job consider making it a full-time deal. My situation is a unique one and I don’t recommend doing what I did unless it really is God calling you to do so. In my case I am now thankful that I got laid off – if I hadn’t I would probably still be doing a job I didn’t like!
Learn everything you can
One of the advantages I have is that I love to learn and don’t stop when I make a mistake. I work really hard to learn from my mistakes and figure out what the better course of action would be for the next time. You are going to do things wrong, but you just have to keep going and keep learning. Learning how to use Google search is very important. If you do, you will be able to find an answer to just about every problem you encounter on the web.
Avoid time-wasters
Checking your stats every hour, reading 500 blogs in your RSS, playing on Facebook , Twitter , Stumbleupon , or Youtube all day will kill your productivity. Focus on what yields results and stay disciplined to stick with that. Social media is an important part of building traffic, but you have to keep it in check.
Have fun
While I wrote this article as a guide to help those who want to make money with a blog, I understand that many people don’t really care about that. Either way, life is too short not to be enjoying it. So whether you want to be a full-time blogger or just communicate with friends – have fun!!
Did you like this article?
Many people have told me that I am “giving away too much for free” with this article. That was my intention. I have had some success making money blogging and want to help others do the same. I just figured that by creating a great and free resource a lot of links would follow – and they have. Some people ask me how they can repay me – which is not necessary -but for those wanting to show their appreciation, I just say linking to the article from their blog is the best compensation I could receive. Thanks for reading
Go to link Download
How To Create a Blog on Blogger For Testing Templates and Codes
How To Create a Blog on Blogger For Testing Templates and Codes
recommend you create a blog on Blogger for testing templates and codes before making changes to your live blogspot blog. By doing this, you wont mess up with your blog by uploading a corrupt template. I always use test blogs when testing templates, scripts and other hacks before implementing the changes on my blog.
Since text blogs are used only for experimental reasons, I set them up in a way different from the way I set up my main blogs. First of all, I ensure that they are not listed in public listing of blogger, not visible to search engines; not appear in my Google+ or blogger profile page. Atimes, I also set them up in a way that no one else can view it except me.
Luckily, Blogger allows us to set up any number of blogs for FREE and also makes it easy to create a Blog on Blogger with the settings highlighted above.
How To Get Started
==> Go to www.blogger.com and sign in with your Google account details.
Since text blogs are used only for experimental reasons, I set them up in a way different from the way I set up my main blogs. First of all, I ensure that they are not listed in public listing of blogger, not visible to search engines; not appear in my Google+ or blogger profile page. Atimes, I also set them up in a way that no one else can view it except me.
Luckily, Blogger allows us to set up any number of blogs for FREE and also makes it easy to create a Blog on Blogger with the settings highlighted above.
How To Get Started
==> Go to www.blogger.com and sign in with your Google account details.

==> Choose a name for your test blog e.g My Test Blog 1
==> Next you will need to choose your blog address (something.blogspot.com). Try to use an address which is unlikely to be used by other Bloggers
==> Choose one of the default templates and create your blog.
The next screen invites you to make your first post. This is actually quite important as having a few posts in your test blog will be of great benefit in seeing how your experiments will work when you try them out.
I recommend you change a few settings as explained below, before adding posts to your test blog.
1. Go to Settings tab.
2. Go to Basic sub-tab.
3. Add description for the test blog eg a test blog for testing templates and scripts.
4. Via "Privacy", Set No for Add your blog to our listings? option and also Set No for Let search engines find your blog? option as seen in the screenshot below:

After configuring these settings, neither your test blog will be indexed by search engines, nor it will be displayed in public search listings of blogger blogs.
How To Restrict Readers From Viewing the Test Blog
1. Go to Settings tab.
2. Go to Basic sub-tab.
2. Scroll down to Permissions.
3. In Blog Readers section, select the "Private - Only blog authors" option.

After configuring this option, no one can view your blog except you.
Disconnecting Test Blog From Google+ Profile
If youve linked your Google+ profile with your Blogger account, you can follow the steps below to disconnect your test blog from auto-sharing the posts on your test blog on Google+ :
==> Go to Google+ tab of your test blog
==> Scroll down and click on "Disable Google+ Link"

If youre still using Blogger Profile instead of Google+ profile, go to your dashboard, click "edit profile", select blogs to display and uncheck your test blog from the listing.
So, How Do I Add Posts To My Test Blog?
For posts in your first test blog, you can copy some individual posts (eg 10 posts) from your main blog making sure each post has at least an image in it. Also ensure you add at least one label to each post. The images and labels will be useful when testing templates with featured images and label widgets.
When creating more test blogs, you can simply import posts from your first test blog to the new test blogs.
You can also easily generate a paragraph or two of dummy text using the Lorem Ipsum generatorbut ensure you add images and labels to the posts.
Now you can use your test blog for whatever experiments you choose! You can upload your existing template to test new modifications, try out your scripts or codes, or even try a new Blogger template youve downloaded somewhere!
When you have finished using your test blog, you can easily delete it by going to Settings >Other and choosing the "Delete blog" option. Once you do this, the blog will be deleted forever. Also the blog url will be released and available for others to use instead.
Do you use test blogs ? If not, how do you manage the modifications done on your Blogger blog?
Go to link Download
Subscribe to:
Posts (Atom)