Showing posts with label without. Show all posts
Showing posts with label without. Show all posts
Monday, November 28, 2016
HOW TO HIDE A FILE OR A DOCUMENT WITHOUT USING ANY APP IN AN ANDROID SMARTPHONE
HOW TO HIDE A FILE OR A DOCUMENT WITHOUT USING ANY APP IN AN ANDROID SMARTPHONE
1. CREATE A FOLDER USING YOUR DEFAULT FILE EXPLORER
Create a folder with a name youd like, and add "." before other characters along the file name and save.
example
file name is Document, then itd now become .Document
Your smartphone should notify you that the folder will be hidden
2. CLICK OPTION TO HIDE OR UNHIDE THE FOLDER
;
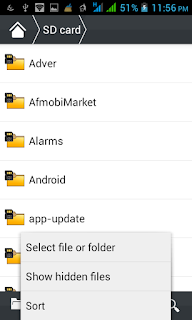
3.COPY THE FILES TO THE FOLDER YOUR CREATED
Copy the files youd want to hide to the folder you created and it will be hidden, take for instance pictures or videos you wouldnt like to be displayed in your gallery once they are moved to this folder you created it wont display there again
4. GO BACK TO STEP THREE IN ORDER NOT TO ALLOW PEOPLE ACCESS THOSE FILES FROM YOUR FILE EXPLORER
THATS ALL!!!!!!!!!!!!!!!!!!
Create a folder with a name youd like, and add "." before other characters along the file name and save.
example
file name is Document, then itd now become .Document
Your smartphone should notify you that the folder will be hidden
2. CLICK OPTION TO HIDE OR UNHIDE THE FOLDER
;
3.COPY THE FILES TO THE FOLDER YOUR CREATED
Copy the files youd want to hide to the folder you created and it will be hidden, take for instance pictures or videos you wouldnt like to be displayed in your gallery once they are moved to this folder you created it wont display there again
4. GO BACK TO STEP THREE IN ORDER NOT TO ALLOW PEOPLE ACCESS THOSE FILES FROM YOUR FILE EXPLORER
THATS ALL!!!!!!!!!!!!!!!!!!
Go to link Download

Sunday, November 27, 2016
How to bypass android lock screen without root
How to bypass android lock screen without root
Android has become one of the most commonly used OS which everyone is using. The Android OS is provided by Google and recently, there was an article which gave details on how to bypass android pattern. But it had a lot of limitation and lead to formatting the entire data of the user. and Its easy to forget your smartphone lock screen pattern or PIN code. Fortunately, Android provides a simple method to bypass the lock screen and get back in. Heres what to do when youve forgotten the lock screen pattern or PIN number on your Android device.
There are several different ways to hack a locked Android smartphone or tablet, but unfortunately, theres not a one-size-fits-all method. So below, Ill go over 5 of the most effective methods, and hopefully one will help you get back into your device.
If your device is running Android 4.4 KitKat (or anything before Lollipop) the method for retrieving your forgotten password or PIN number is relatively simple.
If you enter the incorrect PIN, pattern or password five times, you will receive a “too many attempts” message on your display. From here, you will be prompted to enter the email address and password tied to your Google account to bypass the security screen.
Bypassing the lock screen on Android Lollipop is more tricky, particularly if you wish to keep the data on your phone. Here are a couple of suggestions to start off with.
The first is obvious. Did you set up a smart lock for your device? A secure location perhaps, or a recognized device, such as a wearable? If you did, then just make use of your smart lock and you will no longer enter a PIN code. This will only apply to a small number of users. Find out how to set up a smart lock at the link.
Some smartphone manufacturers bundle their own security software into their device, such as Find My Mobile by Samsung. Such features can be particularly useful for getting past the lock screen, but you will have to have set this up already. If you did, just visit the corresponding website from another device or PC and unlock your phone from there.
The last resort is to conduct a factory reset. This will erase all the data on your Android device, so only do this if you really have tried all of the above options. The easiest method for doing this with a locked phone is by logging into the Android Device Manager online. [post_ad]From here you have the option to conduct a complete factory reset. Again, youll need to have already been using Android Device Manager for this work.
Download :- Get it now on Google Play!
If you haven’t used the Android device manager before, then you must do a hardware reset, which means entering your device’s recovery mode manually.

The method for conducting a hardware factory reset differs on each device, but it generally involves holding down the power and volume buttons when your device is switched off. You can search through our website to find the factory reset guide for your specific device by clicking the link.
Share this amazing trick for how to bypass android lock screen hack tricks with your all friends. Bookmark this page to get latest and new updates on how to bypass android pattern lock without losing data
There are several different ways to hack a locked Android smartphone or tablet, but unfortunately, theres not a one-size-fits-all method. So below, Ill go over 5 of the most effective methods, and hopefully one will help you get back into your device.
How to bypass the lock screen on Android KitKat
If your device is running Android 4.4 KitKat (or anything before Lollipop) the method for retrieving your forgotten password or PIN number is relatively simple.
If you enter the incorrect PIN, pattern or password five times, you will receive a “too many attempts” message on your display. From here, you will be prompted to enter the email address and password tied to your Google account to bypass the security screen.
How to bypass the lock screen on Android Lollipop
Bypassing the lock screen on Android Lollipop is more tricky, particularly if you wish to keep the data on your phone. Here are a couple of suggestions to start off with.
Smart lock
The first is obvious. Did you set up a smart lock for your device? A secure location perhaps, or a recognized device, such as a wearable? If you did, then just make use of your smart lock and you will no longer enter a PIN code. This will only apply to a small number of users. Find out how to set up a smart lock at the link.
Third party security options
Some smartphone manufacturers bundle their own security software into their device, such as Find My Mobile by Samsung. Such features can be particularly useful for getting past the lock screen, but you will have to have set this up already. If you did, just visit the corresponding website from another device or PC and unlock your phone from there.
The last resort
The last resort is to conduct a factory reset. This will erase all the data on your Android device, so only do this if you really have tried all of the above options. The easiest method for doing this with a locked phone is by logging into the Android Device Manager online. [post_ad]From here you have the option to conduct a complete factory reset. Again, youll need to have already been using Android Device Manager for this work.
Download :- Get it now on Google Play!
If you haven’t used the Android device manager before, then you must do a hardware reset, which means entering your device’s recovery mode manually.
On a Nexus device, you will have to enter recovery mode to do a hardware factory reset
The method for conducting a hardware factory reset differs on each device, but it generally involves holding down the power and volume buttons when your device is switched off. You can search through our website to find the factory reset guide for your specific device by clicking the link.
Share this amazing trick for how to bypass android lock screen hack tricks with your all friends. Bookmark this page to get latest and new updates on how to bypass android pattern lock without losing data
Go to link Download
Thursday, November 24, 2016
How to move or rearrange iPhone home screen app icons anywhere without jail breaking
How to move or rearrange iPhone home screen app icons anywhere without jail breaking
Apple’s iOS operating system is bit difficult to customize than Android. Generally, Apple users can arrange applications. But customization can be done without having blank page ore gaps between apps. For further options, it can be possible only through jailbreak.
First of all thanks for Gabriel Whaley, William Stoy and Eric Aragon for developing a fully modify home screen without jailbreak. With the help of their simple web application, any iPhone user can easily adjust home screen layout. This feature supported only from iPhone 5 as well as later released Smartphone’s-except iPad and iPad touch.
To begin with, access makover.iothrough safari browser in your Smartphone. The website leads with step-by-step method. In which you need to select wallpaper provided by makeover or use own wallpaper.
 |
| Makover web application |
If you don’t want to use makeover wallpaper, apply your own walls and just tap/ hold any app icon’s to edit. Now move any app icon to new blank page and capture a screen shot by pressing (sleep + home buttons).
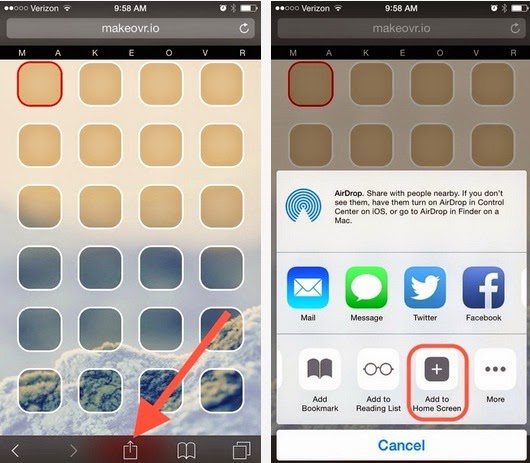 |
| iPhone home screen edit mode |
Rearrange app icon’s can be only after uploading screenshot. Now users can create invisible placeholders in-between apps via web application (makeover). Once modifying your own home screen, share your own home screen in social or upload by tapping add to home screen option.
 |
| customized apple home screen |
Also read : how to download YouTube videos directly in iPhone and iPad?
Finally, this is how to rearrange apple app icons with gap in-between. If you don’t like it! Remove placeholders using delete options. Feel free to share this tips on socially and connect with us for more updates on Apple.
Go to link Download
Wednesday, November 23, 2016
How to auto save passwords in Firefox without confirmation
How to auto save passwords in Firefox without confirmation
It would be a lot of fun if you are able to auto save passwords in Firefox. Consider a situation: One of your friends uses your computer for checking his Facebook. He enters his login email and password on Facebook login page. After hitting on Enter, Firefox does not show him any password saving confirmation prompt. Instead, his email and password is automatically saved by Firefox! Interesting, isn’t it? Yeah, you guessed it right. Today, we will learn how to auto save passwords in Firefox without any confirmation prompt. So, let us give it a go!
Let us get into the procedure of saving passwords in Firefox.
1. Download PowerArchiver and install it on your computer. This is used to open and edit Firefox files. Make sure that Firefox is not running while following the further procedure. Exit Firefox, if running and move to next step.
2. Go to C:Program FilesMozilla Firefox and look for omni.ja file.
Note: Before moving to next step, make sure you have a backup of omni.ja file. If you want to restore your original Firefox settings, you need this default omni.ja file.
3. Open this file using PowerArchiver. You will see all the files present inside omni.ja. Go to jsloader esourcesgrecomponents and delete nsLoginManagerPrompter.js file.

4. Go back to the root folder of omni.ja file and navigate to components folder. In that folder, open nsLoginManagerPrompter.js file using Notepad++. In Notepad++, search for _showSaveLoginNotification function. Now, you have to edit this function as shown in the screenshot below:

Replace all the function contents with this:
Save the file and allow PowerArchiver to overwrite the file in omni.ja.
5. That’s it! Your Firefox is completely configured to auto save passwords without confirmation.
Run your Firefox and login to any online account. Firefox will save passsword without asking any for permission. To view saved passwords in Firefox, go to Tools -> Options and hit on Security tab. Then click on Saved Passwords button. In the prompt, click on Show Passwords and you will be able to see saved passwords like this:

If you are not comfortable with editing files, here is the edited omni.ja file. Download it and copy(overwrite) it in your C:Program FilesMozilla Firefox folder.
I hope now you are able to automatically save passwords in Firefox using the above trick. You can easily capture your friends’ passwords using this beautiful Firefox trick. Cheers!
Auto Save passwords in Firefox:
You have to edit core files of Firefox for auto saving passwords. Please note that this article is for educational purpose only. I am not responsible for any act done by you.Let us get into the procedure of saving passwords in Firefox.
1. Download PowerArchiver and install it on your computer. This is used to open and edit Firefox files. Make sure that Firefox is not running while following the further procedure. Exit Firefox, if running and move to next step.
2. Go to C:Program FilesMozilla Firefox and look for omni.ja file.
Note: Before moving to next step, make sure you have a backup of omni.ja file. If you want to restore your original Firefox settings, you need this default omni.ja file.
3. Open this file using PowerArchiver. You will see all the files present inside omni.ja. Go to jsloader esourcesgrecomponents and delete nsLoginManagerPrompter.js file.
4. Go back to the root folder of omni.ja file and navigate to components folder. In that folder, open nsLoginManagerPrompter.js file using Notepad++. In Notepad++, search for _showSaveLoginNotification function. Now, you have to edit this function as shown in the screenshot below:
Replace all the function contents with this:
var pwmgr = this._pwmgr;
pwmgr.addLogin(aLogin);
Save the file and allow PowerArchiver to overwrite the file in omni.ja.
5. That’s it! Your Firefox is completely configured to auto save passwords without confirmation.
Run your Firefox and login to any online account. Firefox will save passsword without asking any for permission. To view saved passwords in Firefox, go to Tools -> Options and hit on Security tab. Then click on Saved Passwords button. In the prompt, click on Show Passwords and you will be able to see saved passwords like this:
If you are not comfortable with editing files, here is the edited omni.ja file. Download it and copy(overwrite) it in your C:Program FilesMozilla Firefox folder.
How to restore original Firefox settings:
If you want to restore your original Firefox settings, first of all, exit Firefox. Then, simply delete your current edited omni.ja files and copy the backup copy of omni.ja in C:Program FilesMozilla Firefox.I hope now you are able to automatically save passwords in Firefox using the above trick. You can easily capture your friends’ passwords using this beautiful Firefox trick. Cheers!
Go to link Download
Tuesday, November 22, 2016
How to Change Android Fonts without Root Permission
How to Change Android Fonts without Root Permission
Hi guys, TaseUpdates is back again with another great tutorial powered by Don Sampson, I am here to show you how you can install custom android fonts on your android device even if you havent rooted your phone. Now.,Isnt that amazing???

Less talk.,More Action. Lets Swipe into Action!
How can I change android fonts without Root Permission?
For you to be able to change your android font without rooting your phone, you will have to download;
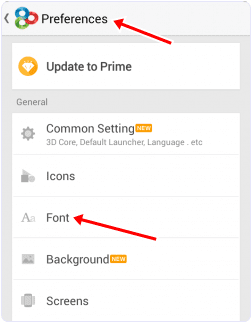 Now you will see the list of fonts then select the font of your choice from there.
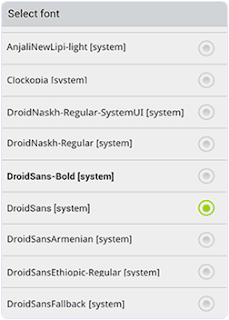
Its done your fonts will be changed immediately.
Hope you Enjoyed this Little Tutorial!!!
Less talk.,More Action. Lets Swipe into Action!
How can I change android fonts without Root Permission?
For you to be able to change your android font without rooting your phone, you will have to download;
- GO Launcher Ex from playstore by clicking here
- After that, you will have to install GO Launcher Fonts from the Play Store. GO launcher fonts is an Amazing App that provide different fonts for your android device.
- Install and launch the Go Launcher App and from the home screen tap the Menu button at right corner and Select the preferences from the menu then look for the font option (as shown below)
Its done your fonts will be changed immediately.
Hope you Enjoyed this Little Tutorial!!!
Go to link Download
Monday, November 21, 2016
How to replace the motherboard without re installing Windows XP
How to replace the motherboard without re installing Windows XP
Tutorial mengganti Motherboard di XP supaya tidak error & install ulang
Bagi para pembaca InfoTeknologi pasti pernah mengalami kejadian ketika anda membeli komponen baru komputer, baik untuk upgrade ataupun mengganti device yang rusak.
Kalau anda hanya mengganti grafik card, network card atau sound card pasti tidak akan menemui masalah; setelah anda booting ulang windows XP akan men-detect hardware baru lalu cukup masukkan cd driver maka proses installasi selesai.
Tapi masalah besar akan terjadi apabila komponen yang anda upgrade / ganti adalah motherboard ataupun prosessor dengan tipe yang berbeda, dijamin 99,99 % Windows XP anda akan berwarna biru (Blue Screen of Death)
Berikut tutorial supaya anda dapat mengganti / mengupgrade motherboard di Windows XP tanpa harus repair ataupun install ulang Windows XP anda.
Windows XP menyimpan informasi hardware komputer kita pada regisrtry, jadi yang cukup anda lakukan ialah dengan merestart registry hardware anda ke kondisi awal saat anda, caranya:
- Masukkan CD Windows XP, Restart komputer, masuk ke Bios lalu buat supaya komputer anda booting melalui CD.
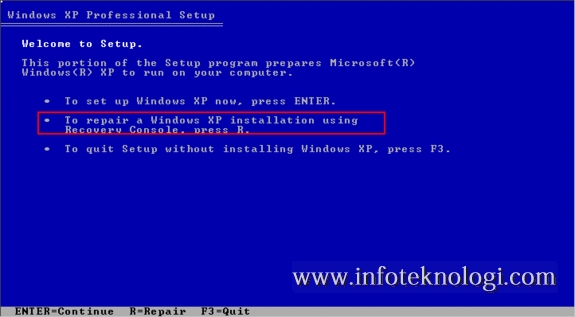
- Ketika Layar “Welcome to Setup” Muncul, klik tombol R keyboard untuk memulai Recovery Console
- Akan diminta memasukkan Administrator password, masukkan bila ada, namun bila anda tidak menset password tekan Enter saja.

- Di command prompt Recovery Console ketik baris berikut (setiap baris tekan enter)
md tmp
copy c:windowssystem32configsystem c:windows mpsystem.bak
delete c:windowssystem32configsystem
copy c:windows epairsystem c:windowssystem32configsystem
copy c:windowssystem32configsystem c:windows mpsystem.bak
delete c:windowssystem32configsystem
copy c:windows epairsystem c:windowssystem32configsystem
- Ketik Exit untuk keluar dari Recovery Console komputer anda akan merestart.
Matikan komputer, ganti motherboard atau prosesor komputer anda dengan yang baru lalu nyalakan ulang komputer anda, Windows XP akan masuk tanpa menampilkan Blue Screen dan akan menginstall ulang driver hardware pada komputer anda. (Windows XP akan menginstall ulang semua driver hardware anda, bukan hanya driver motherboard / prosessor)
Anda bisa melakukan hal diatas tanpa menggunakan Windows Recovery console, yaitu dengan cara memindahkan harddisk ke komputer lain atau booting dengan OS lain (Windows 7 atau Linux) atau menggunakan Hiren Boot CD.
Yang perlu anda lakukan adalah mengcopy file ‘system‘ di folder c:windows epair lalu menimpanya di folder c:windowssystem32configsystem (Ini karena anda tidak bisa melakukan copy dan delete file system saat anda menggunakan Windows XP)
Note: Untuk Windows 7 anda tidak perlu melakukan hal diatas, karena Windows 7 akan secara otomatis menginstall ulang driver bila anda mengganti motherboard atau prosessor tanpa harus mengalami Blue Screen of Death.
Go to link Download
Thursday, November 17, 2016
HOW TO REINSTALL WINDOWS WITHOUT LOSING DATA
HOW TO REINSTALL WINDOWS WITHOUT LOSING DATA
You can use this method as of ten asyou like when you need to repair something that had gotten corrupted and
you dont want to do a clean install. This is better than doing a windowss repair install from the cd because doing that can cause changes to settings and even make it so you cant get updates anymore from microsoft
update site because of the silent install they did a year or so ago (unless you rereg some dll file s).
1- Start WindowsX P
2- Go to the sorry
of your source files
3- Run WINNT32 /
unattend For example, D:I386winnt32/unattend ( copy &paste this command into the RUN box,then press ENTER )Your computer will do the rest. OR Start > All Programs> Accessories >Command Prompt.Copy & paste > D:I386winnt 32 /unattend (notice the space between 32and/ )
Press Enter.
If you have i386 on your drive, you can replace D: ( if D: is your cd drive ) with the sorry of it .(be sure its the full i386 though) D: is the driver letter where your windowss XP Cd is if D:I386winnt32 /unattend doesnt work then try : d: winnt32 /unattend try and give here ur feedback
you dont want to do a clean install. This is better than doing a windowss repair install from the cd because doing that can cause changes to settings and even make it so you cant get updates anymore from microsoft
update site because of the silent install they did a year or so ago (unless you rereg some dll file s).
1- Start WindowsX P
2- Go to the sorry
of your source files
3- Run WINNT32 /
unattend For example, D:I386winnt32/unattend ( copy &paste this command into the RUN box,then press ENTER )Your computer will do the rest. OR Start > All Programs> Accessories >Command Prompt.Copy & paste > D:I386winnt 32 /unattend (notice the space between 32and/ )
Press Enter.
If you have i386 on your drive, you can replace D: ( if D: is your cd drive ) with the sorry of it .(be sure its the full i386 though) D: is the driver letter where your windowss XP Cd is if D:I386winnt32 /unattend doesnt work then try : d: winnt32 /unattend try and give here ur feedback
Go to link Download
Friday, October 28, 2016
How To Root Infinix Hot 2 x510 Without PC
How To Root Infinix Hot 2 x510 Without PC

How To Root Infinix Hot 2 x510 Without PC
==>1. Download and Install KingRoot.apk Here
==>2. After download and installation, make sure you are having a strong 3G network on your Hot 2
==>3. Open KingRoot and wait for all checks to be completed, then tap the Center button with Root written in Chinese language to begin rooting.
==>4. Once kingroot is done rooting your infinix hot 2, a green button indicating "success" will show up. Just Tab the other blue button under it written in Chinese. And thats all.
==>5. You can get Root Checker from play store to check if youve actually gotten root access.
Read Also: How To Quickly Root Infinix Hot X507 + Other Android Devices
Since this phone is a new device, and majority buying it might just be using an Android, or hearing about rooting for the first time. And be wondering if rooting of infinix hot 2 will cause any damage to the device. So i stand to clarify that this has been tested and trusted. Using this method is damn easy and will not brick, harm your phone in anyway.
Go to link Download
Thursday, October 27, 2016
How to root your Infinix android smartphone without a computer
How to root your Infinix android smartphone without a computer


Check if your android smartphone is rooted or rooted here
Go to link Download
Thursday, October 20, 2016
HOW TO CREATE FOLDER WITHOUT NAME
HOW TO CREATE FOLDER WITHOUT NAME
Do you know how to make any folder or file with out name? if not, read this post.
You can challenge to your friends that you can name a file without the name .here is the simple and easy teo step trick
Just follow these two steps

Note
You can challenge to your friends that you can name a file without the name .here is the simple and easy teo step trick
Just follow these two steps
- Create a new folder
- Name the folder by holding "ALT" and press 6655 on number pad and then press enter button. thats it now see the magic folder without name
Note
This trick works on windows operating system.
DONT FORGET TO SHARE WITH YOUR FRIENDS BY JUST CLICK ON THE BELOW LINKS
Go to link Download
Saturday, October 15, 2016
How to Install an Android OTA Update Without Losing Root Access
How to Install an Android OTA Update Without Losing Root Access
Over-the-air updates have long been the bane of many rooted Android users’ existences. It’s an endless battle: installing the update breaks root or won’t flash at all, but everyone wants the latest version of their mobile OS. Thanks to a new tool called FlashFire, the struggle may be over.

Why OTA Updates Don’t Play Nicely with Rooted Phones
The root process also installs an application like SuperSU, which controls access to the su binary, so you can choose which applications are allowed to have root access.Android is based on Linux, so Android devices come with a “root” user that functions like the Administrator user account on Windows. By default, Android doesn’t give you access to the root account. Rooting is the process of enabling access to the root account, installing the su binary. Applications can call su to gain elevated privileges, so they can break free from Android’s security sandbox and do more powerful things. Android doesn’t come pre-rooted because of the security problems this could lead to, especially for less technically inclined users.
You’ll usually lose your root access when you install an operating system update. On Lollipop and earlier versions of Android, the over-the-air (OTA) update sets your Android system partition back to its factory state, removing the su binary. On newer devices with systemless root, it overwrites the boot image. And if you have a custom recovery, the OTA update may not be able to install itself at all.
Once upon a time, SuperSU had an “Survival Mode” that would let you flash updates, but that’s no longer around. Enter FlashFire.
What Is FlashFire?
FlashFire is powerful tool from Chainfire, the maker of SuperSU, that allows rooted users to perform a variety of actions, like flashing OTA updates and full zip files, create and restore backups, wipe data, and much more. It effectively eliminates the need to use recovery to manually backup or restore, and automatically handles un-rooting and re-rooting when flashing update files.
On many devices, having root will prevent OTAs from downloading and flashing. On some devices it will actually download, but you would need a tool like FlashFire to successfully flash it. On other devices, it will not actually download, so you’d have to get the OTA file some other way, and then maybe you can flash it with a tool like FlashFire. If you can’t get the OTA file, you may be out of luck.Theoretically, it should work on many, if not most, Android 4.2+ handsets. However, there are caveats.
Furthermore, if you’re running a rooted device that’s getting a full version update—from Lollipop to Marshmallow, for example—things get murkier. Since there’s no way to root Marshmallow without an unlocked bootloader, you’ll completely lose root access if your device’s bootloader is locked. That’s unavoidable. If you’ve unlocked the bootloader, however, FlashFire should be able to preserve (or at least reinstate) root access once the update is finished.
So: while FlashFire isn’t guaranteed to work on every device, if you’ve gone the “official” route to root your phone, it will probably work.
It’s worth noting that FlashFire is in beta at the time of writing. That means features may not yet work as intended, and certain devices may experience more bugs than others. If you’re not scared away by such things, you’ll have to first join the beta program before you can download the app. I also encourage anyone interested to check this thread on XDA, too, before getting started.
How to Use FlashFire to Flash an OTA Update, Without Losing Root
When you get notified that there’s an update available for your device, the first thing you’ll want to do is go ahead and download it—but don’t install it. If you tell the update to go ahead and install, it will likely fail since you’re running a rooted device.

Instead, fire up FlashFire once the OTA has finished downloading. (If you don’t have it yet, join the beta program and then download the app.) It should automatically detect the update file and ask if you want to generate the actions to flash it. Go ahead and tap “OK.”

This will generate a screen that may seem a little overwhelming to novice users, but it’s essentially just a breakdown of what FlashFire intends to do with the OTA file. Each option is customizable if you tap on it—for example, if you don’t want to wipe the cache partition, simply de-select that option. You can also add various actions, but I wouldn’t necessarily recommend doing that right now.
If you have a custom recovery like TWRP installed, FlashFire will back it up before starting the process, and restore it afterwards.

Once you’ve finalized the set of instructions, hit the “Flash” button. It will give a warning that it can take a bit of time for FlashFire to load, and a couple of black screens may appear. Go ahead and tap “OK” again.

After that, FlashFire will reboot and you’ll see a myriad of scrolling text on the display. Leave the device alone to do its thing—that’s just FlashFire running the needed commands. When it’s finished, it’ll reboot with the update flashed and root restored. Boom. So simple.

What to Do if Flashing the OTA Doesn’t Work
If you’ve modified your device in a way that prevents FlashFire from applying the update—maybe you’re running a custom kernel, or the /system partition has been modified by theXposed Framework, for example—then the update will “fail.” There’s currently no notification that the update wasn’t applied, so you’ll have to jump into the Settings > About phone menu and see if the build number has changed. If not, then you know the update wasn’t applied (there’s also a good chance Android will notify you that the update still needs to be installed).
When this happens, the best thing to do is to download the factory image for your device if it’s available. In this example, I’ll be flashing the newest update (April 2016 security patches) onto my Nexus 7.
Once downloaded, copy the factory image’s .tgz file to your phone’s internal storage or SD card.
Open up FlashFire and tap the floating action button (the red button with the plus) in the bottom right corner. Select “Flash firmware package.”

This will open up a file manager of sorts, which should default to the root internal storage folder. Scroll down until you find the file you just moved to the device.

Once you select the image file, FlashFire will scan the archive to verify its contents, then present a list of what can (and will) be flashed. You’re free to select what you want here—if you have a custom recovery and want to keep it that way, simply de-select the “recovery” option, for example.


Once you’re ready to flash, just tap the checkmark in the upper right corner. You’ll once again be presented with the list of actions before it proceeds, so if you want or need to change anything, now’s the time.

After you’ve confirmed all the steps, hit the “Flash” button. You’ll see the same warning about FlashFire taking some time to load and that a couple of black screens may appear. Just hit “OK.”

FlashFire will reboot and do its thing. Since it’s flashing a full image file and not just a simple update, it could take a little while for it to finish. Once it does, however, it’ll reboot and you’ll be good to go.
This is just scratching the surface of what FlashFire can currently do, and that goes without mentioning what it will be capable of in the future. We’ll undoubtedly have more things to say about it once we’ve spent more time with upcoming updates to the app.
Go to link Download
Friday, October 14, 2016
How to make android run faster without root
How to make android run faster without root
There are various ways to speed up that Android performance, and a few things you can do to make it feel faster. Make sure you’re up to date
The latest software will often contain bug fixes and general improvements and it can help your Android device to run better. Software updates tend to come OTA (Over The Air) and you should be automatically prompted to install them, but it doesn’t hurt to check. Go to Settings > About device > Software update and check for updates.
The same logic applies to apps, so fire up the Play Store, open the menu at the top left and tap My apps and make sure all of the apps you use are up to date.
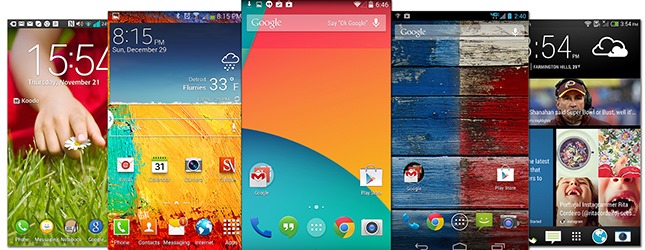
One of the reasons you’ll see differences in performance between Android devices with essentially the same processors, is that some OEMs limit speed in order to reduce heat and extend battery life. If you’re willing to root your Android device then you can overclock it using an app like SetCPU or Android Overclock. It’s wise to proceed with caution if you do decide to do this.
Install a custom ROM [post_ad]
Rooting your Android device doesn’t automatically offer any performance improvements, but a custom ROM can. For some devices that are no longer being updated custom ROMs are a way of getting a newer version of Android. You can also find custom ROMs that dispense with bloatware entirely and offer some interesting tweaks and modifications. You’ll need to do some research to find the right custom ROM for you. you can check also Micromax Stock ROM For All Models
The cache partition is separate from your app data cache and it contains temporary files. It’s worth cleaning this out every once in a while. You’ll have to boot into recovery mode to do it. The method of entering recovery mode varies depending on your device, but you’ll find it easily with a quick Google search. Once in recovery mode you use the volume keys to navigate and the power key to select an item. You’ll want to choose wipe cache partition.
You don’t want to allow apps that you never use to take up space on your device and potentially eat into system resources. Go to Settings > Apps and swipe over to the All tab. Take a good long look down the list and identify the apps you don’t want or need. If you’re in doubt about what any of them do then it’s time to hit Google and check.
Tap on any app you don’t want and then choose Uninstall or, if the option is not there to uninstall, tap Disable. Disabled apps will be listed in a new tab, so you can always enable them again in future if you change your mind. uninstall preinstalled apps on android d
You should also take a look in Settings > Apps at the Running tab. Some apps want to be running all the time and they can seriously impact on performance. Think carefully about whether you need what’s listed there.
Some of the customizations that OEMs make to their devices can be heavy-handed. If you want to change the feel of navigating around, and tweak some settings to make it feel speedier, then you might find that a third-party launcher does the trick. Try out something like Nova Launcher, Go Launcher EX, or Apex Launcher. Experiment with the settings and you should find that your device feels a lot faster.
Perform a factory reset
This is a drastic step, but some people recommend that you do a factory reset periodically if you want your device running in tip-top condition. It’s a shortcut to cleaning up your device and getting rid of any junk you’ve accumulated, but it means wiping all of the data and settings. If you decide to try it then make sure you back up everything that’s important to you first. You can find the option to do it in Settings > Backup & reset > Factory data reset.
You can make your Android device feel snappier by reducing or turning off some of animations. You’ll need to enable Developer options in order to do this. Go to Settings > About phone and scroll down to the System section to look for Build number. Tap on it seven times and you should see a message about being a developer. You can now go back to the previous menu and you should see Developer options listed under System. Head in there and scroll down to find Window animation scale, Transition animation scale, and Animator duration scale. Tap each in turn and set it to .5x or off. Pick an option and find out what suits you, if you don’t like just go back in and change the values again.
Cached data for apps should help them to load more quickly, but it can build up over time to take up quite a lot of space and there will potentially be cached data in there for apps that you no longer use. Sometimes clearing cached data for an app can also help clear up flaky behavior.
If you want to pick individual apps then head into Settings > Apps and slide over the All tab and tap on the relevant app then choose Clear cache. If you’ve decided to just clear the whole lot then go to Settings > Storage and tap on Cached data and then tap OK. Also, check out CCleaner, it cleans out your app cache and helps perform this kind of maintenance.
Most of us end up adding a list of different accounts to our Android devices and we allow them to automatically sync in the background to pull in new data and provide us with updates. All this syncing has a big impact on performance, not to mention battery life.
You could go to Settings and find Auto-sync under Accounts and just turn it off altogether, but that will be too drastic for most people. Instead why not just reduce the sync frequency and remove any accounts you don’t really need? For a lot of apps, like Facebook, you’ll need to open up the app and find the settings to reduce the sync frequency.
Don’t forget to Share it with your friends if you like it How to make android run faster without root and you may even Subscribe for New post, to get directly in your mail inbox.
make android run faster without root
The latest software will often contain bug fixes and general improvements and it can help your Android device to run better. Software updates tend to come OTA (Over The Air) and you should be automatically prompted to install them, but it doesn’t hurt to check. Go to Settings > About device > Software update and check for updates.
The same logic applies to apps, so fire up the Play Store, open the menu at the top left and tap My apps and make sure all of the apps you use are up to date.
Clean up your home screen
If you choose to use live wallpaper then consider replacing it with a good static image. You should also clean away any unused icons and limit your widgets to the essentials. The less cluttered your home screen is, the better in terms of performance.
how to make android run faster and smoothly
Overclock your device
One of the reasons you’ll see differences in performance between Android devices with essentially the same processors, is that some OEMs limit speed in order to reduce heat and extend battery life. If you’re willing to root your Android device then you can overclock it using an app like SetCPU or Android Overclock. It’s wise to proceed with caution if you do decide to do this.
Install a custom ROM [post_ad]
Rooting your Android device doesn’t automatically offer any performance improvements, but a custom ROM can. For some devices that are no longer being updated custom ROMs are a way of getting a newer version of Android. You can also find custom ROMs that dispense with bloatware entirely and offer some interesting tweaks and modifications. You’ll need to do some research to find the right custom ROM for you. you can check also Micromax Stock ROM For All Models
Wipe cache partition
The cache partition is separate from your app data cache and it contains temporary files. It’s worth cleaning this out every once in a while. You’ll have to boot into recovery mode to do it. The method of entering recovery mode varies depending on your device, but you’ll find it easily with a quick Google search. Once in recovery mode you use the volume keys to navigate and the power key to select an item. You’ll want to choose wipe cache partition.
Uninstall and disable unused apps
You don’t want to allow apps that you never use to take up space on your device and potentially eat into system resources. Go to Settings > Apps and swipe over to the All tab. Take a good long look down the list and identify the apps you don’t want or need. If you’re in doubt about what any of them do then it’s time to hit Google and check.
Tap on any app you don’t want and then choose Uninstall or, if the option is not there to uninstall, tap Disable. Disabled apps will be listed in a new tab, so you can always enable them again in future if you change your mind. uninstall preinstalled apps on android d
You should also take a look in Settings > Apps at the Running tab. Some apps want to be running all the time and they can seriously impact on performance. Think carefully about whether you need what’s listed there.
Try a third-party launcher
Some of the customizations that OEMs make to their devices can be heavy-handed. If you want to change the feel of navigating around, and tweak some settings to make it feel speedier, then you might find that a third-party launcher does the trick. Try out something like Nova Launcher, Go Launcher EX, or Apex Launcher. Experiment with the settings and you should find that your device feels a lot faster.
Perform a factory reset
This is a drastic step, but some people recommend that you do a factory reset periodically if you want your device running in tip-top condition. It’s a shortcut to cleaning up your device and getting rid of any junk you’ve accumulated, but it means wiping all of the data and settings. If you decide to try it then make sure you back up everything that’s important to you first. You can find the option to do it in Settings > Backup & reset > Factory data reset.
Turn off or reduce animations
You can make your Android device feel snappier by reducing or turning off some of animations. You’ll need to enable Developer options in order to do this. Go to Settings > About phone and scroll down to the System section to look for Build number. Tap on it seven times and you should see a message about being a developer. You can now go back to the previous menu and you should see Developer options listed under System. Head in there and scroll down to find Window animation scale, Transition animation scale, and Animator duration scale. Tap each in turn and set it to .5x or off. Pick an option and find out what suits you, if you don’t like just go back in and change the values again.
Clear cached app data
Cached data for apps should help them to load more quickly, but it can build up over time to take up quite a lot of space and there will potentially be cached data in there for apps that you no longer use. Sometimes clearing cached data for an app can also help clear up flaky behavior.
If you want to pick individual apps then head into Settings > Apps and slide over the All tab and tap on the relevant app then choose Clear cache. If you’ve decided to just clear the whole lot then go to Settings > Storage and tap on Cached data and then tap OK. Also, check out CCleaner, it cleans out your app cache and helps perform this kind of maintenance.
Turn off or reduce auto-sync
Most of us end up adding a list of different accounts to our Android devices and we allow them to automatically sync in the background to pull in new data and provide us with updates. All this syncing has a big impact on performance, not to mention battery life.
You could go to Settings and find Auto-sync under Accounts and just turn it off altogether, but that will be too drastic for most people. Instead why not just reduce the sync frequency and remove any accounts you don’t really need? For a lot of apps, like Facebook, you’ll need to open up the app and find the settings to reduce the sync frequency.
Don’t forget to Share it with your friends if you like it How to make android run faster without root and you may even Subscribe for New post, to get directly in your mail inbox.
Go to link Download
Monday, October 10, 2016
HOW TO GET LARGE UNLIMITED CREDITS ON MJOY WITHOUT CLICKING THE ADVERTS
HOW TO GET LARGE UNLIMITED CREDITS ON MJOY WITHOUT CLICKING THE ADVERTS

FIRST:
MAKE SURE YOU HAVE LITTLE CREDIT,
ENOUGH TO SEND ONE MESSAGE IN YOUR
ACCOUNT
SECOND:
Go To Send Message..
Write Any WriteUp YOU
Want And Send The Message To This Number
+12074470602 ....
And Watch What Happens!! You Get 129
Credits
Instantly
NOW ENJOY
Go to link Download
Saturday, October 8, 2016
How To ByPass Adf ly Add Timer Adf ly Hack Download without advertisement
How To ByPass Adf ly Add Timer Adf ly Hack Download without advertisement
Adf.ly and Linkbucks are the online websites which pay you for shortening links and then displaying advertisements on those links. So, a visitor has to first wait for 5 seconds and see the advertisement before he can visit the actual website. This 5 seconds wait is really annoying and so I am posting a Adf.ly hack. In this article, we will learn the best way to bypass Adf.ly, linkbucks wait times and download/browse without advertisement.

So, let us get started with this Adf.ly hack:
1. You need to have Greasemonkey addon installed in your Firefox. If you are using Chrome, here is the link to Tampermonkey.
2. Now, go to Bypass Adf.ly script and install the script in your browser.

3. So, the next time you visit any Adf.ly link(e.g. http://adf.ly/DuLN), you won’t see the 5 seconds wait timer and will be taken directly to the intended site. Cheers!
This was a short tutorial on bypassing Adf.ly, linkbucks wait timer and downloading without advertisement. If you have any other Adf.ly hack to bypass Adf.ly, please let us know in comments.
Hack/Bypass Adf.ly:
So, let us get started with this Adf.ly hack:1. You need to have Greasemonkey addon installed in your Firefox. If you are using Chrome, here is the link to Tampermonkey.
2. Now, go to Bypass Adf.ly script and install the script in your browser.
3. So, the next time you visit any Adf.ly link(e.g. http://adf.ly/DuLN), you won’t see the 5 seconds wait timer and will be taken directly to the intended site. Cheers!
This was a short tutorial on bypassing Adf.ly, linkbucks wait timer and downloading without advertisement. If you have any other Adf.ly hack to bypass Adf.ly, please let us know in comments.
Go to link Download
Saturday, October 1, 2016
How To Download Youtube Video To Firefox Google Chrome Without Addon
How To Download Youtube Video To Firefox Google Chrome Without Addon

The Trick
To download youtube videos, click this link while the video is playing. Or to make it easier, drag the link below to your bookmark.
Download youtube video – Drag to bookmarklet to your bookmark toolbar.
When you want to download a youtube video while it’s playing, just click the bookmark link to start. The video will be downloaded as MP4. Available only on Firefox and Google Chrome. If this post has helped you, please take 5 seconds to share it below. We at Tripozia are committed in giving the best of our service.
Go to link Download
Friday, September 30, 2016
How To Browse On Blackberry Without BIS Subscription
How To Browse On Blackberry Without BIS Subscription

Sometimes, our Blackberry BiS expires and we dont really have enough cash to get back on,
but we just want to browse and seek information online with our normal mb(10mb,20mb data plans) or even with our little credit.
Yes, i will show you how to configure your blackberry to browse without BIS Data Plan.
These Guidelines Will Help You Achieve That:
Goto OPTION >>> enter ADVANCE OPTION then >>>Locate TCP/IP
First, you have to mark APN Settings Enabled then you put the APN(Access Point Network) of the network u are using
ACCESS POINT NETWORK FOR VARIOUS NETWORKS
MTN: web.gprs.mtnnigeria.net
ETISALAT: etisalat
AIRTEL: internet.ng.airtel.com
Then you scroll down and mark APN Authenticaton Enabled
Now put the username and password of the network APN u are using....
Mtn :username and password is web
Etisalat: username and password is etisalat
Airtel is: username and password is internet
Eg; I am using airtel

Wen you are done. Press your blackberry key and save
Workinq fine on all opera 2go and whatsapp
Enjoy!
Go to link Download
Friday, September 23, 2016
How to lock the Bitlocker encrypted drive without restarting
How to lock the Bitlocker encrypted drive without restarting
If you have Bitlocker encrypted drives you know when you start your PC they are locked and you must use your password or Key to unlock them. But what do you do if you want to re-lock the Bitlocker drive? Normally, youd have to re-start you computer which could be a pain if you just want to lock the drive while you are away from your PC or if you let another user use your computer and you do not want them to have access to that drive.
This small tutorial will show you how to re-lock a Bitlocker encrypted drive without restarting your computer. Heres how:
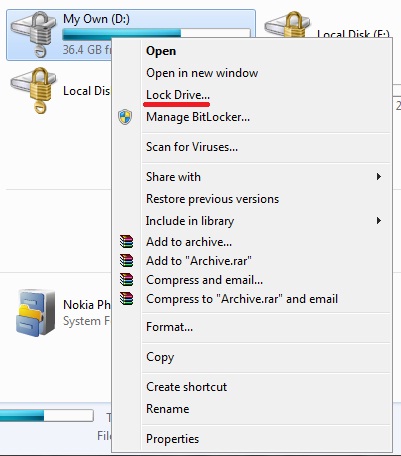
To add "Lock Drive..." to the Explorer right-click context menu...
Apply this registry update:
1) Open Notepad and copy and paste following code, and save it as Lock.reg
and double click on it, it will add a registry value.
Apply this registry update:
1) Open Notepad and copy and paste following code, and save it as Lock.reg
and double click on it, it will add a registry value.
| Windows Registry Editor Version 5.00[HKEY_CLASSES_ROOTDriveshellLock Drive...command] @=hex(2):77,00,73,00,63,00,72,00,69,00,70,00,74,00,2e,00,65,00,78,00,65,00,20, 00,6d,00,61,00,6e,00,61,00,67,00,65,00,2d,00,62,00,64,00,65,00,2e,00,76,00, 62,00,73,00,20,00,2d,00,6c,00,6f,00,63,00,6b,00,20,00,2d,00,66,00,6f,00,72, 00,63,00,65,00,64,00,69,00,73,00,6d,00,6f,00,75,00,6e,00,74,00,20,00,25,00, 31,00,00,00 |
2) Open Notepad , and paste following code, Save the following script as manage-bde.vbs
and copy to the folder C:WindowsSystem32
and copy to the folder C:WindowsSystem32
| Set oWSH = CreateObject("Wscript.Shell") Args = "" Last = Wscript.Arguments.Count - 1 For i = 0 To Last Args = Args & " " & Wscript.Arguments.Item(i) Next Args = Replace(Args,"","") RetVal = oWSH.Run("manage-bde.exe" & Args,0,True) Wscript.Quit RetVal |
It is Done... Cheer up...
now, u will get a new Lock Drive option on right-click context menu..
Be careful while typing extensions... like (.reg, .vbs)
now, u will get a new Lock Drive option on right-click context menu..
Be careful while typing extensions... like (.reg, .vbs)
It is Working Cool In Windows 7 Ultimate...
Go to link Download
Wednesday, September 21, 2016
How to put videos on your iPad without an internet connection
How to put videos on your iPad without an internet connection
Ill disclose here how to duplicate video records from your Windows PC or portable PC to your iPad, and they dont should be changed over into an extraordinary arrangement which the iPad can play. Well likewise demonstrat to you how you can download recordings without utilizing a PC by any stretch of the imagination, so you can watch them at whatever point you need, wherever you are - regardless of the fact that you have no web association.

Step by step instructions to put movies on an iPad: Videos application or an outsider application
On the off chance that you match up motion pictures or TV shows put away in your iTunes library, theyll show up in the local Videos application on your iPad. This is a consummately decent method for doing things, however in the event that your video isnt in an arrangement that iTunes can play, you cant add it to the library, nor sync it with your iPad. Likewise, you can just utilize one PC to adjust your iPad. On the off chance that you attempt to match up recordings from another PC running iTunes, youll get a notice that all your media will be erased first.The uplifting news is that there are heaps of applications accessible in the App Store on your iPad which can play recordings and permit you to "import" documents from any PC running iTunes. Most dont oblige you to first change over the video into a configuration the iPad can play locally (i.e. MP4). Rather, you can play basically anything you like, including AVI, DIVX, MKV and thats only the tip of the iceberg.
For instance, CineXPlayer HD costs two or three pounds yet will play most arrangements. It likewise backings separate subtitle records, which is helpful in case youre viewing a remote film that doesnt have subtitles implanted into the video itself.
There are different applications, including the free VLC player. Tragically, numerous such applications have needed to evacuate codecs taking after lawful solicitations and didnt really bolster encompass sound (AC-3 and others). This implies a video document with this sound configuration will play noiselessly: you would need to change over your video in a suitable application to downmix the encompass soudn to a stereo soundtrack first.
One free application which has astounding audits right now is PlayerXtreme Media Player by PentaLoop. This gives you a chance to exchange recordings by Wi-Fi, however for velocity and dependability well be utilizing a USB link for this aide. Clearly, introduce whichever application youre going to use before taking after the aide underneath.
Step 1. Interface your iPad to a PC with a late form of iTunes (attempt to utilize the most recent rendition if conceivable). iTunes ought to dispatch consequently and your iPad will appear on the left-hand side

Step 2. Click on the symbol speaking to your iPad and afterward tap on Apps in the menu on the left. Look down until you see the File Sharing area.

Step 3. Look down the rundown if vital and click on the suitable video application, for this situation well pick PlayerXtreme. On the privilege is a rundown of the records: its right now clear as we havent yet duplicated any recordings.

Step 4. Click the Add File... catch and explore to the video you need to put on your iPad. Select one or more and snap Open at the base of the dialog box. Bear in mind to choose any subtitle records which run with the recordings.

The movies will begin replicating to your iPad – an advancement bar is appeared in the sheet at the highest point of iTunes.
Once theyre exchanged, you can disengage your iPad, dispatch PlayerXtreme (or whichever video playback application youre utilizing) and the recordings will be there, prepared to watch.
Remember that playing video designs which arent locally bolstered by iOS will go through the battery speedier unless the application can utilize equipment increasing speed (which PlayerXtreme can).
Step by step instructions to put movies on an iPad: Use a video downloader application
On the off chance that you would prefer not to need to associate your iPad to a PC running iTunes, there are different approaches to get movies onto your iPad. One is to introduce a video downloader application, for example, Video Downloader Lite. Utilizing the applications constructed as a part of web program you can make a beeline for YouTube or another video spilling website and discover a video you need to watch.
When it begins playing, a pop-up window ought to seem giving you the choice to download or spare the video. You may need to sort in a name for it, or it may naturally take the name from the site page.
We have a different instructional exercise on downloading YouTube recordings to an iPad with orderly directions.
The most effective method to put movies on an iPad: get up to speed TV
BBC iPlayer and the All 4 application (Chanel 4) both permit you to download TV appears (counting movies) to your iPad. iPlayer now gives you 30 days to watch stuff you download, while with All 4 it relies on upon when the show was telecast in respect to what extent you have before the download lapses. Neither ITV Player nor Demand 5 permit you to download appears.
The most effective method to put movies on an iPad: Buy or lease from iTunes, Google Play Movies and TV or another administration
On the off chance that you dispatch the iTunes store on your iPad, then tap on Films at the base, youll locate an incredible choice of the most recent motion pictures accessible to lease or purchase. Leasing another film costs £3.49 in standard definition or £4.49 in HD. Fantastic movies are a pound less expensive. Purchasing one to observe more than once at whatever point you need costs £9.99 or £13.99 relying upon the motion picture.
Despite the fact that you can stream the movies promptly, a purchased or leased film will likewise be downloaded to your iPad so you can watch it without a web association.
At long last, on the off chance that you want to stay with the inherent Videos application and need to put movies from your PC onto your iPad, youll have to utilize the PC you use to match up and reinforcement your iPad.
At the point when your iPad shows up at the highest point of iTunes (in the wake of associating it with a USB link or utilizing Wi-Fi sync), click on the Films tab and you will see a rundown of the considerable number of movies youve imported into your iTunes library. Remember that they may show up in the TV Programs tab on the off chance that theyve been mistakenly labeled. This is likewise valid for TV Shows which are wrongly labeled as Films.
Tick the Sync Films box, then tick the movies you need to add to your iPad from the rundown. Then again, tick the crate alongside "Consequently incorporate all movies", and utilize the drop-down menu to pick an alternative from the rundown, for example, all unwatched.
You can introduce the Google Play Movies and TV application on the off chance that you favor and purchase or lease recordings that way. Lamentably, Netflix and Amazons gushing video administrations dont give you a chance to download substance to watch disconnected from the net..
Go to link Download
Subscribe to:
Posts (Atom)