Showing posts with label control. Show all posts
Showing posts with label control. Show all posts
Saturday, November 26, 2016
How to Recover Unsaved Microsoft Word Documents With Version Control
How to Recover Unsaved Microsoft Word Documents With Version Control
It is always a good idea to timely save your work while working on a software program like MS Word, MS Excel and MS PowerPoint. There are several reason when you accidentally lose you work when working on any MS Office documents, it may be due to your window system crashing, accidentally hitting ‘Don’t save’ button or power break down.
Now the question most of you would like to ask “is there’s a way to recover it?” Luckily the answer is yes even if you don’t have file history enabled The Microsoft Office 2010 comes with an amazing feature that lets you recover document with some quick and easy steps.
So here we suppose that you were working on word document that accidentally crashed or unsaved.
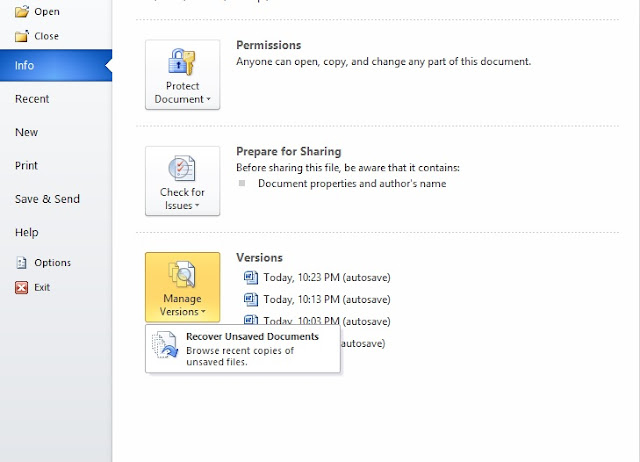
The good thing about this document recovery option is that here you will see a list of several unsaved documents that can be recovered. It will only save files that are five days old. Keep in mind that word doesn’t save each and every file and this option usually better to use in case of emergencies. How the best thing is that using this option in Microsoft Office 2010 will not only recover your unsaved documents but also save your time and efforts.
Now the question most of you would like to ask “is there’s a way to recover it?” Luckily the answer is yes even if you don’t have file history enabled The Microsoft Office 2010 comes with an amazing feature that lets you recover document with some quick and easy steps.
So here we suppose that you were working on word document that accidentally crashed or unsaved.
- Open a blank word document
- Select file from the menu bar and then info
- Here you will see a large square box titled “Manage Versions”
- Click on the dropdown menu and select Recover Unsaved Documents
The good thing about this document recovery option is that here you will see a list of several unsaved documents that can be recovered. It will only save files that are five days old. Keep in mind that word doesn’t save each and every file and this option usually better to use in case of emergencies. How the best thing is that using this option in Microsoft Office 2010 will not only recover your unsaved documents but also save your time and efforts.
Go to link Download

Tuesday, November 15, 2016
How to fix Windows 10 brightness control not working issue
How to fix Windows 10 brightness control not working issue
However, the Windows 10 free upgrade from Windows 7 or 8.1 also brings its own share of bugs and installation issues including problems with adjusting display brightness on some PCs.
Redmond Pie reports that the problem manifests itself by not allowing users to increase or decrease the brightness of the connected display on Windows 10 machines.
In other words, it means laptop and notebook users cannot reduce the screen brightness when a low battery situation arises.
Nevertheless, folks at Redmond Pie have shared a simple step-by-step guide to fix this problem easily:
Steps to fix Windows 10 brightness control not working issue
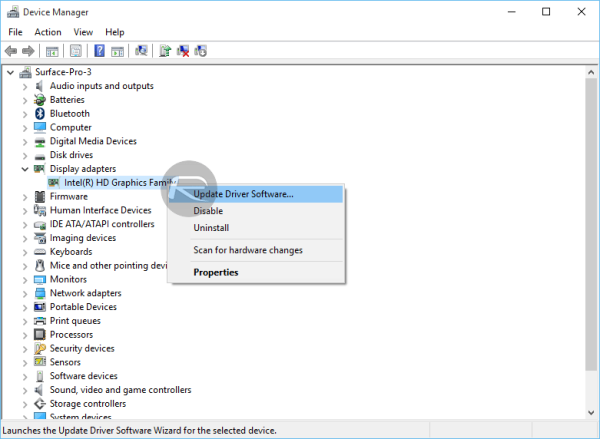
- Go to Start Menu > Search and type Device Manager.
- Then launch the Device Manager app and navigate to the Display adapters section.
- Just expand this option and right-click on the installed display driver.
- Then select Update Driver Software from the ensuing context menu.
- Select Search automatically for updated driver software in the resulting interface menu.
- Windows 10 should automatically download and install the necessary display or video card drivers via the detected internet connection.
- Once the drivers are installed successfully, you will see a notification message confirming the same along with the hardware details pertaining to the driver.
- Go to Start Menu > Search and type "Device Manager" and then launch the Device Manager app
- Scroll down to the Display Adapters entry in the device list and expand the option. Right-click on the installed display drivers, and choose Update Driver Software from the context menu.
- In the ensuing interface menu, choose Browse my computer for driver software.
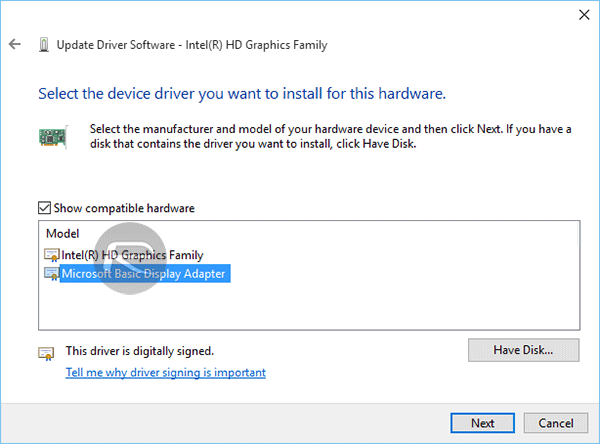
- Then choose the option "Let me pick from a list of drivers on my computer"
- In the next screen, select Microsoft Basic Display Adapter from the list under Show compatible hardware section. Then hit Next to continue.
- Windows should now install the selected driver and the display driver issue should no longer affect your screen brightness feature. You should now be able to increase or decrease display brightness without any hassles.
Go to link Download
Sunday, October 23, 2016
How To Get The Windows 8 Volume Control In Windows 10
How To Get The Windows 8 Volume Control In Windows 10
Windows 10 more or less fixed all complaints users had with Windows 8 and its UI. The chief problem was of course the lack of the Start button and the very confusing Start Screen. Windows 10 has a pretty nice UI but users are still nostalgic for certain Windows 7 UI elements. If you’re pining for the old volume controls that appeared in Windows 7 or Windows 8 when you clicked the speaker icon in the system tray then there’s a simple little registry edit you can make to get it back albeit with a slight Modern UI touch.
![[IMG]](https://lh3.googleusercontent.com/blogger_img_proxy/AEn0k_saUdriqo1I797xYTcPlMqLpnqAfLQfIhao4XoKFaLkC9An7JKOysWkc6fjezZO_GrbsI7Bgk-xKjn1rJjpp6iHctW-wQfq0ZpCiBYa3EytMBBhfMAyz9BOJzhQC57btFcK6Nm8ir13UKc5sP3k0m3Q=s0-d)
Open the windows registry by typing ‘regedit’ in Windows Search. Navigate to;
HKEY_LOCAL_MACHINESoftwareMicrosoftWindows NTCurrentVersionMTCUVC
If the MTCUVC key doesn’t exist already, you will have to create it manually. To do so, go to Edit>New>Key. Make sure you add the key under CurrentVersion and name it MTCUVC.
In the key, add a new registry file. Go to File>new>DWORD (32-bit) Value and name it “EnableMtcUvc’ without the quote marks. Set its value to 0.
![[IMG]](https://lh3.googleusercontent.com/blogger_img_proxy/AEn0k_uZX59HDtMY2tAGhwQ_CYROZzBhEf4m5pJ6jjKIbujjXtoIZdrO33Z_Q87Nk3SHWdwYM04SzO76wtrvaAmeXlBGBljnOa-DV03NbxrLEHryKT1GCi-GWMaNpHqW_0vDWii9yt536lOJIusnt6lyO9O6Ig=s0-d)
Log out of your system and back in again. Click the speaker icon in the system tray and you will see Volume controls that resemble those on Windows 7 and Windows 8. Because Windows 10 doesn’t have the aero glass theme, the volume controls will not look exactly as they did in Windows 7 i.e. they won’t have the aero glass effect which makes them resemble the Windows 8 controls more. That said, the volume controls’ interface is a good trade-off between the aero glass effect and the Modern UI.
![[IMG]](https://lh3.googleusercontent.com/blogger_img_proxy/AEn0k_uqrnBYJQQhFM_MwGu5glggUPR8G4Np4AwQfT_noBy5BKYMjK_3i6L8aSQ5AmFgQfiIeDlC90lOGdxvF_ViF-kESVLb0c9BWMt-iwPkULLQ6HpvK9XGUxYCGWmbvyYTy-DmxsCxJZpMhyoX5XiKuxo=s0-d)
You can use the scroll wheel to increase or decrease the volume with the controls selected. You can open the volume mixer which you couldn’t do from the default volume controls. The on screen volume display will still appear if you use the volume up/down, and mute/unmute keys on your keyboard. This does nothing to it. If you’re looking to disable the on-screen volume indicators, here’s an app that does that as a side function.
Open the windows registry by typing ‘regedit’ in Windows Search. Navigate to;
HKEY_LOCAL_MACHINESoftwareMicrosoftWindows NTCurrentVersionMTCUVC
If the MTCUVC key doesn’t exist already, you will have to create it manually. To do so, go to Edit>New>Key. Make sure you add the key under CurrentVersion and name it MTCUVC.
In the key, add a new registry file. Go to File>new>DWORD (32-bit) Value and name it “EnableMtcUvc’ without the quote marks. Set its value to 0.
Log out of your system and back in again. Click the speaker icon in the system tray and you will see Volume controls that resemble those on Windows 7 and Windows 8. Because Windows 10 doesn’t have the aero glass theme, the volume controls will not look exactly as they did in Windows 7 i.e. they won’t have the aero glass effect which makes them resemble the Windows 8 controls more. That said, the volume controls’ interface is a good trade-off between the aero glass effect and the Modern UI.
You can use the scroll wheel to increase or decrease the volume with the controls selected. You can open the volume mixer which you couldn’t do from the default volume controls. The on screen volume display will still appear if you use the volume up/down, and mute/unmute keys on your keyboard. This does nothing to it. If you’re looking to disable the on-screen volume indicators, here’s an app that does that as a side function.
Go to link Download
Saturday, August 27, 2016
HOW TO CONTROL MOUSE MOVEMENT USING AWESOME BODY GESTURES S
HOW TO CONTROL MOUSE MOVEMENT USING AWESOME BODY GESTURES S
 |
| HOW TO CONTROL MOUSE MOVEMENT USING AWESOME BODY GESTURES,S |
Are you want to convert your desktop of laptop in to kinect kind of thing you saw for those Microsoft consoles. There is an amazing tricky method which allows you to control your system mouse with bodys movement and gesture.
Camera mouse is an pioneering and modern device that can effortlessly move your mouse cursors by just using your body gesturess. It is like labeling something and using your webcam to follow that thing and when it moves it simply moves your mouse. There is no need to add extra hardware in your systems CPU. Just you need to install webcam it will work without any fault. precise use of this webcam is explained clearly on their official website cameramouse.org. This amazing tool is best for disable people or those which have any trouble to use the mouse. Just stick a dot and you are prepared to rock and roll.
This small tool have a lot of setting you can modify it and set it according to your requirement.You can select the clicking option that will able you to click anything in specific time period on setting panel.
Follow the given below easy step to download this tool and to use this tool on your system.
- Download camera mouse (DOWNLOAD)
- Extract the zip file to get exe setup.
- Double click on .ese setup.
- Install this software on your PC.
- A green rectangle icon will appear on your desktop
- Now run this tool by double clicking on green rectangle
- Your webcam will start running and your face would be detectable
- Now use your mouse to click on any part of your face or body to track
- A green or blue rectangle would be marked on that place on your body as shown in below image.

- This will start moving as you move, as your body will move cursor will start move.
- Now you can easily click on any part and entertain mouse movements with bodys movement.
DONT FORGET TO SHARE WITH YOUR FRIENDS BY CLICK ON THE BELOW LINKS
Go to link Download
Subscribe to:
Posts (Atom)