Showing posts with label windows. Show all posts

Tuesday, November 29, 2016

HOW TO DOWNLOAD WINDOWS 7 WINDOWS7 KAISE DOWNLOAD KARE

HOW TO DOWNLOAD WINDOWS 7 WINDOWS7 KAISE DOWNLOAD KARE


hello dosto hamari is site mein aap sab ka swagat hai jaisa ke hamne bataye tha pichli post mein ham windows 7/8 install aur download karne ka tariqa aaj ham windows7 ko download karne ka tariqa sikhenge
step1.sabse pehle ham ise download karenge DOWNLOAD KIJIYE IS LINK SE AAP DIRECT DOWNLOAD KAR SAKTE HOO JAB AAP ISE DOWNLOAD KARLE TOH ISE INSTALL KAISE KARE ISKI JAANKARI MAINE PICHLI POST MEIN DI HAI YHAN CLICK KAR KE HAMARI POST PADHEY


enjoy kijiye aur follew share jarore kare 


Go to link Download

Read more »

How To Cook Everything App Of The Bestselling Cookbook on Windows Phone

How To Cook Everything App Of The Bestselling Cookbook on Windows Phone


How to cook everything is a bestselling cookbook from New York Times columnist Mark Bittman. The cookbook contains 2000 recipes and 400 how to illustrations.The book was released on 1998. This book can help anyone to become a fantastic cook. Happily, this book is now available as a Windows phone app.


How to cook everything app is a simple digital cookbook. This app once downloaded can be used without any internet connection. The app contains about 2000 simple recipes and hundreds of how to illustrations; equipments, techniques and ingredient information and even meal planning ideas.This is a easy-to-use app with flexible search capabilities. You can also browse for recipes and reference information. Bittmans Picks, featured recipe, quick dinners and favorites provide quick access to selected recipes.


When you select a recipe you will be given an overall idea of what you are going to make, required list of ingredients and the steps and variations you can make to a recipe.

On the overview page you will get information about the meal you are going to make, time to prepare/cook it, number of servings and so on.

Next is the ingredients page. Just like the name, it list the ingredients which you need to prepare the selected recipe. The steps page contains all the steps to make the recipe. One of the drawback of this app lies there. The steps page does not contain much photos. Additional photos in this section would definitely be good.


This app is available at a price tag of $2.99 in the Windows Phone Store. You can also try the trial of this app, fully featured, for 3 days. How To Cook Everything App is just simple and awesome and you should definitely try this out.

Download How To Cook Everything For Windows Phone

Did you try this app? Then share your reviews with us 

Go to link Download

Read more »

Monday, November 28, 2016

How To Pangu Jailbreak iOS 8 1 iOS 8 On Windows

How To Pangu Jailbreak iOS 8 1 iOS 8 On Windows


As you know, the Pangu jailbreak for iOS 8.1 - iOS 8 released recently turned out to be the first jailbreak for iOS 8 as well as for iPhone 6 and above.


Are you planning to jailbreak your iOS 8.1-iOS 8 using Pangu? If you are looking for a complete guide, then he this article is a must read. The jailbreak process is a pretty easy and painless. Then Click here to continue reading..

Go to link Download

Read more »

Sunday, November 27, 2016

Hotspot Shield 5 4 0 For Windows Download FREE

Hotspot Shield 5 4 0 For Windows Download FREE


Hotspot Shield Latest For Windows. Through a VPN Hotspot Shield ensures that you are private, secure and anonymous online. 100% free.Hotspot Shield creates a virtual private network ( VPN) between your laptop and the wireless router.

 This dense tunnel prevents spyware and hackers from seeing your e -mail, instant messages, credit card information or anything else you send over a wireless network. This means that you remain anonymous and protect your privacy.

Whenever you surf the Web, you and your equipment exposed to multiple threats and risks online; Hackers can steal your passwords and financial information and the websites you visit may contain malware.

Hotspot Shield 5.4.0 For Windows Download FREE

Hotspot Shield VPN software uses advanced encryption technology to secure your browsing session, to detect and block malware and allows you to access your favorite content from anywhere. You can even bypass geographic restrictions to unblock Facebook Youtube unlock or unblock a website in countries that censor the content.

Requirements:.
Windows ALL

Information:.
Developer: AnchorFree
License / Price: Adware
Size / OS: 7.7 MB / Windows 2K / XP / Vista / 7 / 8 
Published On: Apr 25, 2016

Hotspot Shield 5.4.0 For Windows Download From Developer


Go to link Download

Read more »

How to Enable Windows 10 Hidden Dark Theme

How to Enable Windows 10 Hidden Dark Theme


Windows 10s new default topic is splendid, with loads of white — from window foundations to white title bars. Microsoft fabricated a dim, dark topic into Windows 10, however its covered up.
Microsoft has said it will keep taking a shot at Windows 10, so its conceivable this component will be enhanced and there will be a simple switch for it in the Settings application later on. For the present, heres the way you need to actuate the dim subject.

Redesign: Weve been told the registry change just chips away at the Professional, Enterprise, and Education releases of Windows 10. it wont chip away at the Home version for reasons unknown. Were investigating it.

Empower a far reaching Dark Theme

Microsoft might in the long run add a flip to the Settings application that switches between a framework wide light topic and dim subject. This is the way it deals with Windows Phone. For the time being, you can even now empower a framework wide dull subject — it just requires altering the registry. This will empower the dull subject for a significant number of all inclusive applications, however not every one of them.

You can do this physically with the directions underneath, or download our Enable Dark Theme on Windows 10 registry hack. Simply double tap the included .reg record to empower the dull topic, and double tap the other included .reg document to re-empower the light subject.

After you run the document, log out and log back in or restart your PC.

on the off chance that you need to do this by hand, youll have to open the registry editorial manager and make the accompanying keys. In prior forms of Windows 10, this worth was named "SystemUsesLightTheme", however its named "AppsUseLightTheme" in the last form of Windows 10.

Under HKEY_LOCAL_MACHINESOFTWAREMicrosoftWindowsCurrentVersionThemesPersonalize, make a DWORD worth named "AppsUseLightTheme" with the estimation of "0".

Under HKEY_CURRENT_USERSOFTWAREMicrosoftWindowsCurrentVersionThemesPersonalize, make a DWORD worth named "AppsUseLightTheme" with an estimation of "0".

Log out and log back in, or restart your PC. Erase these qualities later (or set them to "1") to re-empower the light subject.

Dull Themes for Microsoft Edge and the Windows Store

Microsofts new Edge program has a simple to-empower dull subject. In Edge, open the menu and select Settings. Select the "Pick a topic" box, and pick "Dull." This will make Edges program interface dim.

This choice wont change the shades of website pages, which will remain for the most part white. Making most website pages seem dim would require a custom template, which wont be an alternative until Microsoft Edge inevitably picks up backing for program augmentations.

The Windows Store likewise has a dim subject, in spite of the fact that its covered up. Open the Windows Store and press Ctrl+T to flip the dim subject. Press Ctrl+T again to change back to the light subject.

Microsoft may add this alternative to more applications in future application upgrades that take off through the Windows Store. The above traps both work regardless of the fact that you havent empowered the framework wide dim subject alternative.

Dull Theme for Traditional Desktop Applications

While numerous all inclusive applications will now utilize a darker topic, desktop applications like the File Explorer window will keep on utilizing their standard, light, white-overwhelming subjects. You can empower a dull subject for desktop applications similarly you could on past renditions of Windows — by empowering a custom visual style.

Windows includes a few "High-differentiate" desktop topics you can empower on the off chance that you truly need a dim subject. To discover this alternative, right-tap the desktop, select Personalize, select Themes in the Settings window that shows up, and select "Subject settings". Select one of the high-differentiation topics at the base of the window. On the other hand, these topics arent the most attractive, so you presumably wont have any desire to utilize them.

To get a higher-quality dim topic on the Windows desktop — one that progressions the interface of the File Explorer window to look dull, for instance — youll have to do likewise you needed to do on past variants of Windows. This includes fixing your uxtheme.dll to permit client made visual styles and downloading outsider Windows styles from the Internet.

Numerous applications do offer their own topic highlights, so you could likewise simply topic singular applications you depend on. For instance, you could introduce dim subjects for the Chrome or Firefox programs.

Windows 10s dull subjects unquestionably appear like a work in advancement. As this is a choice on Windows Phone — now known as Windows Mobile at the end of the day — it might in the end be cleaned enough and turn into an appropriate choice in Windows 10s Settings application. Be that as it may, notwithstanding when it does, despite everything youll host to chase down third-gathering dim subjects for the desktop. The choice just applies to those new all inclusive

Go to link Download

Read more »

Saturday, November 26, 2016

How to Install Android 4 3 on Windows PC Jelly Bean

How to Install Android 4 3 on Windows PC Jelly Bean


If you are interested in installing and testing the latest Android 4.3 , But you do not have any android supported devices? Dont worry you can try it on your computer with install the SDK or the Android emulator .


First you have to download and install VirtualBox on Windows,then you can run Android 4.3 on a virtual machine.It will work on windows XP/7/8 .


Steps to Install Android Operating System on PC.
1. Download and install VirtualBox if you do not already have.

2. Download  an ISO files on the page of Android-x86. Download the Android 4 .3.

2. Create a new machine and select "Linux" for type and "Linux 2.6" .

3. Then run the new virtual machine and select the ISO file Android-x86 that you downloaded.

4. If the steps of installation as shown in the video in detail and restart your virtual machine.

5. Once on the screen welcome, follow the installation wizard to configure Android 4 .3 with a Google account that will be used to download and install applications and games from Google Play.

Thats all. If you have any difficulty installing , feel free to leave your comments.

Note : Some applications or games do not work properly for lack of drivers in sound and camera.


Go to link Download

Read more »

How to Integrate a Remote SFTP Directory into Your Windows Explorer

How to Integrate a Remote SFTP Directory into Your Windows Explorer


In the event that you much of the time get to a remote SFTP catalog, you know great what a bother it is to work just by means of stand-alone SFTP customer. Perused on to perceive that it is so natural to incorporate the remote index into Windows Explorer.
Why Do I Want to Do This?

Opening up a devoted SFTP customer for the infrequent document exchange isnt a lot of a bother, however in the event that youre as often as possible getting to a remote index for purposes, for example, transferring downpour or NZB records to a watch registry, rolling out continuous improvements to documents on a web server, or generally much of the time bouncing all through the remote area, it can be a genuine agony to continually associate and reconnect the committed customer.

Today, were highlighting that it is so natural to incorporate secure remote access into Windows Explorer so that getting to and exchanging records is as straightforward as opening up My Documents.

What Do I Need?

For this instructional exercise youll require the accompanying things:

A Windows-based PC

A duplicate of Swish (free)

A SFTP record to test your association

A note on our routines: since Windows 2000, Windows has bolstered direct FTP access through Windows Explorer. You can basically sort ftp://username@example.com in any Windows Explorer location bar and afterward connect to your secret word to get to a remote FTP host.

The issue with this setup, however it works easily, is that FTP is intrinsically shaky, and aside from essential document exchanges of openly accessible information (like getting a Linux distro), it ought to be kept away from. Further exacerbating the entire security issue is that Windows has no inherent instrument for setting up a SFTP connection–this is the place Swish comes in.

Introducing and Configuring Swish

2013-06-19_095743

The establishment process for Swish is your run of the mill and straight forward establishment. Run the installer, acknowledge the permit understanding, affirm the establishment area, and let it tear.

After the application is introduced, it will show up as though not a mess has happened. With a specific end goal to see the expansion Swish has made to your framework, explore to My Computer. There you will see a section under "Other" for Swish:

2013-06-19_100148

Double tap on the passage to go into the Swish system registry. There are two catches not ordinarily found in Explorer "Include SFTP Connection" and "Dispatch key operators". Of essential significance to us it the SFTP association catch; in case youre interfacing with a server that uses open key verification, then again, youll additionally need to know about the "Dispatch key operators" catch as it executes Pageant, a free key specialists application included with Swish.

2013-06-19_100355

Snap "Include SFTP Connection" and round out the data for your host:

2013-06-19_102233
Snap make, and watch that another passage exists in the Swish catalog:
2013-06-19_102431
When you tap on a passage surprisingly youll be incited to support the SSH key for that association:
2013-06-19_102918
Click "I believe this key: store and join" and afterward, when incited, enter your secret key. You will just need to enter your watchword once; it will be put away alongside your affirmed SSH key for simple and quick future access to your remote registry.

In the wake of endorsing the key and entering your secret word, youre ready to go:

You now have appropriate and incorporated access to your remote SFTP index from inside of Windows Explorer. You can open documents, duplicate records, and generally work with your remote records as though they were nearby to your machine.

Have a cool Explorer reconciliation tip to share, SFTP related or generally? Join the discussion beneath to share your ti

Go to link Download

Read more »

How to Enable Aero Glass Style in Windows 8

How to Enable Aero Glass Style in Windows 8


How to Enable Aero Glass Style in Windows 8

Aero glass style is the amazing feature of window 7 which is not present in window 8.If your are window 8 user and want to see aero style on your desktop then its not tough task.Following are some steps to enable 
 Transparent Glass effect in windows 8,you can use same method to enable aero glass style.Follow the given below steps.


To activate Transparent Glass Effect in Windows 8, You need to Follow Some Simple steps.

Step 1: Right Click on you desktop and select Personalize. A windows will open Like the Below pic.


Step 2. As shown in the above pic , Click on high contrast White To enable that Theme, Then Click on Color.

Step 3.After Clicking on Color a window will Open. Dont do anything with that window, Leave it as it is.

Step 4. Right Click on Desktop Again and Click on Personalize, Now choose Windows Default Theme To enable it.


Step 5. Now Go back to color and Appearance Window that you kept open earlier and just click on Save Changes.

Thats it you will get the Aero Glass Effect in Windows 8 Too.
you may face some Graphical Curruption when You move any window but This is the closest To Get aero Glass effect in Windows 8

Go to link Download
Read more »

Friday, November 25, 2016

How to Add a PIN to Your Windows 10 Account

How to Add a PIN to Your Windows 10 Account


Windows 10 Pin
With each new form of Windows, new and imaginative components are enhancing the aggregate client involvement in distinctive ways. Windows 10 is rapidly developing in prevalence due to a limited extent to its imaginative security highlights, and among these security alternatives are new sign in choices like the PIN code.
You can enter a numeric PIN, or follow an example of motions on a photo, or with fitting equipment you can even utilize Windows Hello — a biometric sign-in system that sweeps your unique mark, your face, or your iris. In this article, well demonstrate to you proper methodologies to add a PIN to your record in Windows 10.

Why Using a PIN is a Better Option

On the off chance that a secret word is bargained somehow, the individual who has entered the framework may have entry to all stages that are connected to that watchword. Then again, if a PIN is traded off, they can utilize it just on that gadget; they cant utilize it to sign into your record on some other gadget.

Likewise, the individual must be physically present so as to enter the PIN, and this is not the same with a secret key. On the off chance that somebody takes your PC they cant sign in unless they know your PIN. Likewise, remember that the PIN login highlight is fundamental on the off chance that you need to exploit extra security highlights accessible in Windows 10, for example, Windows Hello, the iris peruser, or a unique finger impression scanner.

Furthermore, obviously, a PIN is much less demanding to enter on a touchscreen gadget like the Surface tablet.

Add a PIN to Your Account

Open the "Settings" application, and snap/tap on the "Records" symbol. Snap/tap on "Sign-in choices" on the left side, and snap/tap on the "Include" catch under "PIN" on the right side.

On the off chance that incited to check your record secret key, enter your neighborhood account watchword and snap/tap on "alright".

On the off chance that you have a Microsoft account, then enter your Microsoft account secret key and snap/tap on "Sign in". Subsequent to entering your secret key to affirm your character, enter the numbers in a dialog box. The base length is four digits (0–9 just; no letters or exceptional characters permitted), yet your PIN can be the length of you need. On the off chance that you have to check what youve set as of right now then select the symbol to the right half of the dialog box. This will quickly uncover the number youve entered.

The main criteria for picking a PIN is that it must be no less than four digits in length. There are no impediments on most extreme length or intricacy. Here are a few contemplations before you pick a PIN:

Utilizing more digits will make the PIN harder to figure yet ensure you can enter the PIN rapidly and precisely, generally theres little advantage over simply utilizing a secret key.

Utilizing a straightforward PIN (0000, 0123, 1111, etc) will make it simple to figure; pick arbitrary numbers.

Reusing PINs from your ledgers or charge card number ought to be maintained a strategic distance from. Likewise, abstain from utilizing the same PIN on distinctive gadgets.

Change the PIN for Your Account

Open the "Settings" application, and snap/tap on the "Records" symbol. Snap/tap on "Sign-in choices" on the left side, and snap/tap on the "Change" catch under "PIN" on the right side.

Enter your present PIN at the top, enter another PIN and snap/tap "alright".

In the event that you cant sign into Windows 10 with your PIN, youll be offered a connection that says "Sign-in choices." When you pick that, youre offered the greater part of the sign-in alternatives youve made in this way: picture watchword, PIN, Windows Hello, and consistent secret word.

Reset the PIN for Your Account

Open the "Settings" application, and snap/tap on the "Records" symbol. Snap/tap on "Sign-in alternatives" on the left side, and snap/tap on the "I overlooked my PIN" join under "PIN" on the right side.

Confirm your record watchword, and continue setting up another PIN. Keep in mind, in the event that you boot to Safe mode, youll have the capacity to sign in with your watchword, and not with some other sign-in choices. Closing this article, its very simple to setup a PIN and on the off chance that youve not yet empowered it on your gadget, do it

Go to link Download

Read more »

Monday, November 21, 2016

How to replace the motherboard without re installing Windows XP

How to replace the motherboard without re installing Windows XP


Tutorial mengganti Motherboard di XP supaya tidak error & install ulang

Bagi para pembaca InfoTeknologi pasti pernah mengalami kejadian ketika anda membeli komponen baru komputer, baik untuk upgrade ataupun mengganti device yang rusak.
Kalau anda hanya mengganti grafik card, network card atau sound card pasti tidak akan menemui masalah; setelah anda booting ulang windows XP akan men-detect hardware baru lalu cukup masukkan cd driver maka proses installasi selesai.
Tapi masalah besar akan terjadi apabila komponen yang anda upgrade / ganti adalah motherboard ataupun prosessor dengan tipe yang berbeda, dijamin 99,99 % Windows XP anda akan berwarna biru (Blue Screen of Death)

Berikut tutorial supaya anda dapat mengganti / mengupgrade motherboard di Windows XP tanpa harus repair ataupun install ulang Windows XP anda.

Windows XP menyimpan informasi hardware komputer kita pada regisrtry, jadi yang cukup anda lakukan ialah dengan merestart registry hardware anda ke kondisi awal saat anda, caranya:
Cara masuk ke Windows Recovery Console
  • Masukkan CD Windows XP, Restart komputer, masuk ke Bios lalu buat supaya komputer anda booting melalui CD.
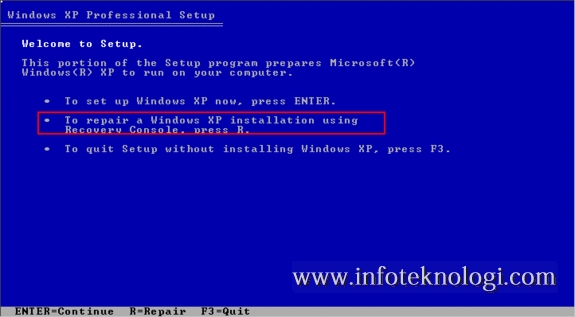
  • Ketika Layar “Welcome to Setup” Muncul, klik tombol R keyboard untuk memulai Recovery Console
  • Akan diminta memasukkan Administrator password, masukkan bila ada, namun bila anda tidak menset password tekan Enter saja.
Tutorial mengganti motherboard tanpa install ulang XP
  • Di command prompt Recovery Console ketik baris berikut (setiap baris tekan enter)
md tmp
copy c:windowssystem32configsystem c:windows mpsystem.bak
delete c:windowssystem32configsystem
copy c:windows epairsystem c:windowssystem32configsystem
  • Ketik Exit untuk keluar dari Recovery Console komputer anda akan merestart.
Matikan komputer, ganti motherboard atau prosesor komputer anda dengan yang baru lalu nyalakan ulang komputer anda, Windows XP akan masuk tanpa menampilkan Blue Screen dan akan menginstall ulang driver hardware pada komputer anda. (Windows XP akan menginstall ulang semua driver hardware anda, bukan hanya driver motherboard / prosessor)
Anda bisa melakukan hal diatas tanpa menggunakan Windows Recovery console, yaitu dengan cara memindahkan harddisk ke komputer lain atau booting dengan OS lain (Windows 7 atau Linux) atau menggunakan Hiren Boot CD.
Yang perlu anda lakukan adalah mengcopy file ‘system‘ di folder c:windows epair lalu menimpanya di folder c:windowssystem32configsystem (Ini karena anda tidak bisa melakukan copy dan delete file system saat anda menggunakan Windows XP)
Note: Untuk Windows 7 anda tidak perlu melakukan hal diatas, karena Windows 7 akan secara otomatis menginstall ulang driver bila anda mengganti motherboard atau prosessor tanpa harus mengalami Blue Screen of Death.

Go to link Download

Read more »

How to Download and Install Windows Phone 8 1

How to Download and Install Windows Phone 8 1


Windows Phone 8.1 is probably the most-anticipated update in the history of Microsofts operating system for smartphones. The OS adds several essential features such as a notification centre, greater start screen personalisation, Skype integration and even a keyboard that lets you swipe to type.
In April this year, Microsoft had unveiled Windows Phone 8.1 and its desktop counterpart Windows 8.1, promising several new features, bringing the platform on par with Android and iOS in terms of functionality. The update also adds a smart voice assistant called Cortana, but this feature isnt available in India yet.

Microsoft had announced that the update would be rolled out to all Windows Phone 8.0 smartphones on June 24. Since the announcement, smartphones such as the Lumia 630 and Micromax Canvas Win have been launched with Windows Phone 8.1.

Before you get to downloading the update, you should check which version of Windows Phone your device is running. To do that, open Settings > about. Here you will see the OS version under phone information. If it is Windows Phone 8.0, your phone should be getting the 8.1 update. Before updating, ensure that your phone has sufficient battery life. We recommend that you update while charging your phone to make sure that it updates without a hitch. Heres how to get the latest


Windows Phone 8.1 update on your smartphone.


1) Open Settings, scroll down and tap the "Phone update" option.

2) Now tap "Check for updates". Your Windows Phone device will now check if the new update is available. You can download the update if it is available.
[post_ad]
3) Alternatively, you may tick the option below check for updates, which reads: Automatically download updates if my data settings allow it. This way, your phone will update software automatically as long as you are on a WiFi connection.

download-install-and-sign-in-to-skype-for-business-for-windows-phone-8.1
If your phone doesnt show any updates available, youll have to wait a while longer. The review note on Microsofts support site reads, "The distribution of these incremental updates may be controlled by the mobile operator or the phone manufacturer from which you purchased your phone, and installation will require that your phone have any prior updates. Update availability will also vary by country, region, and hardware capabilities." Alternatively, you may download the developer preview of Windows Phone 8.1 to get a taste of the OS before it is officially available for your smartphone.
We hope you managed to update to Windows Phone 8.1.

Don’t forget to Share it with your friends via Facebook & Google+ and Twitter, And if you like the article How to Download and Install Windows Phone 8.1 and you may even Subscribe for New post, to get directly in your mail inbox.

Go to link Download

Read more »

How To Fix “This Copy of Windows Is Not Genuine” Notification in Windows 7

How To Fix “This Copy of Windows Is Not Genuine” Notification in Windows 7


Have you ever experienced the pop-up message “This Copy of Windows Is Not Genuine” which shows up once the copy of widows 7 you are running expires? Aside from the Windows OS expiring, another thing that causes this notification to show up is when you are running a pirated copy of the windows software.
Fix Windows Is Not Genuine
My neighbour had a piece of this experience this morning, when he saw this message on his computer. Being an occasional user, he knows little about the system. Lucky him I was still at home preparing for work when this happened, and so I helped him fixed it while he plan on how to get a genuine copy later.

What are the effects of not fixing this message?

There are couple of things which can happen to your computer when your Windows OS expires or reads not genuine, some of them which are:

  • Your wall paper will disappear, and you won’t be able to put any either, your desktop screen will just go black
  • Frequent and irritating 5 minutes pop up message reminding you that you are using a Windows OS that is not genuine
  • Your system if after 30 days you did not fix the issue will go critical
So how can I fix this?

Ordinarily, some folks will tell you that your computer needs to be formatted to be able to fix the problem (and you are charged heavily for that) while others will advice using some named softwares to resolve the problem. But in this post, I will be sharing with you two (2) simple steps I used to fix this problem for my friend.

To fix this problem with few minutes follow these instructions which I have divided into two (2) parts.
Note: You must complete the two parts to be able to get this problem fixed

PART I: Search and Uninstall Windows Update KB971033
PART II: Rearm Windows

Here are the procedures

PART I: Search and Uninstall Windows Update KB971033

Step 1: Go to "Control Panel" and click on Windows Update

Step 2: Look to the bottom left corner of the page and click on "Installed Updates" If the link isn’t there, hit “View Update History” and hit then “Installed Updates” link at the top.

Step 3: Scroll down to the section titled “Microsoft Windows” and look for update KB971033.

Step 4: Right click it and hit “uninstall”. Hit okay. (Note: There are many updates with KBxxxxxxxx, make sure you select KB971033)

Step 5: Restart your computer and head on to PART II

PART II: Rearm Windows

Step 1: Click the Start Menu and type COMMAND PR in the start menu search box.

Step 2: Right click COMMAND PROMPT and select RUN AS ADMINISTRATOR.

Step 3: In the command prompt window type:

slmgr.vbs -rearm
      
and press enter. (Note: There is a space between slmgr.vbs and -rearm, so make sure you type it with the space)

Step 4: Now reboot/restart your computer to see the problem fixed!

Be sure to turn off windows update or else you will face the same problem again. Alternatively, you can hide Windows Update: KB971033 in your windows update history.

The method I have provided in this post is 100% safe and guaranteed more than that of using a software. If you follow the step by step guide correctly, you should have the problem fixed.

What you should have in mind

There is however, one thing you should know, this post is not an encouragement to be using a pirated copy of Windows, it would be very nice you buy a genuine software that way you are guarantied.This post is only a temporary help to fix the problem while you work on getting a genuine copy of Windows OS.

Go to link Download

Read more »

Saturday, November 19, 2016

How To Automatically Close The Edge Browser When Windows 10 Opens It

How To Automatically Close The Edge Browser When Windows 10 Opens It


Microsoft is aggressively pushing the Edge browser on to users. With the present preview builds, it’s undone the little hacks users had in place to route Cortana’s searches through Google and their browser of choice. It’s more or less a tug of war at present with Windows 10 insisting that anything that Cortana searches for be routed through Edge and users consistently saying No to it. For many Cortana is just a fast way to look search for an app but it will often turn a query into a web search and if you accidentally click it, Edge will open. Edge Blocker is a portable app that will automatically close Edge whenever it opens either by accident or by Windows.


Download Edge blocker and run the app. Click the ‘Block’ button and minimize the app. Any time Edge opens, Edge Blocker will close it.

[IMG]

To be fair, Edge Blocker is not without its faults. When you minimize the app, it continues to appear on the Taskbar instead of minimizing to the system tray. It’s also a bit slow at closing Edge. The browser window will open and you will see the big blue loading screen before Edge Blocker closes it.

There’s room for improvement but if Microsoft is going to persistently push the unwanted browser on to users, these little apps are going to become popular fairly fast despite their shortcomings. The current state of Edge on the preview builds is not too encouraging. Granted the browser is going to be a half-baked version on a preview build, it’s still disappointing. In the Preview Build 14342, it’s almost impossible to use and for a browser that’s been around for almost a year now that isn’t encouraging in any way.

Download Edge Blocker For Windows


Go to link Download

Read more »

How To Activate GodMode In Windows 7 8 and 10

How To Activate GodMode In Windows 7 8 and 10


Godmode means you can control all things from a single click. Godmode in the window gives you the ability to control all settings, features and all other important from a single place.
Mean you can see all control panel settings in a single folder, that’s a really good for every pro-internet user
If you enable God Mode in windows you can see all control panel settings and shortcuts in one folder. This hack was first revealed in 2007 and works with all windows versions like window 7, window 8 and also on window 10..
GodMode name has nothing to do with this trick. Use your name instead of GodMode and it’ll work just fine because GodMode is just a name given to this trick as it got popular.of features.

How to Enable or Activate God Mode in Window 7, 8 and 10 

  1. Make a New Folder in Your Desktop.


    Make a New Folder
  2. Then rename the New Folder to GodMode.{ED7BA470-8E54-465E-825C-99712043E01C}


    Read more »