


![[IMG]](https://lh3.googleusercontent.com/blogger_img_proxy/AEn0k_uf_0zDgax5gHQqZz3QcG0B4CwtMJke186-WKOgjR9qB6NsNbd-9mEByv-SU3gQ3NsBAIcb7N8qvQ6Khm7jkywpFFh0yvvsRINqJHRpCMYhR7dBRjdRzpiDFz4ZJfOGA841ne28QRgcX4U03Zk=s0-d)

Godmode means you can control all things from a single click. Godmode in the window gives you the ability to control all settings, features and all other important from a single place.
Mean you can see all control panel settings in a single folder, that’s a really good for every pro-internet user
If you enable God Mode in windows you can see all control panel settings and shortcuts in one folder. This hack was first revealed in 2007 and works with all windows versions like window 7, window 8 and also on window 10..
GodMode name has nothing to do with this trick. Use your name instead of GodMode and it’ll work just fine because GodMode is just a name given to this trick as it got popular.of features.
How to Enable or Activate God Mode in Window 7, 8 and 10
- Make a New Folder in Your Desktop.Make a New Folder
- Then rename the New Folder to GodMode.{ED7BA470-8E54-465E-825C-99712043E01C}


Tuesday, November 15, 2016
How to fix Windows 10 brightness control not working issue
How to fix Windows 10 brightness control not working issue
However, the Windows 10 free upgrade from Windows 7 or 8.1 also brings its own share of bugs and installation issues including problems with adjusting display brightness on some PCs.
Redmond Pie reports that the problem manifests itself by not allowing users to increase or decrease the brightness of the connected display on Windows 10 machines.
In other words, it means laptop and notebook users cannot reduce the screen brightness when a low battery situation arises.
Nevertheless, folks at Redmond Pie have shared a simple step-by-step guide to fix this problem easily:
Steps to fix Windows 10 brightness control not working issue
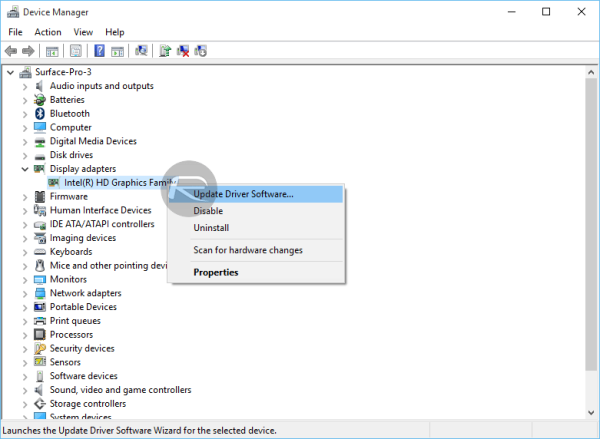
- Go to Start Menu > Search and type Device Manager.
- Then launch the Device Manager app and navigate to the Display adapters section.
- Just expand this option and right-click on the installed display driver.
- Then select Update Driver Software from the ensuing context menu.
- Select Search automatically for updated driver software in the resulting interface menu.
- Windows 10 should automatically download and install the necessary display or video card drivers via the detected internet connection.
- Once the drivers are installed successfully, you will see a notification message confirming the same along with the hardware details pertaining to the driver.
- Go to Start Menu > Search and type "Device Manager" and then launch the Device Manager app
- Scroll down to the Display Adapters entry in the device list and expand the option. Right-click on the installed display drivers, and choose Update Driver Software from the context menu.
- In the ensuing interface menu, choose Browse my computer for driver software.
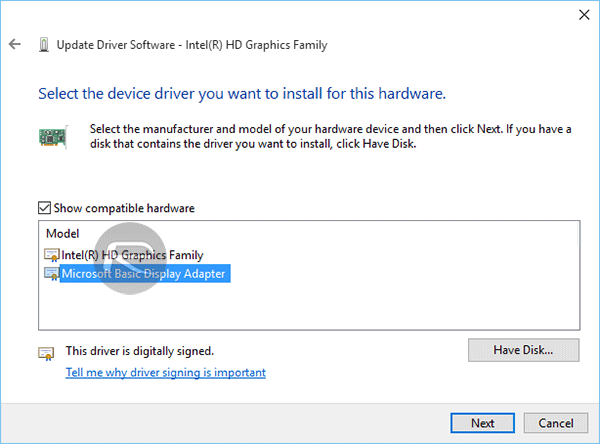
- Then choose the option "Let me pick from a list of drivers on my computer"
- In the next screen, select Microsoft Basic Display Adapter from the list under Show compatible hardware section. Then hit Next to continue.
- Windows should now install the selected driver and the display driver issue should no longer affect your screen brightness feature. You should now be able to increase or decrease display brightness without any hassles.
Go to link Download
How To Sideload Android Apps Onto Your BlackBerry 10 Device
How To Sideload Android Apps Onto Your BlackBerry 10 Device

With the launch of OS 10.2.1, BlackBerry brought the ability to install Android apps straight from the device. However, many in the community wanted to go a step further with access to Google Play — enter Snap. Snap is a native BlackBerry 10 application which allows you to download free and previously purchased apps from Google Play. Unfortunately, it can’t be downloaded from BlackBerry World, but we’ll show you how to sideload it from your computer.In order to do this, you’ll need to make sure you have a number of things ready:- A BlackBerry 10 device running OS 10.2.1.1055 or above.
- The latest Snap .BAR file, which can be obtained from the developer’s website here.
- A tool for sideloading. Option 1 is the Google Chrome BB10/PlayBook App Manager extension (requires Chrome 18.0+, a WiFi network that both your computer and phone are connected to). Option 2 is the DDPB application (PC-only, requires a USB connection, .NET Framework 2.0 or above, and Java Runtime Environment 6).
Once you have everything set, start by putting your device into Development Mode. Both methods of sideloading will require this, so it’s best to get it out of the way before we continue. In order to do this, go into the Settings app and find the Security and Privacy section. Once you’re in the appropriate section, you’ll find the Development Mode at the bottom of the page, so go ahead and enter that page.
 On the Development Mode page, you’ll see a toggle. We want this toggle enabled, so go ahead and turn it on. If your device has a password, it will request that you enter it. If not, it’ll ask you to set a password, which you’ll need to remember for later.
 If you’ve done everything correctly, you should get a notification telling you that Development Mode has been enabled on the device. Now we can go ahead and proceed with the actual process of sideloading.Option 1: Google Chrome extensionIf you haven’t already done so, start by downloading the extension here. A small BlackBerry logo should show up in your toolbar once it’s installed, which you can hit to access the extension options. If the logo doesn’t show up, just go to the Settings menu of Google Chrome and look for it under the Extensions tab on the left.
 Once you’re in the Extensions menu, look for the BB10/PlayBook App Manager, and select Options.
 After that, you’ll be taken to the options screen for the extension. Here, you’ll need to entire your device’s IP address in the Hostnames/IPs field.
 This can be found in the Settings app, on the About page.
 In the About page, hit the Category dropdown and switch to Network.
 Once you’re in the Network category, look for your IPv4 address under the Wi-Fi heading. If there is a forward-slash followed by some numbers after the address, ignore those and only use the numbers prior to the slash. As mentioned earlier, both your computer and your BlackBerry 10 device must be connected to the same WiFi network for this to work, as this extension will send the app over your WiFi network to the phone.
 Once you have the address, make sure to input it into the Hostnames/IPs field in the extension options and hit the Save button. IPs for other devices in the future can be added by separating them with a comma. When you’ve saved the IP, a link will be generated at the bottom of the page.
 If you’ve followed this tutorial correctly, then you should already have Development Mode enabled. If not, you’ll need to enable it now before you can click on the generated link. Once you click on the link, it will request the device password set when Development Mode was enabled. Go ahead and input that password, then hit Log In.
 Once you’ve logged in and the extension has loaded, the process is straightforward. Go find the Snap .BAR file you downloaded at the beginning, then drap and drop it underneath the Install Apps heading.
 And there you have it, after a short while the app should show up on the last screen of your device’s app drawer. For security purposes, it might be best to disable Development Mode at this point. A quick rundown of how to use the app can be found at the end of this How-To, after the text for Option 2.Option 2: DDPB (PC-only)Though DDPB’s developer has long abandoned the application, it still serves as a good method of sideloading for anyone who doesn’t wish to use Google Chrome or doesn’t have a Wi-Fi network to use. As mentioned at the beginning, you’ll need to download and install DDPB HERE, then make sure your device is hooked up to your computer via USB with Development Mode enabled. If DDPB doesn’t work when starting it, make sure your PC has .NET Framework 2.0 or above and Java Runtime Environment 6 installed.
 Once you have DDPB working, you should see a screen like the one above. It requires an IP address and password just like the Google Chrome extension, but the IP address here is different since this is a USB connection. To find the IP address for this, go back to the Development Mode screen we accessed at the beginning (Settings>Security and Privacy>Development Mode).
 As you can see, this screen has a different IP address listed — this is the address you need. So, go ahead and input that IP address into DDPB along with the password you set when enabling Development Mode. Once you’ve done that, hit the Connect button. Your OS version and PIN number should show up underneath if you’ve done everything correctly.
 With that done, now you want to hit the Add button near the top of the application. This will open a separate screen, where you’ll need to navigate to the directory where you’ve saved the Snap .BAR file. Select the file and press Open. This should add the app to the list, as seen above. Now you need to tick off the checkbox next to the app, and hit the Install button at the bottom. A pop-up will show you how far the sideloading process has progressed — give it a bit of time. Once it’s done, another pop-up will alert you to the fact.
 The app should now appear on the last page of your device’s app drawer, as seen above. Now that you’re done, it might be a good time to disable Development Mode for security purposes. If you want a quick tutorial on how to use Snap, keep on reading.Using Snap
 In order to use Snap, you’re going to need a Google Account. If you don’t already have one, you can make one quite easily here. Accounts with two-step verification enabled will need to create an application-specific password, which can be done here by hitting the Settings button for App passwords. All other accounts can just enter their regular username and password into the fields provided, then hit Sign In.
 Once you’re in the app, you can go ahead and browse whatever apps you like and install them. A few things to keep in mind however:
- Not all apps will work. Some will require Google Play services, which are not available in the Android Runtime for BlackBerry 10.
- If you want to download a paid app, you must first buy it through Google Play on your computer or on another Android device.
- Every time an app is downloaded, by default the installation file (also known as the APK file) is kept on your device, unless it is a paid app. If you want to avoid cluttering your device storage, swipe-down from the top of the screen to access the app settings, then scroll to the bottom and switch Post-Install Behavior to Delete APK. You can also clear the cache on this screen to further save storage space in the future.
And that’s everything you need to know to get Snap working on your BlackBerry 10 device. Now you can enjoy access to hundreds of thousands of additional apps on your phone. If you have any questions on the process just drop a comment below and we will be glad to assist you!
Go to link Download
Saturday, November 12, 2016
How to Make a Windows 10 PC a Wi Fi Hotspot
How to Make a Windows 10 PC a Wi Fi Hotspot


Living in a rural area tends to have its disadvantages, especially for mobile devices. I do have data plans that can get my smartphone accessing the web
, but the biggest hurdle is keeping a device updated. Mobile app and operating system developers are constantly updating their software, and the user is always being requested to update an app just to maintain functionality.Just today I got a message on my smartphone telling me WhatsApp is outdated and needs a new version to access messages. On a smartphone data plan, this is unrealistic, with limited connectivity, I have to resort to carrying my laptop into town to get it updated, but what about my smartphone? Internet Café’s in my country tend not to provide wireless access limiting you to a wired connection. Thankfully, there is a quick and easy work around for that; sharing your computers wi-fi connection.
With the release of Windows 7, Microsoft added the option to set up an ad-hoc Wi-Fi hotspot using your Wireless connection. If you are still running Windows 7, you can check out our next article. So what about Windows 10 PC? Unfortunately, the ability to create an ad-hoc network easily via the GUI was removed back with Windows 8. You can still create one, but there is a lot of annoying command line work involved.
Thankfully there is an even easier solution called Virtual Router Manager which and it still works in Windows 10. A free download, this small and open source utility takes care of the entire setup of turning your laptops wireless connection into a hotspot. All you need to do is select SSID (the name for your wireless connection) and a password, and you are good to go.
Go to the Virtual Router Manager page on CodePlex then proceed to download the latest version. Please make sure you download it directly from the CodePlex website. Many websites host this small app and inject it with spyware and other crap. If you try downloading it from one of those sites, there’s a possibility you’ll get hit by numerous drive-by downloads that are difficult to remove.
When you download third-party software, we always recommend downloading directly from the source page if possible, or use ninite.com. You don’t want to get infected with crapware from a site like CNET’s Download.com that is notorious for that type of conduct. For more about that, read the following articles:
Go to link Download