Friday, September 30, 2016
How to Change the iPhone Become Lawas iPod Touch
How to Change the iPhone Become Lawas iPod Touch
Sell ??old iPhone when you want to upgrade to a new model of iPhone is probably the most easy solution that you can take . But did you know that your old iPhone does not need to be sold because you can make it as an iPod touch , although without a data plan .
How to Change the iPhone Become Lawas iPod Touch

There are a number of steps that you need to do before making an old iPhone as an iPod touch , without a data plan . What is it ?
1 . SIM Card
Youll need a SIM card is the first card that you used to use to turn your old iPhone . You can use any SIM card with a note card is the card that was used to activate an old iPhone . Its a little complicated if you are no longer using the SIM card , but you still have the choice to look at eBay .
After getting a SIM card in question , please lakukang the steps below :
- Insert the SIM card into the slot your old iPhone .
- Connect your iPhone to the computer and launch iTunes .
- ITunes will recognize it as a new device and will activate it . Once activated , you can simply use it as an iPod touch !
You can use your old iPhone without SIM card but later on you will continue interrupted by a pop - up every time after reboot . Moreover , without a SIM card , you will not be able to restore your iPhone . For that you need to install the SIM card and not have to worry about data plan monthly pulses truncated unused alias .
2 . Turn off Cellular , Turn on WiFi
Because iPod Touch that you just created does not possess a data service plan or subscription internet data and also can not be used to send messages and call , you certainly do not need to activate the cellular radio feature . Instead , your iPod touch will depend on WiFi so make sure the WiFi feature is active . Perform the following ways :
- Open the Settings app , tap Cellular option .
- There is a toggle on the upper side to turn off the cellular radio . Tap on the toggle until the color turns gray .
- Go back to the Settings screen , tap WiFi .
- WiFi toggle Navigate towards ON
- Select the home network from the list and enter the password .
In this way , your old iPhone has turned into an iPod touch . You can use it to listen to thousands of songs , download and install apps and games , and even to see the maps when connected to WiFi . In short, the iPod touch is an iPhone that has no phone function .
In addition , you made ??the iPod touch can be used as a backup phone if your primary iPhone damaged or faulty . That is, by not selling the old iPhone then you can use it at any time without having confusion immediately buy a new iPhone . Good luck ;)
Go to link Download

How to Link Your Website With Facebook
How to Link Your Website With Facebook
When you have a website up and running, you may want to link it to your Facebook account. Here’s how:
EditSteps
- spaceplay / pauseescstopffullscreenshift + ??slower / faster (latest Chrome and Safari)??volumemmute??seek. seek to previous12…6 seek to 10%, 20%, …60%1Create a fan page. If you already have a Facebook account, ensure you create a fan page as opposed to creating a separate ‘business’ Facebook account as Facebook does not allow multiple accounts for one person. If you do set up two accounts and Facebook discovers this, they may ban both accounts.
- spaceplay / pauseescstopffullscreenshift + ??slower / faster (latest Chrome and Safari)??volumemmute
How To Post Blog Posts Automatically To Facebook Using Hootsuite
Read more »How To Post Blog Posts Automatically To Facebook Using Hootsuite
My fellow bloggers always send me mails and messages on how I use hootsuite to drive traffic to my blog, I always explain it to them but some will still be confused on how to use it effectively so i decided to write a tutorial on it so that they can fully understand it and those that have not heard of it too can use it.
So lets get started. You can use Hootsuite to drive traffic to your website or blog by connecting it with your Facebook, Twitter or GooglePlus accounts so that you can schedule posts which will be posted automatically on this social media platforms.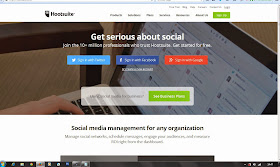
Now you are ready use to Hootsuite, go to :www.hootsuite.com on your browser and sign up if you are a new user or log in if you already have an hootsuite account. After you finish setting up your Hootsuite account and you logged in you will see the screen below.
Click on Add Social Networks, a new window will pop up as seen below :
You can connect only one social network if youre still using the free account but if you upgrade to Hootsuite Pro, you can connect as many as you want. See the screen below after I connected my Facebook account.
In the screen above you can see the Facebook groups I belong to but you I can only add 2 groups because I am still using free account, you should now add the two groups you want to be posting in.
Now we are done with the connecting ish, lets now link our Feeds to Hootsuite to so that it can do the work for us automatically.
Go to Publisher and click on RSS Feeds
A new window will pop up click on RSS/Atom so that you can connect your Feed to Hootsuite so that anytime you post it will automatically posted in your groups.
Now click on that Plus icon below RSS/Atom
Thats the screen you will see above.
Fill the form as explained below:
Feed Url: Type in your blog address
Network to send feed items to: Select your Facebook profile or one of your groups.
Check this feed for new posts every: You can select every one hour, two hours and so on.
When new posts are found, send up to: You choose 1, 2 3 and so on.
Save your feed when you are done.
After you save the above, anytime you publish on your website/blog, Hootsuite will always be updating your Facebook for you with your latest blog posts.
In next tutorial, I will share with you, how to schedule your blog posts to be published on Facebook, Twitter etc using Hootsuite.
Are you also using hootsuite? Kindly share your experience.Go to link Download
How To Root And Get Access To Google Play Store On Nokia X2 Dual Sim RM 1013
Read more »How To Root And Get Access To Google Play Store On Nokia X2 Dual Sim RM 1013

I got Rooted for my Nokia X2 and successfully install the supersu. Everything is attached below. Cheers!- Download & sideload the towelroot apk
- Run it and tap on "make it rain" to root
- Download & sideload the Supersu
- Run it > continue > Normal and reboot your device
CONGRATS! Now Your X2 is successfully rooted. Next Is To Get Google Play Store N ServicesStep to install Play Store:- Download and extract This File
- Copy the folder to your device / sdcard
- Install any Root Explorer app, we only need to use this to copy files
- Go to copied folder, copy all the files
- Go to /system/app and paste them there
- Reboot your device
- Enjoy!
OR U Can Use The Below App To Install Drivers,Root And Install Google Play>>>>Download HEREGo to link Download
How to Reset Your Forgotten Password In Windows
Read more »How to Reset Your Forgotten Password In Windows
Guys Today we will Learn How to Reset your Forgotten Password In Windows. Often People Tend To Forget their Password of Their Windows Password.
Forgetting any passoword is not fun, but luckily Here is the simple trick which i will show you to Reset your Forgotten Password.
REQUIREMENTS :
1. Windows Installation Disk.
2. A simple Command Line.
Follow Below Simple Steps :
Step 1: Insert Your windows disk And Boot Your Pc.
Step 2: Select " Repair Your Computer " From the lover Left Corner. Check the below Pic. Step 3: Follow on Till you get the below screen , You need to click on Command Promt.
 Step 4: Now The Real Trick,Type The below Command to backup the original Sticky keys File.copy c:windowssystem32sethc.exe c:
Step 5: Now Copy The Command Prompt Executable on top of the sticky keys executable :copy c:windowssystem32cmd.exe c:windowssystem32sethc.exeFollow The below Pic For More Idea on It. Step 6: Now Reboot Your PC.
Step 7: After Rebooting your pc, You will see a login Screen, All You need to do is Hit Shift Key 5 Times, You will get a Command Promt.Step 8 : Now to Reset Your Password just replace The Username and passoword with your own In Below line.net user Freak MyNewPassword
Thats all Now you can Login.
you probably want to put the original sethc.exe file Back, Then You have to just reboot into the installation CD, Open the Command Promt Again and Copy The c:sethc.exe file back toc:windowssystem32sethc.exe.Go to link Download
Thursday, September 29, 2016
How To Send Message From Your Phone To E mail
Read more »How To Send Message From Your Phone To E mail
Go to message box, text the e-mail address of the person give a space followed by your message, then send to 3333. Charges is N15 per sms.
E.g johneze83@yahoo.com- how are you. Send to 3333.
We Love Comments!Go to link Download
How to create Website Blog Extension for Browsers
Read more »How to create Website Blog Extension for Browsers
In this post i will tell you how to create a blog or a website extension for browsers.
To create extension Click here. Then Go To Build Your Own.
 Then Just Enter you blog/website URL and click Build.Then a code will appear.Paste on to you blog page/website page.refresh your blog/website scroll up and down a pop will appear for extension.
Go to link Download
Subscribe to: Posts (Atom)

