Showing posts with label change. Show all posts
Showing posts with label change. Show all posts
Friday, November 25, 2016
How to add Contact form on Blogger Change Style Install it on Static Pages
How to add Contact form on Blogger Change Style Install it on Static Pages
While going through various widgets on blogger dashboard i came across a must use widget that everybody on the bloggersphere network should use on his/her blogsite, which is the contact form.
?
?
 |
| By Egbo Harold |
The contact form for Blogger has the following features:
- Field for the user name
- Field for email
- Submit Button
- Field for the message (text-area)
Screenshot

How to Add Contact Form to Blogger
To add it to your blog, just select the Layout tab, then click on Add a gadget in the section you want to show, for example, if is in the sidebar you want to add the contact form. Then, select the More gadgets tab and add the Contact Form gadget.
Styling Contact Form
As the background is transparent, the form will integrate well, but its easy to modify using Style Sheets (CSS) to the appropriate selectors. Heres an example:
/* Contact Form Container */
.contact-form-widget {
width: 500px;
max-width: 100%;
margin: 0 auto;
padding: 10px;
background: #F8F8F8;
color: #000;
border: 1px solid #C1C1C1;
box-shadow: 0 1px 4px rgba(0, 0, 0, 0.25);
border-radius: 10px;
}
/* Fields and submit button */
.contact-form-name, .contact-form-email, .contact-form-email-message {
width: 100%;
max-width: 100%;
margin-bottom: 10px;
}
/* Submit button style */
.contact-form-button-submit {
border-color: #C1C1C1;
background: #E3E3E3;
color: #585858;
width: 20%;
max-width: 20%;
margin-bottom: 10px;
}
/* Submit button on mouseover */
.contact-form-button-submit:hover{
background: #4C8EF9;
color: #ffffff;
border: 1px solid #FAFAFA;
}
.contact-form-widget {
width: 500px;
max-width: 100%;
margin: 0 auto;
padding: 10px;
background: #F8F8F8;
color: #000;
border: 1px solid #C1C1C1;
box-shadow: 0 1px 4px rgba(0, 0, 0, 0.25);
border-radius: 10px;
}
/* Fields and submit button */
.contact-form-name, .contact-form-email, .contact-form-email-message {
width: 100%;
max-width: 100%;
margin-bottom: 10px;
}
/* Submit button style */
.contact-form-button-submit {
border-color: #C1C1C1;
background: #E3E3E3;
color: #585858;
width: 20%;
max-width: 20%;
margin-bottom: 10px;
}
/* Submit button on mouseover */
.contact-form-button-submit:hover{
background: #4C8EF9;
color: #ffffff;
border: 1px solid #FAFAFA;
}
This is how it will look like after applying the style:

To add this style, go to Template > Edit HTML, click on the sideways arrow next to <b:skin>...</b:skin> and paste the code just above ]]></b:skin> (press CTRL + F to find it):

How To Add Contact Form In A Static Page
First step is to add the Contact Form gadget (Layout) and second, to edit the template (Template > Edit HTML) to remove most of the gadget. You have to search for the id "ContactForm", expand the widget by clicking on the black arrow on the left (same with the includable) and then delete the part that I have colored in red (see below):

Part to be removed:
<b:widget id=ContactForm1 locked=false title=Contact Form type=ContactForm>
<b:includable id=main>
<b:if cond=data:title != "">
<h2 class=title><data:title/></h2>
</b:if>
<div class=contact-form-widget>
<div class=form>
<form name=contact-form>
<p/>
<data:contactFormNameMsg/>
<br/>
<input class=contact-form-name expr_id=data:widget.instanceId + "_contact-form-name" name=name size=30 type=text value=/>
<p/>
<data:contactFormEmailMsg/> <span style=font-weight: bolder;>*</span>
<br/>
<input class=contact-form-email expr_id=data:widget.instanceId + "_contact-form-email" name=email size=30 type=text value=/>
<p/>
<data:contactFormMessageMsg/> <span style=font-weight: bolder;>*</span>
<br/>
<textarea class=contact-form-email-message cols=25 expr_id=data:widget.instanceId + "_contact-form-email-message" name=email-message rows=5/>
<p/>
<input class=contact-form-button contact-form-button-submit expr_id=data:widget.instanceId + "_contact-form-submit" expr_value=data:contactFormSendMsg type=button/>
<p/>
<div style=text-align: center; max-width: 222px; width: 100%>
<p class=contact-form-error-message expr_id=data:widget.instanceId + "_contact-form-error-message"/>
<p class=contact-form-success-message expr_id=data:widget.instanceId + "_contact-form-success-message"/>
</div>
</form>
</div>
</div>
<b:include name=quickedit/>
</b:includable>
</b:widget>
<b:includable id=main>
<b:if cond=data:title != "">
<h2 class=title><data:title/></h2>
</b:if>
<div class=contact-form-widget>
<div class=form>
<form name=contact-form>
<p/>
<data:contactFormNameMsg/>
<br/>
<input class=contact-form-name expr_id=data:widget.instanceId + "_contact-form-name" name=name size=30 type=text value=/>
<p/>
<data:contactFormEmailMsg/> <span style=font-weight: bolder;>*</span>
<br/>
<input class=contact-form-email expr_id=data:widget.instanceId + "_contact-form-email" name=email size=30 type=text value=/>
<p/>
<data:contactFormMessageMsg/> <span style=font-weight: bolder;>*</span>
<br/>
<textarea class=contact-form-email-message cols=25 expr_id=data:widget.instanceId + "_contact-form-email-message" name=email-message rows=5/>
<p/>
<input class=contact-form-button contact-form-button-submit expr_id=data:widget.instanceId + "_contact-form-submit" expr_value=data:contactFormSendMsg type=button/>
<p/>
<div style=text-align: center; max-width: 222px; width: 100%>
<p class=contact-form-error-message expr_id=data:widget.instanceId + "_contact-form-error-message"/>
<p class=contact-form-success-message expr_id=data:widget.instanceId + "_contact-form-success-message"/>
</div>
</form>
</div>
</div>
<b:include name=quickedit/>
</b:includable>
</b:widget>
After you have saved the template, go to Pages and paste the following code into a new blank page with the title you want:
<div class=widget ContactForm id=ContactForm1>
<div class=contact-form-widget>
<div class=form>
<form name=contact-form>
<p>Name<p>
<input class=contact-form-name id=ContactForm1_contact-form-name name=name size=30 type=text value=/>
<p>E-mail *</p>
<input class=contact-form-email id=ContactForm1_contact-form-email name=email size=30 type=text value=/>
<p>Message *</p>
<textarea class=contact-form-email-message cols=25 id=ContactForm1_contact-form-email-message name=email-message rows=5></textarea>
<input class=contact-form-button contact-form-button-submit id=ContactForm1_contact-form-submit type=button value=Submit/>
<p class=contact-form-error-message id=ContactForm1_contact-form-error-message></p>
<p class=contact-form-success-message id=ContactForm1_contact-form-success-message></p>
</form>
</div>
</div>
</div>
<div class=contact-form-widget>
<div class=form>
<form name=contact-form>
<p>Name<p>
<input class=contact-form-name id=ContactForm1_contact-form-name name=name size=30 type=text value=/>
<p>E-mail *</p>
<input class=contact-form-email id=ContactForm1_contact-form-email name=email size=30 type=text value=/>
<p>Message *</p>
<textarea class=contact-form-email-message cols=25 id=ContactForm1_contact-form-email-message name=email-message rows=5></textarea>
<input class=contact-form-button contact-form-button-submit id=ContactForm1_contact-form-submit type=button value=Submit/>
<p class=contact-form-error-message id=ContactForm1_contact-form-error-message></p>
<p class=contact-form-success-message id=ContactForm1_contact-form-success-message></p>
</form>
</div>
</div>
</div>
Messages will be sent to the same email that you have registered in Blogger.
Hope you enjoyed this tutorial? Please, use the share buttons and make sure you drop a comment below so i can know if my little tutorial helped or not.Thanks for stopping by!
Go to link Download

Tuesday, November 22, 2016
How to Change Android Fonts without Root Permission
How to Change Android Fonts without Root Permission
Hi guys, TaseUpdates is back again with another great tutorial powered by Don Sampson, I am here to show you how you can install custom android fonts on your android device even if you havent rooted your phone. Now.,Isnt that amazing???

Less talk.,More Action. Lets Swipe into Action!
How can I change android fonts without Root Permission?
For you to be able to change your android font without rooting your phone, you will have to download;
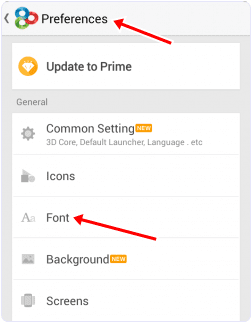 Now you will see the list of fonts then select the font of your choice from there.
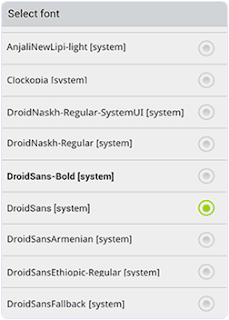
Its done your fonts will be changed immediately.
Hope you Enjoyed this Little Tutorial!!!
Less talk.,More Action. Lets Swipe into Action!
How can I change android fonts without Root Permission?
For you to be able to change your android font without rooting your phone, you will have to download;
- GO Launcher Ex from playstore by clicking here
- After that, you will have to install GO Launcher Fonts from the Play Store. GO launcher fonts is an Amazing App that provide different fonts for your android device.
- Install and launch the Go Launcher App and from the home screen tap the Menu button at right corner and Select the preferences from the menu then look for the font option (as shown below)
Its done your fonts will be changed immediately.
Hope you Enjoyed this Little Tutorial!!!
Go to link Download
Friday, November 18, 2016
How to Change and Create a Android Logo In accordance in your own style with Androidify
How to Change and Create a Android Logo In accordance in your own style with Androidify
How to Change and Create a Android Logo In accordance in your own style with Androidify - Whats Androidify - Androidify is made google android applications that can make your avatar with andaroid logo, or in other words able to make the android logo in accordance with its own character. So far we know the logo android as a robot in green and shaped rigid, android logo google himself calls it by the name "andy". Then how about if we contumisasi the android logo in accordance with our wishes. add a variety of knick-knacks, and accessories in accordance with the latest fashion styles. Interesting is not it? see the image below.
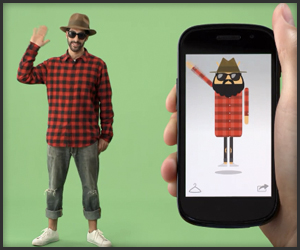
Androidify create our own android logo according to the character and fashion we
What can be done with Androidify
With Androidify we can change the android logo as we want, we can add the hair, adding to the variety Eksen fashion clothes and accessories, add glass eyes, adding pants, adding shoes, add hats, mustaches, jangut, and all things that smell fashion Style . Be logo android models themselves.
How to make own android with Androidify logo
I use it quite easy you just need to install this free app via google android play store open and make your hearts content. there is no limit we can tamper add modifiers themselves according to their own desires then we can also membagikanna our edits to various social networks such as google plus, facebook, twitter or email.
below is a screenshot application androidify

Features the latest androidify
• Currently available almost all fashion accessories that can be customized to the android logo, with the word lai we can it about with android logo at will
• make available tutorials android logo with androidify
• share feature to various social networks such as Google Plus, twitter, and facebook
Download Androidify Android apk
Official android application created by Google Inc. and is available free for download via google play for free. Androidify latest version is 1.1.3. Cdengan apk 2.1Mdan sizes can be installed for both katas android 2.1 OS smartphone / android phone and android tablet
Download Androidify Android apk app via google play store or click here
Androidify create our own android logo according to the character and fashion we
What can be done with Androidify
With Androidify we can change the android logo as we want, we can add the hair, adding to the variety Eksen fashion clothes and accessories, add glass eyes, adding pants, adding shoes, add hats, mustaches, jangut, and all things that smell fashion Style . Be logo android models themselves.
How to make own android with Androidify logo
I use it quite easy you just need to install this free app via google android play store open and make your hearts content. there is no limit we can tamper add modifiers themselves according to their own desires then we can also membagikanna our edits to various social networks such as google plus, facebook, twitter or email.
below is a screenshot application androidify
Features the latest androidify
• Currently available almost all fashion accessories that can be customized to the android logo, with the word lai we can it about with android logo at will
• make available tutorials android logo with androidify
• share feature to various social networks such as Google Plus, twitter, and facebook
Download Androidify Android apk
Official android application created by Google Inc. and is available free for download via google play for free. Androidify latest version is 1.1.3. Cdengan apk 2.1Mdan sizes can be installed for both katas android 2.1 OS smartphone / android phone and android tablet
Download Androidify Android apk app via google play store or click here
Go to link Download
Thursday, November 10, 2016
How To Root and Change IMEI On The Mtn Android Phone
How To Root and Change IMEI On The Mtn Android Phone
Concerning the MTN Android phone, its not a new thing, the phone has been out in the Store/Market place for some time now.

In any case you wish to root you MTN mini Android, yes you can, and this can be done even within 20 minutes.
Just follow the simple steps below!

- Download VROOT Official Chinese version here or VROOT unofficial English Version here.
- Install it on your System
- Enable USB debugging on your Android device. To enable USB debugging, go to Developers => USB debugging then, tick it. If you cant find it, start tapping on build number until you see developer options.
- Plug USB chord to your device and VROOT will detect your phone.
- Click on Root and your phone will Reboot.
- VROOT cant find my device? Download PDANET to install necessary drivers or Download Adb Driver Installer (Universal).
- Download GIPv4.1 Software for generating BB Imei.
- Download MTKDRIOD Tools
- Open the MTK Droid Tools it must detect the information of your Device. Click on Root Button to gain SuperSU permission and the yellow box down should turn to green.
- By the left, you will see IMEI, just tap on it. Generate your Imei and replace it with the older one.
- Dont forget to backup your old Imei before you followed the above procedures.
That is all.
Hope this info helps? Feel free to share this post with your friends using the Share/Like buttons. Never miss any of my future post CLICK HERE TO SUBSCRIBE Once entered, you will have to check your inbox for a confirmation email containing a confirmation link. Once you VERIFY your email by clicking on the confirmation link in the message, you will never miss any future articles.
Dont Forget To Add your View, Comments on this Post.
Always Like and Share Posts, You can Make use of the Share Buttons below.....
Dont Forget To Add your View, Comments on this Post.
Always Like and Share Posts, You can Make use of the Share Buttons below.....
Go to link Download
How to Change Keyboard in iOS 8
How to Change Keyboard in iOS 8

How to Change Keyboard in iOS 8
QuickType
At first glance, QuickType might appear to be an ordinary keyboard but it starts to show its worth after you use it for a while. It suggests words based on your typing style in different apps such as Messages and Mail. If someone asks you a question such as "Dinner or movie?", QuickType automatically suggests the words Dinner and Movie. Heres how to enable or disable QuickTypes features.
1. On your iOS device, tap Settings > General > Keyboard.
2. Now scroll down and youll see several options such as Auto-Corrections, Auto-Capitalisation, Check Spelling, Enable Caps Lock and Predictive. Flick the switch next to each one to enable or disable it.
3. In case you cant see predictions on your iOS 8 keyboard, make sure the switch next to Predictive is On. [post_ad]
4. You can also set keyboard shortcuts such as typing "omw" for "on my way". In the same menu, just tap Shortcuts to configure this.

Third-party keyboards
We liked the QuickType keyboard a lot, but some people want more features, such as swipe to type. Thats where the new third party keyboards enter the picture. While these keyboards offer features QuickType does not, there is a risk of the app recording and storing your keystrokes. All apps claim that they respect user privacy but theres no way to verify this.
At the time of writing this article, we also faced some issues with the third party keyboards. Lag and even crashes occurred from time to time. These issues will likely be fixed in later updates, but if you dont want to wait, this is what you need to do to get these keyboards:
1. Go to the App Store and install your favourite keyboard app.
2. Open Settings > General > Keyboard > Keyboards.
3. Tap Add New Keyboard.
4. Select the keyboard you want to use from the list.
5. Tap Edit at the top to change the order in which the keyboards appear. The primary keyboard you want to use should be at the top.
6. Now open any app that lets you type, such as Messages or WhatsApp. Tap the globe icon to switch between keyboards. Some keyboards such as Swype require you to tap and hold the globe icon to switch between keyboards, but tapping the globe icon switches keyboards in most other apps that weve tried.

1. Go to Settings > General > Keyboard > Keyboards.
2. Select the keyboard you want to give full access to.
3. Slide the switch next to Full Access to On. To disable it, slide this switch to Off.
4. Full Access is a keyboard-specific option, so youll have to enable or disable it individually for each third-party keyboard.
That covers how to use third-party keyboards on iOS 8. Do you like the default QuickType keyboard or do you use third-party keyboards? Let us know via the comments.
Don’t forget to Share it with your friends via Facebook & Google+ and Twitter, And if you like the article How to Change Keyboard in iOS 8 and you may even Subscribe for New post, to get directly in your mail inbox.
Go to link Download
Monday, November 7, 2016
How To Change Your Default Search Engine In Chrome
How To Change Your Default Search Engine In Chrome

1. Tap on the Overflow menu button in the top-right corner of the app, which will automatically drop down a menu. Depending on if you have any tabs open or not, the menu will list different choices

2. Tap on the settings button, which will launch you into the main settings menu.
3. Under the basics section, just tap on the Search Engine button. The search engine that is currently selected as the default is written in a smaller font under the button text.

4. Now you will be in the selection menu, and you will be able to select from 5 different search providers. You can choose from Google, Yahoo, Bing, Ask and Aol. Google is set as default search engine in Chrome.
And if case if you are using the Chrome beta version there will slight changes when compared to the images shown above.
Go to link Download
Sunday, October 23, 2016
How to Change a Wordpress Logo in Login Page
How to Change a Wordpress Logo in Login Page

How to Change a Wordpress Logo in Login Page - I want to share a trick for wordpress. this trick is How to Change a Wordpress Logo in Login Page which can make your wordpress become more interesting.
You can to Change Wordpress logo, you can to put your photo or other picture in wordpress login page.. You want to try this??
This is the secret, First open the functions.php file, and copy this code:
function custom_loginlogo() {
echo ‘<style type=”text/css”>
h1 a {background-image: url(‘.get_bloginfo(‘template_directory’).’/images/login_logo.png) !important; }
</style>’;
}
add_action(‘login_head’, ‘custom_loginlogo’);
dont forget to copy logo file to image folder at your theme, and adjust the logo file name.. for example the name login_logo.png.
Ok, I hope you become more cool with the new logo..
Go to link Download
Saturday, October 22, 2016
How to Change Microsoft Edge to Search Google Instead of Bing
How to Change Microsoft Edge to Search Google Instead of Bing

Microsofts new Edge program uses Bing as its default internet searcher, however theres a decent risk you lean toward Google or another web crawler. Edge can utilize any web index that backings OpenSearch as its default.
Edge no more uses the old "hunt supplier" module framework IE utilized, so you dont need to stress over introducing those. It likewise has this choice effectively open — its not covered in the old rendition of IE, as it was on Windows 8.
In this article were utilizing DuckDuckGo as a sample internet searcher, on the grounds that you can change the program to hunt anything. On the off chance that you need Google rather, simply substitute Google in the guidelines wherever you see DuckDuckGo. In spite of the fact that well take note of that DuckDuckGo is an awesome web crawler as well.
Get More Search Engines
Microsoft Edge no more uses inquiry suppliers you need to introduce from Microsofts site. Rather, when you visit a website page that uses the "OpenSearch" look standard to uncover its web search tool data, Edge sees this and makes a record of the web crawler data.
This is the same way Google Chrome works, as well — visit a page with OpenSearch and itll naturally be distinguished.
You should do nothing more than visit the web search tools site — that is it. On the off chance that you need to introduce Google, visit Googles landing page. For DuckDuckGo, visit DuckDuckGos landing page. Not each web index bolsters OpenSearch yet, but rather we expect web crawlers will include support for this rapidly.

Change Your Default Search Engine
To change your hunt supplier, snap or tap the menu catch — that is the catch with three specks at the upper right corner of the MIcroosft Edge window. Select "Settings" in the menu.

Look down in the Settings board and tap or tap the "Perspective propelled settings" catch close to the base.

Look down again in the Advanced settings list and youll see the "Inquiry in the location bar with" box. Snap or tap it and select "Include new."

Youll see a rundown of accessible inquiry suppliers. Select the web crawler you need to utilize and snap or tap "Include as default."
In the event that the web crawler you need to utilize doesnt show up here, make certain youve gone by the internet searchers landing page first. On the off chance that you have despite everything it doesnt show up, that web crawler doesnt bolster OpenSearch yet. You might need to contact the web index and request that it bolster OpenSearch so you can utilize it as your default web search tool in Microsoft Edge.

Seek From the Address Bar or New Tab Page
You can now sort an inquiry into Edges location bar and press Enter — itll consequently seek your default web index. Edge will even give proposals from it in the drop-down box, expecting your web index underpins recommendations and you abandon them empowered in Edges settings.
This additionally influences the "Where to next?" box on the new tab page, giving you an approach to effortlessly look your most loved web index.
To rapidly seek with console alternate routes, press Ctrl + T to open another tab page or Ctrl + L to center the location bar on the flow page and begin writing your pursuit.
Obviously, this alternative doesnt influence anything outside Microsoft Edge. When you perform an inquiry from the Start menu or by means of Cortana and select "Pursuit the web," Windows will seek the web with Bing. Cortana is, all things considered, "controlled by Bing." The above alternative just applies to hunts you start from inside Microsoft Edge.
Obviously, this just changes a solitary programs settings. In the event that you utilize Internet Explorer for legacy applications, youll have to change its web index the way it was done in the good ol days. Chrome, Firefox, and different programs have their own particular default look alt
Go to link Download
Saturday, October 8, 2016
How to change Gmail email id Hack
How to change Gmail email id Hack
I can still remember many people googling for " How to change email id in Gmail ? " . Even i googled many times and finally i have found a solution to it !
It is very easy and this hack will certainly help you :
The answer is both Yes and No !

It is not possible to change your username in gmail. The username is chosen at the time the account is created and is the permanent identifier of the account . But if you need to use a different username, it is possible. You simply need to create a new account and move your content over from the old account. For that :
Create a new account
Sign in to new account you just created and Hit the Settings link and then Accounts and Import tab.
You need to use POP3 entry. Enter the following configuration:
Username: Your old gmail email address
Password: Password for your old gmail account
POP server: gmail.com
Port: 995
Always use secure connection: check
Label incoming messages: check
This will make sure all of your old mails along with recent ones continue to land upon your new email id . You can follow the instructions
Remember that if you delete an account, you can never get it back or reuse the address.
Now , the hope for answer Yes :
If you have email id like tom@gmail and if you want to merge your surname say Clinton !
Then tell all your friends to email you @ tom+clinton@gmail but not vice versa !
Similarly you can go on like tom+clinton+is+my+name@gmail.com thus , any name you enter after your existing unchangeable gmail email id your mail will be sent on your inbox !
And if you have made tomclinton@gmail.com and want to make name and surname separate then you can go tom.clinton@gmail.com . Mail will appear in your inbox but not like plus sign where you can go tom.clinton.is.my.nam@gmail ! This wont work in this case and works only for plus symbol !
This is Because Gmail doesnt recognize dots as characters within usernames, adding or removing dots from a Gmail address wont change the actual destination address. Messages sent to yourusername@gmail.com and y.o.u.r.u.s.e.r.n.a.m.e@gmail.com are all delivered to your Inbox, and only yours.
Hope you find it useful !
Go to link Download
Friday, October 7, 2016
How to change your boot animation on android
How to change your boot animation on android
I’m sure most Android users love the ability to change almost every aspect of their phone. One of these is the fact that you can change your boot animation (that animation that shows when you start your phone up). Granted you have root and a bit of common sense, this can be easily achieved by downloading an animation, and replacing your old one with it. As there’s root involved, there is a small chance something could go wrong in this process and damage your phone, although that chance is remote.
Step 1: Find an animation that you like
You’ll have the ability to chose from several different animations that you would enjoying seeing on your phone. These come in the .zip format and contain many images that make the animation. Don’t worry about this part though, just choose one that suits you. Also, try choose one that fits your screen resolution, otherwise it may end up being small or not fitting your screen. There’s some available here:
> http://androidbootanimation.com/
> http://forum.xda-developers.com/showpost.php?p=42849451
Step 2: Download and replace your old one
Once you’ve downloaded in the .zip format, don’t try open it. This won’t damage the file, but you don’t need to see what’s inside. With a root browser, find the file you just downloaded. It should be called ‘bootanimation.zip’, and you find it under Storage>Emulated>O>Download. Rename it something like ‘bootanimationnew.zip’. Copy it and find your way to the directory where the original lies. Find ‘storage’ in the main directory
![QuickMemo-_2015-08-01-12-13-20-183x300[12]](https://blogger.googleusercontent.com/img/b/R29vZ2xl/AVvXsEicbOB4GL1NupnAUjwDvoGQhGZlxgB82_0kfdNpBu3wjmbynUcr02gwiJH7vOJKfqpXO4ZGNp9MQnAl6sCNqOgAwmm0E-eIM8bAuIMeJKG-2CB-CUGOmB1ZFjbQ8UGYLn0AYl5_D84o0JdT/?imgmax=800 "QuickMemo-_2015-08-01-12-13-20-183x300[12]")
![QuickMemo-_2015-08-01-12-13-40-183x300[5]](https://blogger.googleusercontent.com/img/b/R29vZ2xl/AVvXsEhhep65rQH_BimNCBr9UOkpLqtA8WoNbhsNFSdnCx9Uws32BLELV_mIBAC2LnesWIx0CMMoC7tN4DoKkafJF3DnfKtiOwfx0ffWOc1LxFpPa4g4cJhLoX24QV1UTEwbw58Aq2S8zspV2LMy/?imgmax=800 "QuickMemo-_2015-08-01-12-13-40-183x300[5]")
![QuickMemo-_2015-08-01-12-13-49-183x300[6]](https://blogger.googleusercontent.com/img/b/R29vZ2xl/AVvXsEirpUDuf27FJamSBPegRbBfaPrz5Vp_-ueDRmdtk5y1cR_L0PUuM6O6gs5hP-EiKd76iwjg4vV2SsCRh05C-96D-2I75_GRYmzyJtKJ49XPQ-OKGWoo-StMBx-EG1IFomRitCYz75-d7YhP/?imgmax=800 "QuickMemo-_2015-08-01-12-13-49-183x300[6]")
![QuickMemo-_2015-08-01-12-14-00-183x300[5]](https://blogger.googleusercontent.com/img/b/R29vZ2xl/AVvXsEg2KlbrKuvD5XhtYELBm-M0CF9esnYEF-HXai3sYirm7N1ersXakq_z2ybnrD_b-EJvjoEETLaVXttEUg04f7laTSgSC_oU3VReSSZp81qvllaKvCOnTXkwL6H1DdY4IsKBzyjhJGy8yGhg/?imgmax=800 "QuickMemo-_2015-08-01-12-14-00-183x300[5]")
![QuickMemo-_2015-08-01-12-14-37-183x300[4]](https://blogger.googleusercontent.com/img/b/R29vZ2xl/AVvXsEihOxxay3V9geZQlF41L-Ap90x8AkkZFfLDzLKfB3-Vr_XaEYmXGIhBTL0M-QZ9F3bZwbD9_MwVdBEVEXCPHK4qnQplAi7gyObxRd9-VcOHvMOQ4Fek47hxmIu4hcuUkcaVpROsk0E6xy1I/?imgmax=800 "QuickMemo-_2015-08-01-12-14-37-183x300[4]")
This is where your downloaded file probably went
The original will be under system>media, and be labelled ‘bootanimation.zip’. The file with this name is the one that the phone runs, so paste the new one here. Rename the old one to something suitable, like ‘bootanimationold.zip’. Now rename the one you just downloaded to ‘bootanimation.zip’. Make sure the file is the same name as the old one.
Find “system” in the main directory


The one underlined red is the file Android uses, the ones underlined yellow are inactive animations with improper names Make sure the one you want to use. Although most phones use this setup, you might have to do further research if your phone works a bit differently. You can also check How to root the Samsung Galaxy S7 and S7 Edge Tips and Tricks
Step 3: Reboot your phone
Shut down your Android and start it up. If you followed the steps, you should now see the new animation! If you did something wrong, it’s likely to show an animation that simply glows ‘android’. You can’t really brick your phone doing this, so it’s actually a relatively safe tweak.[post_ad]
Don’t forget to Share it with your friends via Facebook & Google+ and Twitter, And if you like the article How to change your boot animation on android and you may even Subscribe for New post, to get directly in your mail inbox.
Go to link Download
Saturday, October 1, 2016
How to Change Chrome into a language tutor
How to Change Chrome into a language tutor
There are a considerable measure of activities you can do to take in another dialect, for example, listening to radio projects, perusing, and staring at the TV in your picked target dialect. In any case, to complete that you need to attempt to coordinate those sessions into your day by day life.
In case youre thinking that its difficult to contemplate, a Chrome application called Language Immersion for Chrome can kick you off or keep up practice on a dialect you definitely know.
You should simply give LI an objective dialect and rate your level of learning from beginner to familiar. At that point the augmentation will slip words or expressions from the objective dialect into the sites you visit each day. LI for Chrome uses Google Translate and is accessible for 64 of the dialects Googles Translate administration offers.
Heres the means by which it works.
Utilizing Language Immersion for Chrome
Download and introduce Language Immersion for Chrome. Once its introduced, click the symbol that appears to one side of the location bar. At that point simply pick your dialect, set your level of familiarity, and youre prepared to go.
Presently simply visit a site and youll see words or expressions that are highlighted and deciphered into the objective dialect. You must understand the made an interpretation of segment to assemble your vocabulary. In case youre having a truly extreme time, simply tap on the interpreted words and theyll return back to English. Snap again and they do a reversal to your objective dialect. The expansions settings likewise have an alternative to hear any interpreted bits talked utilizing Google Translate.
LI additionally sets the Google Translate site to consequently make an interpretation of words into your objective dialect.
At the tenderfoot level just little bits of sentences are deciphered into the dialect youre learning. It then builds the measure of deciphered segments as you physically knock up the trouble level. When you hit familiar, youll see full sections in the second dialect.
In the event that you ever need a break from LI for Chrome, simply tap the symbol again and after that hit the huge Off catch.
LIs thought is fairly strange since its a mess of English and whatever dialect youre concentrate, yet its a novel approach to get a tad bit of practice into your day.
Concerning the interpreted bits of sites, theyre about what youd anticipate from Google Translate. Theyre not generally idealize. The expansion would in some cases decipher gaming administration Steam as vapeur in French, for instance, and sentence structure and word endings for dialects that rely on upon setting can be somewhat wonky.
Its not a dialect learning framework by any methods, but rather its a convenient supplement to whatever other contemplating youre doing.
You should simply give LI an objective dialect and rate your level of learning from beginner to familiar. At that point the augmentation will slip words or expressions from the objective dialect into the sites you visit each day. LI for Chrome uses Google Translate and is accessible for 64 of the dialects Googles Translate administration offers.
Heres the means by which it works.
Utilizing Language Immersion for Chrome
Download and introduce Language Immersion for Chrome. Once its introduced, click the symbol that appears to one side of the location bar. At that point simply pick your dialect, set your level of familiarity, and youre prepared to go.
Presently simply visit a site and youll see words or expressions that are highlighted and deciphered into the objective dialect. You must understand the made an interpretation of segment to assemble your vocabulary. In case youre having a truly extreme time, simply tap on the interpreted words and theyll return back to English. Snap again and they do a reversal to your objective dialect. The expansions settings likewise have an alternative to hear any interpreted bits talked utilizing Google Translate.
LI additionally sets the Google Translate site to consequently make an interpretation of words into your objective dialect.
At the tenderfoot level just little bits of sentences are deciphered into the dialect youre learning. It then builds the measure of deciphered segments as you physically knock up the trouble level. When you hit familiar, youll see full sections in the second dialect.
In the event that you ever need a break from LI for Chrome, simply tap the symbol again and after that hit the huge Off catch.
LIs thought is fairly strange since its a mess of English and whatever dialect youre concentrate, yet its a novel approach to get a tad bit of practice into your day.
Concerning the interpreted bits of sites, theyre about what youd anticipate from Google Translate. Theyre not generally idealize. The expansion would in some cases decipher gaming administration Steam as vapeur in French, for instance, and sentence structure and word endings for dialects that rely on upon setting can be somewhat wonky.
Its not a dialect learning framework by any methods, but rather its a convenient supplement to whatever other contemplating youre doing.
Go to link Download
Friday, September 30, 2016
How To Change Nimbuzz Id Password
How To Change Nimbuzz Id Password
Change Nimbuzz id password using simple and easy way. Nimbuzz is not 100% secure from hacking and you may need to use strong password to avoid being hacked. You can change the Nimbuzz id password easily by follow the below steps.
1. Goto the following website Link.
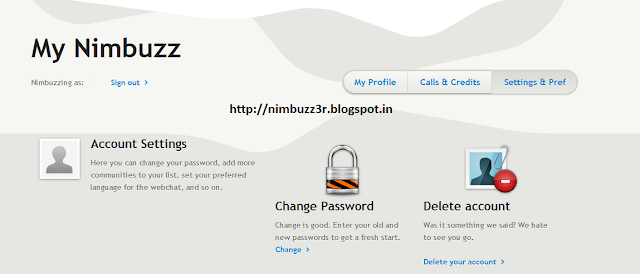
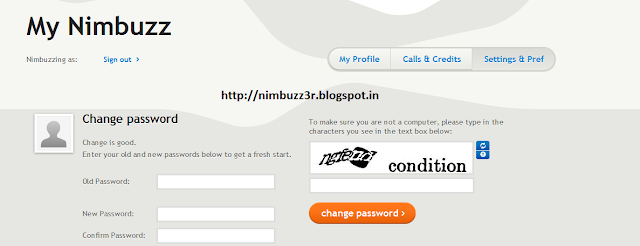
1. Goto the following website Link.
2. Write your Nimbuzz User Id and Password and login to Nimbuzz.
3. Select Setting & Pref option.
4. Click on Change Password on the page.
5. Write your Old Password, New Password and Confirm Password.
6. Write the Captcha and click on Change Password.
Thats it and your old Nimbuzz id password is changed to new password.
Go to link Download
How to Change the iPhone Become Lawas iPod Touch
How to Change the iPhone Become Lawas iPod Touch
Sell ??old iPhone when you want to upgrade to a new model of iPhone is probably the most easy solution that you can take . But did you know that your old iPhone does not need to be sold because you can make it as an iPod touch , although without a data plan .
How to Change the iPhone Become Lawas iPod Touch

There are a number of steps that you need to do before making an old iPhone as an iPod touch , without a data plan . What is it ?
1 . SIM Card
Youll need a SIM card is the first card that you used to use to turn your old iPhone . You can use any SIM card with a note card is the card that was used to activate an old iPhone . Its a little complicated if you are no longer using the SIM card , but you still have the choice to look at eBay .
After getting a SIM card in question , please lakukang the steps below :
- Insert the SIM card into the slot your old iPhone .
- Connect your iPhone to the computer and launch iTunes .
- ITunes will recognize it as a new device and will activate it . Once activated , you can simply use it as an iPod touch !
You can use your old iPhone without SIM card but later on you will continue interrupted by a pop - up every time after reboot . Moreover , without a SIM card , you will not be able to restore your iPhone . For that you need to install the SIM card and not have to worry about data plan monthly pulses truncated unused alias .
2 . Turn off Cellular , Turn on WiFi
Because iPod Touch that you just created does not possess a data service plan or subscription internet data and also can not be used to send messages and call , you certainly do not need to activate the cellular radio feature . Instead , your iPod touch will depend on WiFi so make sure the WiFi feature is active . Perform the following ways :
- Open the Settings app , tap Cellular option .
- There is a toggle on the upper side to turn off the cellular radio . Tap on the toggle until the color turns gray .
- Go back to the Settings screen , tap WiFi .
- WiFi toggle Navigate towards ON
- Select the home network from the list and enter the password .
In this way , your old iPhone has turned into an iPod touch . You can use it to listen to thousands of songs , download and install apps and games , and even to see the maps when connected to WiFi . In short, the iPod touch is an iPhone that has no phone function .
In addition , you made ??the iPod touch can be used as a backup phone if your primary iPhone damaged or faulty . That is, by not selling the old iPhone then you can use it at any time without having confusion immediately buy a new iPhone . Good luck ;)
Go to link Download
Sunday, September 25, 2016
How to change the appearance of the blog header
How to change the appearance of the blog header
The steps to change the appearance of the blog header are, as follows :
The first step,
let us know, how the size of the header before we create an image that will be added in it, this is done, for the size of the image were really fit with the size of the header, so the picture will looking good and fit.
and, to know the size of a blog header, please follow the steps below:
- Login to blogger.
- Click Layout ( desain ) >> Edit HTML.
the code usually written something like this :
# Header-wrapper {
background: transparent url (http://lingua-mysite.blogspot.com/images/flash/bg.jpg) no-repeat scroll 0 0;
border-bottom: 1px solid # A6A6A6;
margin-bottom:-13px;
}
In the listing above, we got the value of the header width = 936 px and height = 90 px, So, the width and height are the size of the header we need to determine the size of the image that we will create. and now we can specify the size of the image should we made is, 936 x 90 px.
The second step,
After knowing the size of the header, it is time to create a good picture, and try to draw the theme of the image is matches with the theme of the blog, you can create images using Photoshop, or other.
The third step,
when you finish drawing, upload images to your hosting, and get the Url link of the image, to be placed on your homepage.
The fourth step,
Change the codes on your homepage for the image appears as an imageheader,
Login to blogger >> and then click desain >> Edit HTML >>
check (tick) , the box of expand template widget.
Then, find the codes, # header-wrapper,
the complete codes are, as below :
# Header-wrapper {
background: transparent url () no-repeat scroll 0 0;
border-bottom: 1px solid # A6A6A6;
height: 90px;
margin-bottom:-13px;
width: 936px;
}
In the listing above , change the green codes and blink, with the url of the image.
If the background codes arent found in your the listing.
Add background code, as in the listing above.
After that, click Save template, and see the results.
note:
beckup and save the template, before changing or adding the HMTL code listing,
- to your blogging success -
Go to link Download
Friday, September 16, 2016
How to Root and Change Imei of Infinix HotNote X551
How to Root and Change Imei of Infinix HotNote X551
Hi readers,Today we are going to talk about a tutorial on how to root and also change the imei of infinix hot note X551. The last time we wrote a post a on infinix hot note, we posted the specification of the infinix hot note.
How to Root Infinix HotNote X551
1. First of all, you need to allowed third party installations in your device, if you want this app to install on your device. You can enable this option on your device setting. Go to Setting => Security => and there you can tick the “Unknown sources” box.2. Run and install KingRoot app on your device. Though its written in half Chinese Language but don’t worry, I will help you to learn a bit of Chinese language.
3. After successful installation, start the app and wait for KingRoot to fully analyze your device.
4. After a few seconds you will see the main window, the Chinese language
4. After a few seconds you will see the main window, the Chinese language
5. Click on the Big Green Circle on your device that says Root and wait for a few minutes (Your phone must be connected to the internet).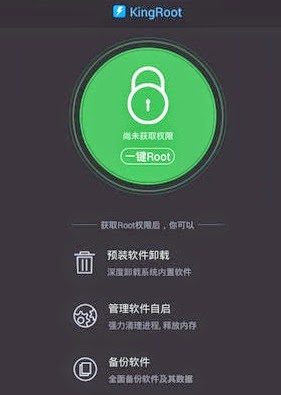
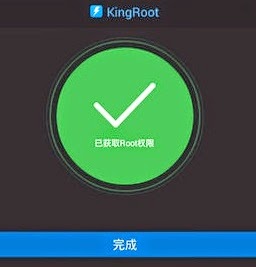
6. After a few minutes, you should see a tick mark in a green circle and the blue horizontal bar below the green circle, which means that your device has been successfully rooted! with the help of KingRoot.
The KingUser app will be installed for SuperUser access.
7. Download Root Checker from Play Store to verify your root privileges. After downloading, simply Install Root Checker, run it and you should get a success message after then.
Go to link Download
Tuesday, August 30, 2016
How to Change QualComm Device IMEI Samsung Without a PC
How to Change QualComm Device IMEI Samsung Without a PC
Its no News that Some Qualcomm Device users are find it difficult to change their Android device IMEI. If any of the previous posted method did not work for your device, here is another perfect working method. The method has been tested to work on Xiaomi redmi 1s, MTNSmart S720 and Samsung Ace 4. It may not work on all Samsung devices, while it works for some.
Disclaimer: Note that changing of IMEI is illegal in some countries, and I will not be held responsible for any consequences that befall the changer.
Remember to write down your original IMEI number and keep it safe. Also, backup your original IMEI incase anything goes wrong, you can easily revert back.
Materials Needed
1. Your device must be rooted
2. Xpose installer, download it here
3. Imei Changer, Play Store Link
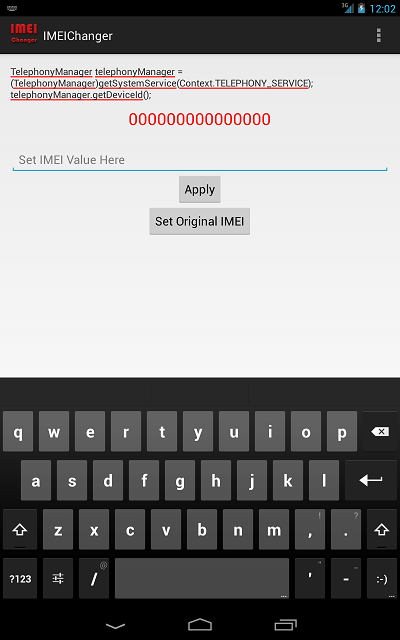
EXPOSED IMEI Changer - see screenshot above...
Now Follow the Steps below Carefully
1. Install Xpose installer and launch it
2. Click on Framework, click on install/update
3. When all is done, reboot your device
4. Install imei changer>>open xpose installer and click on modules, make sure IMEI changer is ticked then click on imei changer to launch the app
5. Generate your blackberry imei with IMEI Generator APK Version and input it in the space provided, then click Apply
6. Reboot your device and dial *#06# to confirm if your imei was successfully changed.
Best of luck.
Dont Forget To Add your View, Comments on this Post.
Always Like and Share Posts, You can Make use of the Share Buttons below.....
Disclaimer: Note that changing of IMEI is illegal in some countries, and I will not be held responsible for any consequences that befall the changer.
Remember to write down your original IMEI number and keep it safe. Also, backup your original IMEI incase anything goes wrong, you can easily revert back.
Materials Needed
1. Your device must be rooted
2. Xpose installer, download it here
3. Imei Changer, Play Store Link
EXPOSED IMEI Changer - see screenshot above...
Now Follow the Steps below Carefully
1. Install Xpose installer and launch it
2. Click on Framework, click on install/update
3. When all is done, reboot your device
4. Install imei changer>>open xpose installer and click on modules, make sure IMEI changer is ticked then click on imei changer to launch the app
5. Generate your blackberry imei with IMEI Generator APK Version and input it in the space provided, then click Apply
6. Reboot your device and dial *#06# to confirm if your imei was successfully changed.
Best of luck.
Dont Forget To Add your View, Comments on this Post.
Always Like and Share Posts, You can Make use of the Share Buttons below.....
Go to link Download
Subscribe to:
Posts (Atom)