Tuesday, November 29, 2016
How to Delete blackberry all Phone Book Contacts in One Go
How to Delete blackberry all Phone Book Contacts in One Go
OR
You can do this with the help of Desktop manager
Plug device To BB manager>
Desktop Manager> Device> Delete data> select Selected data> Tick Address Book> Press Delete
Go to link Download

Monday, November 28, 2016
How to delete and Recover Google or Gmail account
How to delete and Recover Google or Gmail account
A Google account gives you access to all of Google’s services, including Gmail, YouTube, Google+, Drive, and more. There’s certainly a lot of data you’ll be losing if you plan to delete your Google account. You may have a secondary account that you don’t use anymore, or have some other reason to do so, but if you want to delete your Google account permanently, it is quite easy to get done. Let’s take a look. How to delete a Google or Gmail account

If you have used your Google account for a while, you’ll probably have some important data that needs saving, such as emails, notes, photos, and other information. If there isn’t a lot, you can download them individually, but Google provides a simple way to backup all your data.
> Open your Google account settings by going to accounts.google.com.
> Under the “Personal info & privacy” option, click on “Control your content.”
> Once open, click on “Create archive.” There you can select which Google products you want the information saved from.
> You can then choose the file type of the archive and where you want to save it. You can also opt to get a download link via email, or save it to cloud services like Drive, OneDrive or Dropbox.
> Depending on how much information is being archived, the entire process could take a while.
Also, remember that you might have your Gmail address associated with other services as well, such as bank accounts, and other websites, so make sure that you keep a track of these accounts and update the information accordingly, before deleting your Google account.
Deleting your Google account
> Go to your Google account settings, and under the “Account Preferences” option, click on “Delete your account or services.” Then tap on “Delete Google account and data.”
> You will see an option to backup your data here as well, followed by a comprehensive list of all the content you will be losing access to when you delete your Google account.
[post_ad]
> At the end of the page, there are two acknowledgements you will have to accept before you can tap on the “Delete Account” button to permanently delete your Google account.
Deleting specific services only
> There you will see a list of services that you can individually remove.
> If you delete your Gmail account, you will have to add an alternate email address that will now be linked to the other Google services that you are still using.
Recover a recently deleted account
> Go to the password assistance page.
> Select “I’m having other problems signing in.”
> Then follow the instructions on the page to see if you can recover the account. Keep in mind that it might not be possible. Further, if you have deleted Gmail and have added another non-Google email address to be able to access other Google services, recovering your Gmail username will not be possible.

< How to Unlist Your Number From Truecaller Database
> How to download facebook videos on android phone
> How to stop Android apps running in the background
> How to Update Samsung Galaxy S6 marshmallow
Don’t forget to Share it with your friends via Facebook & Google+ and Twitter, And if you like the article, How to delete and Recover Google or Gmail account and you may even Subscribe for New post, to get directly in your mail inbox.
Go to link Download
Sunday, November 27, 2016
How to Delete Contact On Blackberry
How to Delete Contact On Blackberry
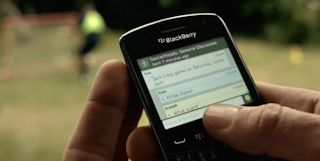
- Sign on the contacts in your bb.
- Press Menu, select Option.
- Once you’re on the menu option, type RSET on your bb keypad.
- After that will pop up a confirmation question, press YES.
- Completed.
Go to link Download
Monday, November 21, 2016
How To Delete Call Logs On the Samsung Galaxy S6
How To Delete Call Logs On the Samsung Galaxy S6
By default, call logs are saved on Samsung Galaxy S6, including duration of call and other details. For most users, this is not good enough and for others, they simply want to get rid of it so it can be viewed by other persons.
A guy who has a girlfriend, but regularly calls other girls will definitely want to delete his call log so his girlfriend doesn’t find out… hoho.
In either case, the solution is here.
Delete Call Log On Samsung Galaxy S6
Launch the Phone app
Access the Log tab on the left side of the screen
Select More button just at the top
Tap Edit
Now, use the checkbox to delete a single entry or select “All” to delete all Call log entries on Samsung Galaxy S6. Note that the process to delete call log on Samsung Galaxy S6 will also work for Galaxy S6 Edge.
Go to link Download
Thursday, November 10, 2016
How to delete or disable your Google history and data
How to delete or disable your Google history and data

How to look at your Google data
> Web & App History
> Voice & Audio Activity
> Device Information
> Location History
> YouTube Watch History
> YouTube Search History
How to disable your Google history
> Go to your Google history page from any browser.
> Click on the data section you want disabled. (e.g. Location History).
> Select the 3-dot menu button located on the top-right corner of the page.
> Select “Settings”.
> You will find a switch next to the writing “Your searches and browsing activity”. Toggle it off.
> You will get a warning telling you some information about what this action may cause.
> Select “Pause” if you still want to go through with this.
> Repeat the process for each of the history sections you want to disable. Or from any of the Settings pages, select “SHOW MORE CONTROLS” and toggle them all off.
How to delete your Google history
> Go to your the Google history page from any browser.
> Click on the data section you want disabled. (e.g. Location History).
> Select the 3-dot menu button located on the top-right corner of the page.
> Select “Delete options”.
> You can pick whether you want to delete data from today or yesterday. Selecting “Advanced” will allow you to delete the past 4 weeks of activity. But if you really want every single trace of information to disappear you can choose “All time”.
> Make your selection and click on “Delete”.
> Confirm your selection.
> Repeat the process for each of the history sections you want to delete.
> How to take a screenshot on your macbook
> How To Root Sony Xperia C C2305
> How To Root Samsung Galaxy S Duos S7562 with pc
It should also be noted that deleting your history won’t make you completely invisible to Google. If you have a Google account to use services like Gmail, YouTube or any others, you’re being tracked. For more information on how to delete your Google account, head to our guide here.[post_ad]Don’t forget to Share it with your friends via Facebook & Google+ and Twitter, And if you like the article, Don’t forget to Share it with your friends via Facebook & Google+ and Twitter, And if you like the article, ,and you may even Subscribe for New post, to get directly in your mail inbox. and you may even Subscribe for New post, to get directly in your mail inbox.
Go to link Download
Friday, October 28, 2016
How to remotely delete Android phone data
How to remotely delete Android phone data
Make sure you can delete your data while you still have your phone If you want the ability to remotely wipe your phone, there are two settings that you need to switch on before your phone goes missing. It should be enabled by default, but check to make sure. lets see how to Remotely delete android data
Go to Google Settings > Security > Android Device Manager. Look for Allow remote lock and erase and make sure it’s switched on.
The second toggle that needs to be enabled is also in the Android Device Manager screen: find Remotely Locate This Device, and make sure its on. If these settings aren’t enabled, then Device Manager won’t be able to locate your device.
Android Device Manager works for tablets
as well, but if you have multiple user accounts, only the person set as tablet owner can set the Android Device Manager features. It’s a good idea to take a few other precautions too: don’t store anything sensitive on microSD cards (remote wiping can’t erase them), make sure you have a decent lock code or pattern, and consider investing in an app such as AirDroid or Lookout. Both apps offer remote wipe features, but they can also transfer crucial data before pulling the plug.
 If Android Device Manager cant find your phone, itll wait for the device to connect to Wi-Fi or cellular.
 How remotely wipe your Android phone
Oh no! Your phone’s gone! It’s time for action, and by action we mean Android Device Manager. You can access Android Device Manager in two ways: via the Android Device Manager app on another Android device, or via the Android Device Manager website.
At that point you can erase all the data from your phone, but we’d strongly recommend trying the less-serious options in before you go nuclear and delete everything. Try them in this order:
Use Android Device Manager to make your phone ring
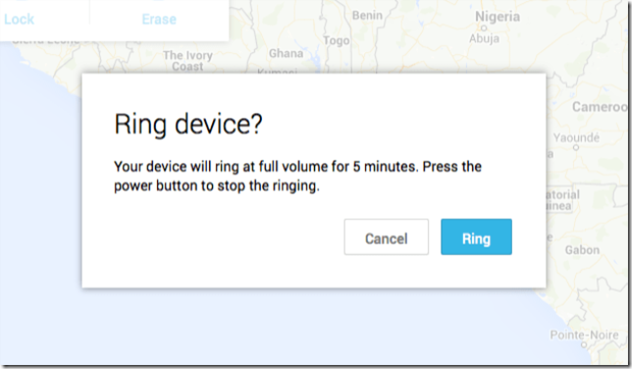 Try this before you go nuclear: lost phones are often just misplaced.
Change the lock screen
Tried that? Still no joy? OK. It’s time to destroy your data.

Erase your data

What if Android Device Manager can’t connect?
Go to link Download
Saturday, October 22, 2016
How To Listen And Delete Every Word You’ve Ever Said To Google
How To Listen And Delete Every Word You’ve Ever Said To Google
 Short Bytes: This could be one of the creepiest things you would have come across in recent times. You’ll be surprised to know that Google gives you the option to listen (and delete) everything you have ever said to Google while using its voice search feature.
Do you know that every time you say something to Google while performing a voice search, Google records your words and stores it? Yes, if you go ahead and use Google’s voice search or Google Now to search for some stuff online, the technology giant saves it.On its Voice and Audio Activity page, Google stores all your voice inputs and gives you the option to listen to them. I just listened to mine and, honestly, it freaked me out a little bit.
Moreover, each file comes with its plain text transcript and other information related to it. This feature is like a digital diary that also records your search history and YouTube history.

I was relieved when I found out that I can delete these recording. To do this, I had to simply click on More > Delete Options > Advanced.

Google probably records these clips to learn more about the natural language patterns of users and make its voice search better.
While this makes Google’s data storage policies more transparent and allows the users to access their data, this also reminds us to stay careful while saying something embarrassing to our phones.
As mentioned above, you can go ahead and delete your unwanted voice search recordings. Apart from the voice history, there are many other options available on the history page.
You can also click on this link and see the recently visited places and control your location tracking by Google. Here’s a picture of my location history over the past couple of years:

To tell you how to delete and download your entire search history, we’ve
Go to link Download
Monday, October 10, 2016
How to Delete Gmail Facebook Twitter Google YouTube or LinkedIn Account
How to Delete Gmail Facebook Twitter Google YouTube or LinkedIn Account

If youre not ready for that yet, you can always check out our guide to cleaning your social media accounts instead. If youve made up your mind though, heres a step-by-step guide to help you delete all your social media accounts.
Please note that while some services may let you reactivate your account where left off should you have second thoughts, at most all your data is gone once you click on that delete button - so make sure you know what you are doing before proceeding.
How to Delete Gmail Account
These days, almost everyone uses a Gmail account. In case youve decided to move on to another service though - or just want to delete an old account you no longer use - here are the steps you need to follow:
1) Head to this Google accounts page and log in.
2) Here you will see three links, one to remove Gmail without deleting your Google account, a second to remove Google Books and a third to close your Google account and delete all services. If youre sure about removing your Gmail account, click the first link. Youll see a warning page right away.
3) Now you will see a confirmation page. Click the check-box saying "Yes I would like to delete", enter a new primary email address you will use for other Google services, enter your Gmail password in the dialogue box,and click Remove Gmail. This will delete your Gmail account. Just to reiterate Googles warning, theres no coming back from this step, and all your mail will be gone forever.

How to Delete Facebook Account
Facebook makes it very difficult to delete your account. You wont find the option to delete your account permanently simply by looking through the settings. To find that page, you can either to go to Facebooks help center or you can follow these steps:
1) If youre not sure whether you want to permanently remove your Facebook account, you can deactivate it. This way, you can rejoin within 30 days without losing your data. To do that, head to Facebooks security settings page.
2) Now click Deactivate your account. This link is buried beneath "When youre logged in" and you are unlikely to see it unless youre looking for it.
[post_ad]
3) Facebook will now try to emotionally blackmail you into reversing your decision. If you ignore the photos of the people who "will miss you", you can select any reason and click Confirm
.
4) If choose to delete your account permanently, go to Facebooks account deletion page and click Delete My Account.
5) Youll see a pop-up, where youll have to enter your password and characters shown in an image (captcha). Click Okay and then click Okay again in a second pop-up. Facebook gives you a chance to change your mind - if you log in anytime in the next two weeks, Facebook will reactivate your account.

How to Delete Twitter Account
If youd rather stay away from the constant stream of tweets on this website, follow these steps to remove your account:
1) Head to Twitter settings and scroll to the bottom.
2) Now click Deactivate my account, which is a link below the Save changes button.
3) Twitter will give you a warning about what this means. If youre sure, you need to click on the Deactivate button. This will deactivate your Twitter account. If you change your mind and choose to return to the social network, you will have to log in within 30 days. After 30 days, Twitter will permanently remove your account.

How to Delete Google+ & YouTube Account
Did you accidentally sign-up for Google+ from your Gmail account? It is extremely easy to delete your Google+ profile but it can have some unwanted consequences. First, your YouTube account will be removed too. Yes, all your YouTube comments will be removed and if you have a channel, it will be disabled. Secondly, you will not be able to leave reviews on Google Play store. This is because Google has integrated all three services together. If you still want to take this step, this is what you need to do
1) Go to the Google+ Downgrade page and sign in with your Google account.
2) Now scroll down all the way to the bottom and click the check-box next to "Required: Yes I understand that...
3) Click Remove selected services. This will delete your Google+ and YouTube accounts.

How to Delete LinkedIn Account
The worlds most popular career database, LinkedIn, can be quite annoying with its constant notification emails and updates that land in your inbox. Luckily, theyve made it pretty easy to delete your account. Heres how:
1) Open LinkedIns Privacy & Settings page and sign in.
2) Click the Account tab next to the shield icon near the bottom-left of the page.
3) Under the Helpful Links section, select Close your account.
We hope this article helped you close accounts on various websites. If youd like to read more tutorials like this one, In case you have any queries or opinions regarding this tutorial, feel free to reach out using the comments section below.
Don’t forget to Share it with your friends via Facebook & Google+ and Twitter, And if you like the article How to Delete Gmail Facebook Twitter Google+ YouTube or LinkedIn and you may even Subscribe for New post, to get directly in your mail inbox.
Go to link Download
Saturday, October 8, 2016
How to delete FriendFeed Account
How to delete FriendFeed Account

Heres why ...
During last month I had subscribed to the FriendFeed service using Twitter and was really bugged after seeing non stop tweets in friendfeed feeds , even i cant pause all tweets as i have more followers !
Adding to it more updates like facebook , feeds from other blogs which i couldnt check due to huge feeds from twitter itself , even if i remove twitter account then also i was having trouble as i had signed through twitter account and by default i was subscribed to all people i follow on twitter and if i unsubscribe , i unfollow em, really weird,
Then i decided to delete this account created via signing via twitter and then create another as usual by choosing username
To remove your account and all of the data associated with your feeds, please re-enter your password below. We would also appreciate it if you would leave a short note letting us know why you are deleting your account, though this is entirely optional.
but i wasnt able to delete , because i had signed up via twitter no password was given , that was problem i face and i mailed friendfeed about the problem and i got this reply from Ana .R .Yang
You can delete the account by going to https://friendfeed.com/account/login and signing in using the Twitter button you pressed to create the account.
Then, go to settings and add a password. Once you have a password, you can visit https://friendfeed.com/account/delete to delete your account.
If you want to create an account w/o giving your Twitter or Google credentials, you can do so here: https://friendfeed.com/account/create
Then I became aware of the possibility to enjoy friendfeed at last as now even if i have added twitter account , i cant see their flood tweets but i follow all of em :D , one more such site is Likaholix
I suggest you better sign up friendfeed by choosing username and then adding accounts , rather than signing in directly with twitter or google or facebook ,so as to browse many feeds as well as have updates in all social sites ,Thanks to Ana R. Yang of FriendFeed Inc. for having emailed me in no time
Add this feed to receive more updates
Follow me on twitter and i will follow all of you back !
@ajinkyaforyou
Go to link Download
Friday, October 7, 2016
How to delete Technorati account
How to delete Technorati account

Let me tell you my tale :
First of all i made a technorati account with username A and then claimed this blog , later i wanted to change my userid and tried to edit but i got to know that once you created an id , you cant edit it . So what i did was that first i unclaimed this blog and then created another desired technorati id B and then claimed this blog .
But to my surprise technorati did not unclaim my blog with user id A .
So now it keeps on displaying 2 authors for this blog
When i had my A id , i had authority 4 but now it shows just 1 and its completely crap .
Even they have made my location USA without me choosing any , also when i edit my blog by adding tags and save it , it just refuses to get saved and i think my account has been tricked !
My blog even is not indexed by technorati and cannot be found in search results
I have filled form to contact them , 3 to 4 times , but no reply
Even there is no link to delete account like in google or friendfeed or facebook which is very worst case and seems to be getting complicated and people should think before registering technorati .
Whenever a blog links at you, they will increase your authority which means your ranking is been improved in blogosphere. Apart from being featured in top 100 blogs you will be getting massive subscribers and unique traffic as technorati is been accepted globally in blog ranking. I dont know how is this true coz i havent got even a single visit and my claimed blog , which i can see still donnot have a thumbnail and its still queued .
Now no one can save you and if you badly need to delete your account stick to this link http://getsatisfaction.com/technorati/topics/delete_technorati_account and wait for any official news in ordert o do so !
Careful to read Blog claiming Faq
Go to link Download
Saturday, October 1, 2016
How to delete a Corrupt file in Windows
How to delete a Corrupt file in Windows

A typical issue is that a video document gets to be adulterated and Windows cant erase it, regardless of whether you push the Delete key or even the Shift+Delete combo. It isnt constrained to video documents, however. For all intents and purposes any record can oppose erasure, in spite of the fact that the explanations for the issue are fluctuated.
There are heaps of different approaches to take a stab at erasing documents. Here are only some of them. Ideally youll discover one of them works for you.
Close Windows Explorer
A standout amongst the most irritating mistake messages is "Record being used", which avoids you moving and erasing said document. On the off chance that youve shut down all applications despite everything you cant erase it, its most likely on the grounds that Windows Explorer is getting to the record, maybe to show a thumbnail.
You can move every single other record in the envelope to an interim organizer and afterward erase the envelope that contains the unfaltering document, yet in the event that this still doesnt work, have a go at shutting Windows Explorer. To do this, begin Task Manager (right-tap on the taskbar and pick Task Manager).
The most effective method to erase degenerate documents in Windows
Windows Safe Mode
A second choice is to restart your PC in protected mode. Press F8 when the PC is beginning up until you see the boot menu. Pick Safe Mode and a chop down Windows will stack. You can take a stab at erasing the document in Windows Explorer or File Explorer.
Heres the means by which to boot into experimental mode in case youre running Windows 8.
The most effective method to erase degenerate records in Windows
Outsider erasure utility
Loads of utilities can tidy up troublesome records, including those that cant be erased. They have a tendency to make a script which runs when Windows boots up at once before any limitations are put on the record forestalling it being erased. They incorporate File Assassin and MoveOnBoot.
Additionally, as has been said in the remarks underneath, you can attempt Long Path Tool.
Utilize the Command Prompt
Yet another strategy is to utilize the Command Prompt. Youll discover this in your Start menu, or Start Screen. Simply look for it, click on it and a dark window will open.
Change to the catalog where the document is situated by writing compact disc . For instance compact disc c:usersjimdesktop
Presently sort dir to list the documents in that organizer.
Presently sort del. You can utilize the Tab key to autocomplete the name of a document in the wake of writing the initial few characters. Youll have to incorporate the expansion of the record, so youd write erase movie.mkv to dispose of that video document.
Change the record augmentation
Once in a while this is the least complex approach to erase a record that declines to move utilizing the Delete key. On the off chance that you have record called birthday.avi, select it in Windows Explorer, press F2 and change the expansion - the .avi - to something else, for example, .txt.
Youll need to empower record expansions in the first place, however, since Windows defaults to concealing augmentations for known document sorts. To show expansions in Windows 8 onwards, tap on the View tab and tick the Record name augmentations container.
In past forms, scan for organizer choices in the Start menu. Click on it and a window will show up. Look down and untick the crate for "Shroud augmentations for known record sorts" and snap OK.
Go to link Download
Sunday, September 25, 2016
How to Delete Screwdrivers and Pliers in blogger template
How to Delete Screwdrivers and Pliers in blogger template
How to Delete Screwdrivers and Pliers in blogger template - ok, amalul ahli will explain How to Delete Screwdrivers and Pliers in blogger template, follow the tutorial:
this is screenshot:
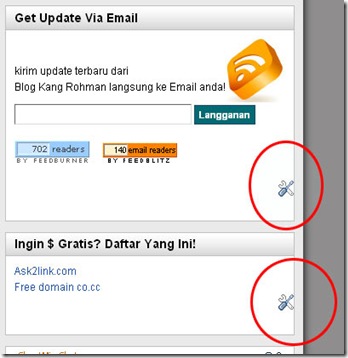 |
| How to Delete Screwdrivers and Pliers in blogger template |
this is some steps:
=> go to HTML edit
=> search code ]]></b:skin>
=> paste this code in above the code:
.quickedit{
display:none;
}
=> save template
now, your template will clear than before, I hope this article is very useful for you.
Go to link Download
Thursday, September 15, 2016
How to Delete Window Login Password
How to Delete Window Login Password
How to Bypass Windows Login:
Requirements:
- A computer.- USB drive
- Download this file: Files to Bypass Windows Login.
Password: techotips.com
Make sure you have the above files before moving to the procedure.
Got those files? Great! So, let us get into the steps to delete Windows password.
Steps for Deleting Windows Password:
1. First of all, you have to format your USB drive. You can do that easily by right click -> Format. Also, while formatting make sure that you have selected FAT32 as File System. This is necessary for proper working of this trick.2. Unzip your downloaded folder and from “Grub” folder, run grubinst_gui.exe as Administrator. For this, right click on file and hit on “Run As Administrator”.
Note: Do not run this file in Sandbox. The trick will not work.
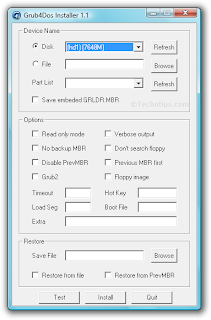
3. Click on “Disk” radio button and from dropdown box, select your USB drive.
Note: Make sure you select your USB drive and not any other drive. You can select it correctly by looking at size mentioned in the options.
4. Hit on Install and you will be shown message regarding successful installation in command prompt.
Update: If you are getting some error like: Bad partition table or so, copy this code:
--skip-mbr-test into Extra textbox and hit on Install. Thanks to vihari for the feedback. 
5. Now, copy these 3 files in your USB root:
- grldr from “grub4dos” folder
- menu.lst and
- KON.IMG
The 3 files are present in the downloaded folder. Make sure you copy these files in USB root and not in any folder.
That’s it. You are done with the basic configuration of USB drive.
Boot from USB:
Restart your system and boot using the USB drive you just configured. On next screen, hit Enter once. Windows will start normally and you will be shown Windows login page. Don’t worry! You don’t have to enter any password. Just hit on Enter and you will be able to bypass Windows password. Cheers!Now, when you restart your computer in a normal way (without booting from USB), you will be asked to enter a valid password. So, if you want to access friend’s computer anonymously, without his knowledge, you can do it easily using this beautiful trick.
Whenever you want to remove Windows password, simply boot using this USB drive and enjoy anonymous access to any Windows computer. I hope you will now be able to bypass Windows password using the above trick.
Recommended: You might be interested in our article: SMS Bomber to send unlimited messages to friends.
This was a short tutorial on how to bypass Windows login using USB drive. If you have any queries on how to delete Windows password, please let us know in comments.
Go to link Download