Showing posts with label android. Show all posts
Showing posts with label android. Show all posts
Tuesday, November 29, 2016
How to install Android 4 4 KitKat apps in other Android phones
How to install Android 4 4 KitKat apps in other Android phones
KitKat, the latest version of Android, brings great news to Nexus 5 , the first device with Android 4.4 KitKat , but this does not mean you can not enjoy another phone.

Google brought a new experience to Android with the new Launcher for Android 4.4. KitKat , providing improvements over previous versions, new colors, new icons and the ability to open Google Now with just a gesture on the home screen ( Home ).
Another major Android News KitKat was the integration of your text messages with instant messaging Hangouts. In addition to integrating these messages in one place, now also supports GIFs and lets you easily share your location.
The Android keyboard has also been updated and now brings a large number of Emoji more deeply integrated into the operating system.
First you can install these applications, you need to have enabled the option that allows you to install applications outside of Google Play. To do this go to Settings, Security and then enable Unknown Sources box.
Second, download the applications (APKs) of the application you want to install on your Android phone. If you download it to your computer, transfer it to your phone via USB, microSD card, cloud storage or other method you prefer. If you downloaded to your phone, just go to the Downloads folder.
» Watch
» Gallery
» Camera
» Hangouts
» Keyboard
» Google Search
» KitKat Android Home (Launcher)
Now install the applications to open and follow the instructions.

After installing the application, you need to put this new launcher to start by default. Just tap the home key (Home), select "Chooser" with with blue icon and then select Always.
Finally you can enjoy the l auncher like the other new apps you installed without need for Android KitKat. I
Google brought a new experience to Android with the new Launcher for Android 4.4. KitKat , providing improvements over previous versions, new colors, new icons and the ability to open Google Now with just a gesture on the home screen ( Home ).
Another major Android News KitKat was the integration of your text messages with instant messaging Hangouts. In addition to integrating these messages in one place, now also supports GIFs and lets you easily share your location.
The Android keyboard has also been updated and now brings a large number of Emoji more deeply integrated into the operating system.
First you can install these applications, you need to have enabled the option that allows you to install applications outside of Google Play. To do this go to Settings, Security and then enable Unknown Sources box.
Second, download the applications (APKs) of the application you want to install on your Android phone. If you download it to your computer, transfer it to your phone via USB, microSD card, cloud storage or other method you prefer. If you downloaded to your phone, just go to the Downloads folder.
KitKat Android applications (APKs):
» Google Play Services» Watch
» Gallery
» Camera
» Hangouts
» Keyboard
» Google Search
» KitKat Android Home (Launcher)
Now install the applications to open and follow the instructions.
After installing the application, you need to put this new launcher to start by default. Just tap the home key (Home), select "Chooser" with with blue icon and then select Always.
Finally you can enjoy the l auncher like the other new apps you installed without need for Android KitKat. I
Go to link Download

Monday, November 28, 2016
HOW TO HIDE A FILE OR A DOCUMENT WITHOUT USING ANY APP IN AN ANDROID SMARTPHONE
HOW TO HIDE A FILE OR A DOCUMENT WITHOUT USING ANY APP IN AN ANDROID SMARTPHONE
1. CREATE A FOLDER USING YOUR DEFAULT FILE EXPLORER
Create a folder with a name youd like, and add "." before other characters along the file name and save.
example
file name is Document, then itd now become .Document
Your smartphone should notify you that the folder will be hidden
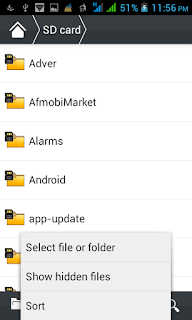
2. CLICK OPTION TO HIDE OR UNHIDE THE FOLDER
;
3.COPY THE FILES TO THE FOLDER YOUR CREATED
Copy the files youd want to hide to the folder you created and it will be hidden, take for instance pictures or videos you wouldnt like to be displayed in your gallery once they are moved to this folder you created it wont display there again
4. GO BACK TO STEP THREE IN ORDER NOT TO ALLOW PEOPLE ACCESS THOSE FILES FROM YOUR FILE EXPLORER
THATS ALL!!!!!!!!!!!!!!!!!!
Create a folder with a name youd like, and add "." before other characters along the file name and save.
example
file name is Document, then itd now become .Document
Your smartphone should notify you that the folder will be hidden
2. CLICK OPTION TO HIDE OR UNHIDE THE FOLDER
;
3.COPY THE FILES TO THE FOLDER YOUR CREATED
Copy the files youd want to hide to the folder you created and it will be hidden, take for instance pictures or videos you wouldnt like to be displayed in your gallery once they are moved to this folder you created it wont display there again
4. GO BACK TO STEP THREE IN ORDER NOT TO ALLOW PEOPLE ACCESS THOSE FILES FROM YOUR FILE EXPLORER
THATS ALL!!!!!!!!!!!!!!!!!!
Go to link Download
Sunday, November 27, 2016
How to bypass android lock screen without root
How to bypass android lock screen without root
Android has become one of the most commonly used OS which everyone is using. The Android OS is provided by Google and recently, there was an article which gave details on how to bypass android pattern. But it had a lot of limitation and lead to formatting the entire data of the user. and Its easy to forget your smartphone lock screen pattern or PIN code. Fortunately, Android provides a simple method to bypass the lock screen and get back in. Heres what to do when youve forgotten the lock screen pattern or PIN number on your Android device.
There are several different ways to hack a locked Android smartphone or tablet, but unfortunately, theres not a one-size-fits-all method. So below, Ill go over 5 of the most effective methods, and hopefully one will help you get back into your device.
If your device is running Android 4.4 KitKat (or anything before Lollipop) the method for retrieving your forgotten password or PIN number is relatively simple.
If you enter the incorrect PIN, pattern or password five times, you will receive a “too many attempts” message on your display. From here, you will be prompted to enter the email address and password tied to your Google account to bypass the security screen.
Bypassing the lock screen on Android Lollipop is more tricky, particularly if you wish to keep the data on your phone. Here are a couple of suggestions to start off with.
The first is obvious. Did you set up a smart lock for your device? A secure location perhaps, or a recognized device, such as a wearable? If you did, then just make use of your smart lock and you will no longer enter a PIN code. This will only apply to a small number of users. Find out how to set up a smart lock at the link.
Some smartphone manufacturers bundle their own security software into their device, such as Find My Mobile by Samsung. Such features can be particularly useful for getting past the lock screen, but you will have to have set this up already. If you did, just visit the corresponding website from another device or PC and unlock your phone from there.
The last resort is to conduct a factory reset. This will erase all the data on your Android device, so only do this if you really have tried all of the above options. The easiest method for doing this with a locked phone is by logging into the Android Device Manager online. [post_ad]From here you have the option to conduct a complete factory reset. Again, youll need to have already been using Android Device Manager for this work.
Download :- Get it now on Google Play!
If you haven’t used the Android device manager before, then you must do a hardware reset, which means entering your device’s recovery mode manually.

The method for conducting a hardware factory reset differs on each device, but it generally involves holding down the power and volume buttons when your device is switched off. You can search through our website to find the factory reset guide for your specific device by clicking the link.
Share this amazing trick for how to bypass android lock screen hack tricks with your all friends. Bookmark this page to get latest and new updates on how to bypass android pattern lock without losing data
There are several different ways to hack a locked Android smartphone or tablet, but unfortunately, theres not a one-size-fits-all method. So below, Ill go over 5 of the most effective methods, and hopefully one will help you get back into your device.
How to bypass the lock screen on Android KitKat
If your device is running Android 4.4 KitKat (or anything before Lollipop) the method for retrieving your forgotten password or PIN number is relatively simple.
If you enter the incorrect PIN, pattern or password five times, you will receive a “too many attempts” message on your display. From here, you will be prompted to enter the email address and password tied to your Google account to bypass the security screen.
How to bypass the lock screen on Android Lollipop
Bypassing the lock screen on Android Lollipop is more tricky, particularly if you wish to keep the data on your phone. Here are a couple of suggestions to start off with.
Smart lock
The first is obvious. Did you set up a smart lock for your device? A secure location perhaps, or a recognized device, such as a wearable? If you did, then just make use of your smart lock and you will no longer enter a PIN code. This will only apply to a small number of users. Find out how to set up a smart lock at the link.
Third party security options
Some smartphone manufacturers bundle their own security software into their device, such as Find My Mobile by Samsung. Such features can be particularly useful for getting past the lock screen, but you will have to have set this up already. If you did, just visit the corresponding website from another device or PC and unlock your phone from there.
The last resort
The last resort is to conduct a factory reset. This will erase all the data on your Android device, so only do this if you really have tried all of the above options. The easiest method for doing this with a locked phone is by logging into the Android Device Manager online. [post_ad]From here you have the option to conduct a complete factory reset. Again, youll need to have already been using Android Device Manager for this work.
Download :- Get it now on Google Play!
If you haven’t used the Android device manager before, then you must do a hardware reset, which means entering your device’s recovery mode manually.
On a Nexus device, you will have to enter recovery mode to do a hardware factory reset
The method for conducting a hardware factory reset differs on each device, but it generally involves holding down the power and volume buttons when your device is switched off. You can search through our website to find the factory reset guide for your specific device by clicking the link.
Share this amazing trick for how to bypass android lock screen hack tricks with your all friends. Bookmark this page to get latest and new updates on how to bypass android pattern lock without losing data
Go to link Download
Saturday, November 26, 2016
How to Install Android 4 3 on Windows PC Jelly Bean
How to Install Android 4 3 on Windows PC Jelly Bean
If you are interested in installing and testing the latest Android 4.3 , But you do not have any android supported devices? Dont worry you can try it on your computer with install the SDK or the Android emulator .

First you have to download and install VirtualBox on Windows,then you can run Android 4.3 on a virtual machine.It will work on windows XP/7/8 .
1. Download and install VirtualBox if you do not already have.
2. Download an ISO files on the page of Android-x86. Download the Android 4 .3.
2. Create a new machine and select "Linux" for type and "Linux 2.6" .
3. Then run the new virtual machine and select the ISO file Android-x86 that you downloaded.
4. If the steps of installation as shown in the video in detail and restart your virtual machine.
5. Once on the screen welcome, follow the installation wizard to configure Android 4 .3 with a Google account that will be used to download and install applications and games from Google Play.
Thats all. If you have any difficulty installing , feel free to leave your comments.
Note : Some applications or games do not work properly for lack of drivers in sound and camera.
First you have to download and install VirtualBox on Windows,then you can run Android 4.3 on a virtual machine.It will work on windows XP/7/8 .
1. Download and install VirtualBox if you do not already have.
2. Download an ISO files on the page of Android-x86. Download the Android 4 .3.
2. Create a new machine and select "Linux" for type and "Linux 2.6" .
3. Then run the new virtual machine and select the ISO file Android-x86 that you downloaded.
4. If the steps of installation as shown in the video in detail and restart your virtual machine.
5. Once on the screen welcome, follow the installation wizard to configure Android 4 .3 with a Google account that will be used to download and install applications and games from Google Play.
Thats all. If you have any difficulty installing , feel free to leave your comments.
Note : Some applications or games do not work properly for lack of drivers in sound and camera.
Go to link Download
Wednesday, November 23, 2016
How To Configure The MTN Tweak On Your Android Phone
How To Configure The MTN Tweak On Your Android Phone
This MTN free browsing tweak on Android phones was discovered few days ago and it is still working very well for me. At first i doubted it but after some couple of days, i decide to try it out and its working fine on my Tecno D5. So i decided to share it with you to enjoy it too while it last.
Step 1. Set your phone device IP and Port using the following:
IP: 010.199.212.2
Port: 8080.
Navigate to Settings, then Mobile network, then APN. You will see where to enter the settings above.
Step 2. Now send Fbo as text to 131 and wait till you receive a welcome message.
Step 3.Download operamini handler in apk format or UCbrowser.
Step 4.Once you open the operamini handler or UC Browser handler, then enter the following setups in the Handler menu fields.
=> Frontquerry: 0.facebook.com%2f%3a% 0 0 a@
Then tick remove port.
=> Select Real host and input 0.facebook.com
=> Save the field setup and launch browser.
Then you should start browsing.
Please take note that, some MTN SIM cards do cap the bundle as 5mb. So if yours does the same, just follow this procedure below instead.
1. Go to Google playstore and download SMS Scheduler.
2. Then configure the app to send the message Fb0 to 131 every 3 minutes every day according to how you set it. This software will send the Fb0 message automatically every 3 minutes to 131 and the 5mb plan will be increasing each time the message is sent.
Hope this helps! Enjoy browsing unlimited but dont forget to give us feedback. It helps us serve you better.
Please feel free to share this post with your friends using the like/share buttons. You can also subscribe to my blog below for more tips delivered to your inbox. Thank you.
How To Configure The MTN Tweak On Your Android Phone.
Step 1. Set your phone device IP and Port using the following:
IP: 010.199.212.2
Port: 8080.
Navigate to Settings, then Mobile network, then APN. You will see where to enter the settings above.
Step 2. Now send Fbo as text to 131 and wait till you receive a welcome message.
Step 3.Download operamini handler in apk format or UCbrowser.
Step 4.Once you open the operamini handler or UC Browser handler, then enter the following setups in the Handler menu fields.
=> Frontquerry: 0.facebook.com%2f%3a% 0 0 a@
Then tick remove port.
=> Select Real host and input 0.facebook.com
=> Save the field setup and launch browser.
Then you should start browsing.
Please take note that, some MTN SIM cards do cap the bundle as 5mb. So if yours does the same, just follow this procedure below instead.
1. Go to Google playstore and download SMS Scheduler.
2. Then configure the app to send the message Fb0 to 131 every 3 minutes every day according to how you set it. This software will send the Fb0 message automatically every 3 minutes to 131 and the 5mb plan will be increasing each time the message is sent.
Hope this helps! Enjoy browsing unlimited but dont forget to give us feedback. It helps us serve you better.
Please feel free to share this post with your friends using the like/share buttons. You can also subscribe to my blog below for more tips delivered to your inbox. Thank you.
Go to link Download
Tuesday, November 22, 2016
How to Change Android Fonts without Root Permission
How to Change Android Fonts without Root Permission
Hi guys, TaseUpdates is back again with another great tutorial powered by Don Sampson, I am here to show you how you can install custom android fonts on your android device even if you havent rooted your phone. Now.,Isnt that amazing???
Less talk.,More Action. Lets Swipe into Action!
How can I change android fonts without Root Permission?
For you to be able to change your android font without rooting your phone, you will have to download;
 Now you will see the list of fonts then select the font of your choice from there.
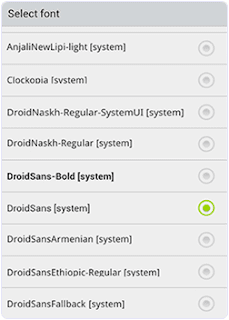
Its done your fonts will be changed immediately.
Hope you Enjoyed this Little Tutorial!!!
Less talk.,More Action. Lets Swipe into Action!
How can I change android fonts without Root Permission?
For you to be able to change your android font without rooting your phone, you will have to download;
- GO Launcher Ex from playstore by clicking here
- After that, you will have to install GO Launcher Fonts from the Play Store. GO launcher fonts is an Amazing App that provide different fonts for your android device.
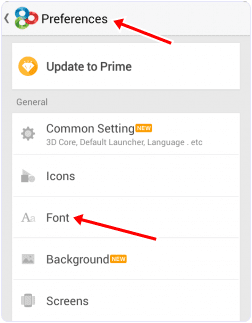
- Install and launch the Go Launcher App and from the home screen tap the Menu button at right corner and Select the preferences from the menu then look for the font option (as shown below)
Its done your fonts will be changed immediately.
Hope you Enjoyed this Little Tutorial!!!
Go to link Download
How to get bbm Stickers for Free Android Updated 2 6 0 28 bbm Stickers hack bbm 2 6 28 free stickers
How to get bbm Stickers for Free Android Updated 2 6 0 28 bbm Stickers hack bbm 2 6 28 free stickers
My Previous Free Sticker Trick Is not working anymore so im here again with new trick which work with latest version of bbm,
so lets start it
 Step 1 -> download Free Sticker Version From Download link Below and install it (make sure you uninstall your previous version of bbm and then install this one
Step 2 -> after installing this go to shop and you will see all stickers are free install as much you want (But this is free sticker version not Latest version so when you done installing stickers that you want Download Official version of bbm from link below
Step 3 -> install this official version of bbm and overwrite (Means do not uninstall freestickers version install it as a update)
here we go now u can use that stickers for free with latest version of bbm
Share if this helped :)
so lets start it
Step 2 -> after installing this go to shop and you will see all stickers are free install as much you want (But this is free sticker version not Latest version so when you done installing stickers that you want Download Official version of bbm from link below
Step 3 -> install this official version of bbm and overwrite (Means do not uninstall freestickers version install it as a update)
here we go now u can use that stickers for free with latest version of bbm
Share if this helped :)
Free Sticker Version
Official Version
Go to link Download
How to Hack AppLock in Android Phones
How to Hack AppLock in Android Phones
AppLock is one of the android security apps used by most of the android users. AppLock helps us to lock photos, messages, contacts, apps etc., and protects our privacy. However, AppLock will not give 100% security to the apps. In this article, I’ll explain How to hack AppLock android app. No need to uninstall the app or no root is required. well! let us see
Note: This trick will not work if the settings are locked by the admin.
1. Take the target phone in which you want to hack AppLock.
2. Now go to settings and then tap on Apps or Applications.
3. You will see AppLock app under downloaded section and tap on it.

4. After that tap on Force stop option.
 With this AppLock application is currently in the idle state. You can open locked apps without entering the password.
I hope you’ve have understood How to bypass AppLock application in android devices. If you have any doubts, comment below in the comment section and feel free to share this trick with others. [post_ad]
Don’t forget to Share it with your friends via Facebook & Google+ and Twitter, And if you like the article How to Hack AppLock in Android and you may even Subscribe for New post, to get directly in your mail inbox.
How to bypass AppLock android app without knowing the password.
Note: This trick will not work if the settings are locked by the admin.
1. Take the target phone in which you want to hack AppLock.
2. Now go to settings and then tap on Apps or Applications.
3. You will see AppLock app under downloaded section and tap on it.
4. After that tap on Force stop option.
With this AppLock application is currently in the idle state. You can open locked apps without entering the password. I hope you’ve have understood How to bypass AppLock application in android devices. If you have any doubts, comment below in the comment section and feel free to share this trick with others. [post_ad]
Don’t forget to Share it with your friends via Facebook & Google+ and Twitter, And if you like the article How to Hack AppLock in Android and you may even Subscribe for New post, to get directly in your mail inbox.
Go to link Download
Sunday, November 20, 2016
How To Install Android APK Files On A Kindle Fire Tablet
How To Install Android APK Files On A Kindle Fire Tablet
Have you been looking to install APK files on Kindle Fire? That’s not an issue that’s peculiar to you, alot other persons have found themselves in similar situation.
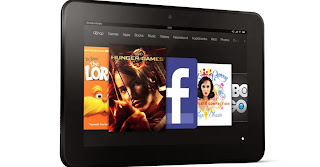
Here are easy steps to install APK files on Kindle Fire. The entire process should work like a charm for you, if you adhere strictly to the steps listed below.
Install APK File On Kindle Fire – Best Approach
- Locate Apps on Your Kindle Fire
- Access Settings >Applications
- Select Apps From Unknown Sources
- Download APK file of your choice from your Kindle Fire web browser [You can also transfer APK files from PC to Kindle Fire]
- After Downloading, SimplyInstall the APK file
Hint: The Install APK File can be found in Apps > Device
Warning: Ensure you download APK files from trusted vendors. Installing a malicious APK file can corrupt your Kindle Fire.
Hope this info helps? Feel free to share this post with your friends using the Share/Like buttons. Never miss any of my future post CLICK HERE TO SUBSCRIBE Once entered, you will have to check your inbox for a confirmation email containing a confirmation link. Once you VERIFY your email by clicking on the confirmation link in the message, you will never miss any future articles.Dont Forget To Add your View, Comments on this Post.
Always Like and Share Posts, You can Make use of the Share Buttons below.....
Go to link Download
Saturday, November 19, 2016
How to Overcoming Android Devices Start slow
How to Overcoming Android Devices Start slow
How to Overcoming Android Devices Start slow- Having a mobile device is very necessary in todays life . However , Noharasolutions would get annoyed if your Android phone or tablet suddenly becomes slow and often experience lag .

Do not worry . Noharasolution team will give you some tips for your Android device back in operation quickly and more efficient batteries .
Uninstall or disable unused applications
Each device has a limited storage capacity . The more unfilled internal memory is full , it will be the slower the performance of the device . Therefore , it is time to take action Noharasolutions clean . One of them is doing penyortiraan document images and videos , as well as uninstall the application is not important .
To uninstall an application , then Jerukers just need to go to " Settings " . After that , access the " Apps" and select the application you want to uninstall . Default application which is called bloatware can not be eliminated . But Jerukers can still disable it by selecting "Disable " .
Clean cache
The data cache will always appear along with the use of applications on an ongoing basis . Unfortunately , the cache will also affect the Performance Jerukers device . You can do the cache cleaning operations by performing the same steps as you read the tips first . But if you want to delete the cache at once , then you need a separate tool .
Use the App Cache Cleaner or Clean Masters to clear the cache of data in mobile devices Jerukers . Both are also available for free .
Limit use of widgets and live wallpapers
The existence of widgets will indeed facilitate Jerukers in accessing the information needed , without having to bother opening the application in question . So also with live wallpaper which of course will make your smartphone look more pleasing to the eye . However , the presence of both will drain battery power .
Reduce the presence of a widget that takes a lot of data , such as Facebook . Way too easy , Jerukers only need to touch the widget rather long and pulled to the top of the screen . In this way , then your device battery will be more efficient and speed up the processing system .
Live wallpaper is also one of the facilities that slows performance smartphones and tablets . Immediately change the wallpaper with a static image , surely you device will work faster .
Turn off animation
To perform these tips , then you have to go into developer mode . The trick is very simple . Perform tap seven times in the " Build Number " which can be found in the " About Phone " , in the " Settings " . After that , Jerukers will have greater access to your phone .
Immediately go to the " Developer " in the " Settings " . Search option " Drawing " . Then , turn off the " Windows Animation Scale " , " Transition Animation Scale " , and " Scale Length Animator " . Once completed , the phone will Noharasolutions work faster than ever before .
Always update the
There is a reason behind the release of software updates . One is to improve the ability of a device . Therefore, there is nothing wrong with being a "sissy update " in this case .
Noharasolution should always check the availability of software updates on a regular basis . The way is easy : Go to "Settings" menu , followed by " About Phone " . Then touch the option " System Updates " . When available , then do not hesitate to immediately perform the software update .
Rooting and roming
These tips should be done by those who have a really expert and in-depth understanding of Android devices . By rooting , then Noharasolutions will have the ability to overclocking the processor , install the ROM as needed , and other things that is necessary .
However it should be remembered , this activity shall be preceded by performing a data backup . In addition , Noharasolution also not responsible if the post- crash rooting and roming . ( U.S. )
Do not worry . Noharasolution team will give you some tips for your Android device back in operation quickly and more efficient batteries .
Uninstall or disable unused applications
Each device has a limited storage capacity . The more unfilled internal memory is full , it will be the slower the performance of the device . Therefore , it is time to take action Noharasolutions clean . One of them is doing penyortiraan document images and videos , as well as uninstall the application is not important .
To uninstall an application , then Jerukers just need to go to " Settings " . After that , access the " Apps" and select the application you want to uninstall . Default application which is called bloatware can not be eliminated . But Jerukers can still disable it by selecting "Disable " .
Clean cache
The data cache will always appear along with the use of applications on an ongoing basis . Unfortunately , the cache will also affect the Performance Jerukers device . You can do the cache cleaning operations by performing the same steps as you read the tips first . But if you want to delete the cache at once , then you need a separate tool .
Use the App Cache Cleaner or Clean Masters to clear the cache of data in mobile devices Jerukers . Both are also available for free .
Limit use of widgets and live wallpapers
The existence of widgets will indeed facilitate Jerukers in accessing the information needed , without having to bother opening the application in question . So also with live wallpaper which of course will make your smartphone look more pleasing to the eye . However , the presence of both will drain battery power .
Reduce the presence of a widget that takes a lot of data , such as Facebook . Way too easy , Jerukers only need to touch the widget rather long and pulled to the top of the screen . In this way , then your device battery will be more efficient and speed up the processing system .
Live wallpaper is also one of the facilities that slows performance smartphones and tablets . Immediately change the wallpaper with a static image , surely you device will work faster .
Turn off animation
To perform these tips , then you have to go into developer mode . The trick is very simple . Perform tap seven times in the " Build Number " which can be found in the " About Phone " , in the " Settings " . After that , Jerukers will have greater access to your phone .
Immediately go to the " Developer " in the " Settings " . Search option " Drawing " . Then , turn off the " Windows Animation Scale " , " Transition Animation Scale " , and " Scale Length Animator " . Once completed , the phone will Noharasolutions work faster than ever before .
Always update the
There is a reason behind the release of software updates . One is to improve the ability of a device . Therefore, there is nothing wrong with being a "sissy update " in this case .
Noharasolution should always check the availability of software updates on a regular basis . The way is easy : Go to "Settings" menu , followed by " About Phone " . Then touch the option " System Updates " . When available , then do not hesitate to immediately perform the software update .
Rooting and roming
These tips should be done by those who have a really expert and in-depth understanding of Android devices . By rooting , then Noharasolutions will have the ability to overclocking the processor , install the ROM as needed , and other things that is necessary .
However it should be remembered , this activity shall be preceded by performing a data backup . In addition , Noharasolution also not responsible if the post- crash rooting and roming . ( U.S. )
Go to link Download
How To Get Bold Italics And Strikethorugh Formatting Options In WhatsApp For Android And iOS
How To Get Bold Italics And Strikethorugh Formatting Options In WhatsApp For Android And iOS

The new text formatting tools introduced by WhatsApp is available for users running on version 2.12.17 on iOS and 2.12.535 for Android. Now you can make your texts look in bold and italics. Strikethrough format is also included. WhatsApp helps to instantly share photos, videos and audios with your friends. Click here to learn how to get these new formatting tools.
Go to link Download
How to save battery Android KitKat 4 4
How to save battery Android KitKat 4 4
Five tips to help you take advantage of all the new features of the new Android operating system without draining the battery of your phone.

The version 4.4 of Android, or KitKat , comes with a host of new features to explore, but so will leave you load new breeze.
Follow these five tips to get the most out of KitKat without killing your battery so fast.
To not leave you too exhausted battery, go to "Settings", "Location", Mode and activate the option for "Battery Saver".
If you are looking for directions somewhere with small alleys and confusing, you can activate the option "High Accuracy" to more accurately locate you on the map.
To save battery sync your photos wait until youre connected to a Wi-Fi network. Go to the application of "Gallery", click the three dots, select "settings" and active "Sync only Wi-Fi".
And since were in this menu disables Bluetooth when youre not using. The phone is always connected when youre looking on and this wastes energy.
These tips are basic, but you can get out of trouble the next time youre desperate to conserve battery.
The version 4.4 of Android, or KitKat , comes with a host of new features to explore, but so will leave you load new breeze.
Follow these five tips to get the most out of KitKat without killing your battery so fast.
1. GPS
The GPS function consumes the battery of your device even when youre not in the Maps application. Each time you register a visit on Facebook ( check-in ) or take a picture even when the GPS is active.To not leave you too exhausted battery, go to "Settings", "Location", Mode and activate the option for "Battery Saver".
If you are looking for directions somewhere with small alleys and confusing, you can activate the option "High Accuracy" to more accurately locate you on the map.
2. Sync photos
KitKat automatically synchronized to your account many of the things you do on your device, but make sure you are synchronizing only the things you need.To save battery sync your photos wait until youre connected to a Wi-Fi network. Go to the application of "Gallery", click the three dots, select "settings" and active "Sync only Wi-Fi".
3. Brightness and Bluetooth
Many already know this, but one of the things that drain the battery faster your device is the screen brightness. To adjust the brightness slide your finger down on the screen, go to the box in the upper right corner, click "brightness" and select "auto". The automatic option adjusts to ambient light and better preserves your battery.And since were in this menu disables Bluetooth when youre not using. The phone is always connected when youre looking on and this wastes energy.
4. NFC
If you have near field communication (NFC for its acronym in English) on, be sure to have it checked only when you need it. Go to "Settings", "More" (under data usage) and disable it.5. Tool Battery
Finally, remember that you have the battery tool which lets you monitor your applications are those that are using more load. Slide your finger downward from the Home screen, press the upper right box and go to the little picture of the battery. If you notice any of your applications are using heavily loaded, close it.These tips are basic, but you can get out of trouble the next time youre desperate to conserve battery.
Go to link Download
Friday, November 18, 2016
How to Change and Create a Android Logo In accordance in your own style with Androidify
How to Change and Create a Android Logo In accordance in your own style with Androidify
How to Change and Create a Android Logo In accordance in your own style with Androidify - Whats Androidify - Androidify is made google android applications that can make your avatar with andaroid logo, or in other words able to make the android logo in accordance with its own character. So far we know the logo android as a robot in green and shaped rigid, android logo google himself calls it by the name "andy". Then how about if we contumisasi the android logo in accordance with our wishes. add a variety of knick-knacks, and accessories in accordance with the latest fashion styles. Interesting is not it? see the image below.
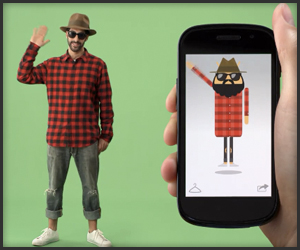
Androidify create our own android logo according to the character and fashion we
What can be done with Androidify
With Androidify we can change the android logo as we want, we can add the hair, adding to the variety Eksen fashion clothes and accessories, add glass eyes, adding pants, adding shoes, add hats, mustaches, jangut, and all things that smell fashion Style . Be logo android models themselves.
How to make own android with Androidify logo
I use it quite easy you just need to install this free app via google android play store open and make your hearts content. there is no limit we can tamper add modifiers themselves according to their own desires then we can also membagikanna our edits to various social networks such as google plus, facebook, twitter or email.
below is a screenshot application androidify

Features the latest androidify
• Currently available almost all fashion accessories that can be customized to the android logo, with the word lai we can it about with android logo at will
• make available tutorials android logo with androidify
• share feature to various social networks such as Google Plus, twitter, and facebook
Download Androidify Android apk
Official android application created by Google Inc. and is available free for download via google play for free. Androidify latest version is 1.1.3. Cdengan apk 2.1Mdan sizes can be installed for both katas android 2.1 OS smartphone / android phone and android tablet
Download Androidify Android apk app via google play store or click here
Androidify create our own android logo according to the character and fashion we
What can be done with Androidify
With Androidify we can change the android logo as we want, we can add the hair, adding to the variety Eksen fashion clothes and accessories, add glass eyes, adding pants, adding shoes, add hats, mustaches, jangut, and all things that smell fashion Style . Be logo android models themselves.
How to make own android with Androidify logo
I use it quite easy you just need to install this free app via google android play store open and make your hearts content. there is no limit we can tamper add modifiers themselves according to their own desires then we can also membagikanna our edits to various social networks such as google plus, facebook, twitter or email.
below is a screenshot application androidify
Features the latest androidify
• Currently available almost all fashion accessories that can be customized to the android logo, with the word lai we can it about with android logo at will
• make available tutorials android logo with androidify
• share feature to various social networks such as Google Plus, twitter, and facebook
Download Androidify Android apk
Official android application created by Google Inc. and is available free for download via google play for free. Androidify latest version is 1.1.3. Cdengan apk 2.1Mdan sizes can be installed for both katas android 2.1 OS smartphone / android phone and android tablet
Download Androidify Android apk app via google play store or click here
Go to link Download
How To Access Your Information On Your Stolen Android Device
How To Access Your Information On Your Stolen Android Device

Sometimes your Android Device which contains important files or might be stolen or get lost.
It might probably get into the wrong hand as this important might be used for nefarious activities e.g your bank details/logins or some highly confidential text messages.
If you want this informations protected or probably destroy , follow this Easy Guides.
Find your phone using the Android Device Manager app. You can simply log intoGoogle device Manager web page
and find any devices you’re signed in on. You can make your phone ring, or even lock it from your computer to protect your valuable information.

Go to link Download
Wednesday, November 16, 2016
How to install 2 BBM in one android BBM2 2 6 0 30 Latest Version
How to install 2 BBM in one android BBM2 2 6 0 30 Latest Version
Hi guys Once again im here with a new trick, many of you guys want to install 2 BBM in same device so here is a MOD apk of latest version of bbm , with this trick you can install more than 2 BBM in one android device, you can install BBM2 BBM3 BBM4 + All Stickers Free

No Enter Key
Download BBM2 + BBM3 + BBM4 v.2.6.0.30 + Free Sticker
Features :
Move to SD cardNo Enter Key
Download BBM2 + BBM3 + BBM4 v.2.6.0.30 + Free Sticker
- BBM2 + BBM3 + BBM4 v.2.6.0.30 apk | Via Mediafire
Download Link BelowDownload BBM2Feel Free to ask anything
Go to link Download
Tuesday, November 15, 2016
How To Sideload Android Apps Onto Your BlackBerry 10 Device
How To Sideload Android Apps Onto Your BlackBerry 10 Device

With the launch of OS 10.2.1, BlackBerry brought the ability to install Android apps straight from the device. However, many in the community wanted to go a step further with access to Google Play — enter Snap. Snap is a native BlackBerry 10 application which allows you to download free and previously purchased apps from Google Play. Unfortunately, it can’t be downloaded from BlackBerry World, but we’ll show you how to sideload it from your computer.In order to do this, you’ll need to make sure you have a number of things ready:- A BlackBerry 10 device running OS 10.2.1.1055 or above.
- The latest Snap .BAR file, which can be obtained from the developer’s website here.
- A tool for sideloading. Option 1 is the Google Chrome BB10/PlayBook App Manager extension (requires Chrome 18.0+, a WiFi network that both your computer and phone are connected to). Option 2 is the DDPB application (PC-only, requires a USB connection, .NET Framework 2.0 or above, and Java Runtime Environment 6).
Once you have everything set, start by putting your device into Development Mode. Both methods of sideloading will require this, so it’s best to get it out of the way before we continue. In order to do this, go into the Settings app and find the Security and Privacy section. Once you’re in the appropriate section, you’ll find the Development Mode at the bottom of the page, so go ahead and enter that page.
 On the Development Mode page, you’ll see a toggle. We want this toggle enabled, so go ahead and turn it on. If your device has a password, it will request that you enter it. If not, it’ll ask you to set a password, which you’ll need to remember for later.
 If you’ve done everything correctly, you should get a notification telling you that Development Mode has been enabled on the device. Now we can go ahead and proceed with the actual process of sideloading.Option 1: Google Chrome extensionIf you haven’t already done so, start by downloading the extension here. A small BlackBerry logo should show up in your toolbar once it’s installed, which you can hit to access the extension options. If the logo doesn’t show up, just go to the Settings menu of Google Chrome and look for it under the Extensions tab on the left.
 Once you’re in the Extensions menu, look for the BB10/PlayBook App Manager, and select Options.
 After that, you’ll be taken to the options screen for the extension. Here, you’ll need to entire your device’s IP address in the Hostnames/IPs field.
 This can be found in the Settings app, on the About page.
 In the About page, hit the Category dropdown and switch to Network.
 Once you’re in the Network category, look for your IPv4 address under the Wi-Fi heading. If there is a forward-slash followed by some numbers after the address, ignore those and only use the numbers prior to the slash. As mentioned earlier, both your computer and your BlackBerry 10 device must be connected to the same WiFi network for this to work, as this extension will send the app over your WiFi network to the phone.
 Once you have the address, make sure to input it into the Hostnames/IPs field in the extension options and hit the Save button. IPs for other devices in the future can be added by separating them with a comma. When you’ve saved the IP, a link will be generated at the bottom of the page.
 If you’ve followed this tutorial correctly, then you should already have Development Mode enabled. If not, you’ll need to enable it now before you can click on the generated link. Once you click on the link, it will request the device password set when Development Mode was enabled. Go ahead and input that password, then hit Log In.
 Once you’ve logged in and the extension has loaded, the process is straightforward. Go find the Snap .BAR file you downloaded at the beginning, then drap and drop it underneath the Install Apps heading.
 And there you have it, after a short while the app should show up on the last screen of your device’s app drawer. For security purposes, it might be best to disable Development Mode at this point. A quick rundown of how to use the app can be found at the end of this How-To, after the text for Option 2.Option 2: DDPB (PC-only)Though DDPB’s developer has long abandoned the application, it still serves as a good method of sideloading for anyone who doesn’t wish to use Google Chrome or doesn’t have a Wi-Fi network to use. As mentioned at the beginning, you’ll need to download and install DDPB HERE, then make sure your device is hooked up to your computer via USB with Development Mode enabled. If DDPB doesn’t work when starting it, make sure your PC has .NET Framework 2.0 or above and Java Runtime Environment 6 installed.
 Once you have DDPB working, you should see a screen like the one above. It requires an IP address and password just like the Google Chrome extension, but the IP address here is different since this is a USB connection. To find the IP address for this, go back to the Development Mode screen we accessed at the beginning (Settings>Security and Privacy>Development Mode).
 As you can see, this screen has a different IP address listed — this is the address you need. So, go ahead and input that IP address into DDPB along with the password you set when enabling Development Mode. Once you’ve done that, hit the Connect button. Your OS version and PIN number should show up underneath if you’ve done everything correctly.
 With that done, now you want to hit the Add button near the top of the application. This will open a separate screen, where you’ll need to navigate to the directory where you’ve saved the Snap .BAR file. Select the file and press Open. This should add the app to the list, as seen above. Now you need to tick off the checkbox next to the app, and hit the Install button at the bottom. A pop-up will show you how far the sideloading process has progressed — give it a bit of time. Once it’s done, another pop-up will alert you to the fact.
 The app should now appear on the last page of your device’s app drawer, as seen above. Now that you’re done, it might be a good time to disable Development Mode for security purposes. If you want a quick tutorial on how to use Snap, keep on reading.Using Snap
 In order to use Snap, you’re going to need a Google Account. If you don’t already have one, you can make one quite easily here. Accounts with two-step verification enabled will need to create an application-specific password, which can be done here by hitting the Settings button for App passwords. All other accounts can just enter their regular username and password into the fields provided, then hit Sign In.
 Once you’re in the app, you can go ahead and browse whatever apps you like and install them. A few things to keep in mind however:
- Not all apps will work. Some will require Google Play services, which are not available in the Android Runtime for BlackBerry 10.
- If you want to download a paid app, you must first buy it through Google Play on your computer or on another Android device.
- Every time an app is downloaded, by default the installation file (also known as the APK file) is kept on your device, unless it is a paid app. If you want to avoid cluttering your device storage, swipe-down from the top of the screen to access the app settings, then scroll to the bottom and switch Post-Install Behavior to Delete APK. You can also clear the cache on this screen to further save storage space in the future.
And that’s everything you need to know to get Snap working on your BlackBerry 10 device. Now you can enjoy access to hundreds of thousands of additional apps on your phone. If you have any questions on the process just drop a comment below and we will be glad to assist you!
Go to link Download
Sunday, November 13, 2016
How to install Android 4 4 KitKat Emoji keyboard
How to install Android 4 4 KitKat Emoji keyboard
Adding emoticons to your conversations is a way to express your emotions in messaging today, whether in the SMS or another application you use. They are used to give a little life and color to the text so it is not so boring. Well Emojis is a Japanese word and keyboard Android 4.4 KitKat has these emojis on board.

If youre using the iOS keyboard, they can be a little hard to find. You want to go to Settings> General, scroll down and tap on the keyboard. Then tap "Add New Keyboard". There, sandwiched between the keyboards will see Emojis. Now you should have two keyboards installed. When you go to write a message, an email or status update on social networks, now the world will see an icon loaded in the bottom left of the keyboard of iOS.
Download the Android 4.4 APK directly on the device or on your computer and then transfer it later. You can use this link also.
After installation, follow installation tutorial Google.
If you own an Android device and do not want to go through the previous installation, the only option is to continue with an application like Whatsapp that supports its own emojis keyboard, or install a keyboard emojis third. Results vary by phone model.
If youre using the iOS keyboard, they can be a little hard to find. You want to go to Settings> General, scroll down and tap on the keyboard. Then tap "Add New Keyboard". There, sandwiched between the keyboards will see Emojis. Now you should have two keyboards installed. When you go to write a message, an email or status update on social networks, now the world will see an icon loaded in the bottom left of the keyboard of iOS.
For users of Android have to follow these steps:
Go to Settings, Security and check "Unknown sources" to have the ability to install software from sources other than Google PlayDownload the Android 4.4 APK directly on the device or on your computer and then transfer it later. You can use this link also.
After installation, follow installation tutorial Google.
If you own an Android device and do not want to go through the previous installation, the only option is to continue with an application like Whatsapp that supports its own emojis keyboard, or install a keyboard emojis third. Results vary by phone model.
Go to link Download
Saturday, November 12, 2016
How To Get BBM Stickers For Free In Android Version 2 8 0 21 Updated 2 8 0 21
How To Get BBM Stickers For Free In Android Version 2 8 0 21 Updated 2 8 0 21

? Get All Paid Stickers For Free ?
In This Trick Ill Show You How To Get BBM Stickers For Free in Android With Latest Version Of BBM 2.8.0.21
Step 1 -> download Free Sticker Version From Download link Below and install it (make sure you uninstall your previous version of bbm and then install this one
Step 2 -> after installing this go to shop and you will see all stickers are free install as much you want (But this is free sticker version not Latest version so when you done installing stickers that you want.... Download Official version of bbm from link below
Step 3 -> install this official version of bbm and overwrite (Means do not uninstall freestickers version install it as a update)
here we go now u can see all stickers you have downloaded before and you can use the with your latest version of BBM
Note :-Above Method Work perfectly for all users but if you have signature issues so you have to use Titanium Backup..
1. Install bbm free sticker version
2. Install stickers as much as you want
3. Go to Titanium Backup then backup your bbm application
4. Uninstall bbm free sticker version
5. Install official bbm
6. Go to Titanium Backup and choose restore (data only)
And you can use the stickers that youve installed before
Step 2 -> after installing this go to shop and you will see all stickers are free install as much you want (But this is free sticker version not Latest version so when you done installing stickers that you want.... Download Official version of bbm from link below
Step 3 -> install this official version of bbm and overwrite (Means do not uninstall freestickers version install it as a update)
here we go now u can see all stickers you have downloaded before and you can use the with your latest version of BBM
Note :-Above Method Work perfectly for all users but if you have signature issues so you have to use Titanium Backup..
1. Install bbm free sticker version
2. Install stickers as much as you want
3. Go to Titanium Backup then backup your bbm application
4. Uninstall bbm free sticker version
5. Install official bbm
6. Go to Titanium Backup and choose restore (data only)
And you can use the stickers that youve installed before
Care For Share :P
Download Links -
Official Version
Free Sticker Version
Go to link Download
How to install Android Emulator on Windows Mac and Linux
How to install Android Emulator on Windows Mac and Linux
In this post I try to explain how to install and use the Android emulator on different OS versions to test new Google system.

There are different versions for each operating system, all have a compressed file that has everything you need inside and Windows has an executable that makes life a little easier as you see if you have everything you need.
First of all, download it and unzip it to a folder, no matter where.
http://developer.android.com/sdk/index.html
Then, before trying anything else we need to check that Java is installed:
It is very important to have Java installed or we can not use the other tools.
Open the SDK folder and find the file in SDK Manager. We ran and we will get this window:

Now wait for it to finish loading the information about new versions and the end look like this:

Now we have to choose the things we want to get down and give Install. In this tutorial we will go down the Android 4.0.3 version but you can use any.
After installing the Android version you want, in the folder of the SDK also find the file AVD Manager. We ran and we will get this window:

We will have to create a new virtual device, we click on New and we will emulator options:

Configure the emulator as you want and you can create. The important parts are:
Target: The Android version will use the emulator.
SD Card - Size: Size of the virtual sd, for example 1024 MiB.
Skin: Screen Size to emulate.
At the end we will have the emulator created and only need to give to Start:

If all goes well the emulator will start and we will try our pc Android.
There are different versions for each operating system, all have a compressed file that has everything you need inside and Windows has an executable that makes life a little easier as you see if you have everything you need.
First of all, download it and unzip it to a folder, no matter where.
http://developer.android.com/sdk/index.html
Then, before trying anything else we need to check that Java is installed:
It is very important to have Java installed or we can not use the other tools.
Configuration
Now that you have the Java SDK installed and unzipped, plays configure the emulator to use it.Open the SDK folder and find the file in SDK Manager. We ran and we will get this window:
Now wait for it to finish loading the information about new versions and the end look like this:
Now we have to choose the things we want to get down and give Install. In this tutorial we will go down the Android 4.0.3 version but you can use any.
After installing the Android version you want, in the folder of the SDK also find the file AVD Manager. We ran and we will get this window:
We will have to create a new virtual device, we click on New and we will emulator options:
Configure the emulator as you want and you can create. The important parts are:
Target: The Android version will use the emulator.
SD Card - Size: Size of the virtual sd, for example 1024 MiB.
Skin: Screen Size to emulate.
At the end we will have the emulator created and only need to give to Start:
If all goes well the emulator will start and we will try our pc Android.
Go to link Download
How I Set Up And Watch DSTV Channels For Free On My Android Device
How I Set Up And Watch DSTV Channels For Free On My Android Device

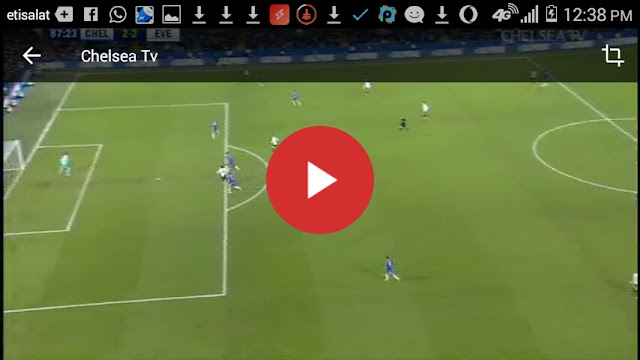
Hey guys, I am going to be teaching you how to watch the satellite TV; DSTV on your android phones. First of all you need is a good internet connection and the second thing you need is the fantastic app called MOBDRO it has over 2000channels and it keeps updating, all you have to do is to download it by following
Screenshots


Download
Download Now
Go to link Download
Subscribe to:
Posts (Atom)