Monday, November 21, 2016
How to replace the motherboard without re installing Windows XP
How to replace the motherboard without re installing Windows XP
Tutorial mengganti Motherboard di XP supaya tidak error & install ulang
Berikut tutorial supaya anda dapat mengganti / mengupgrade motherboard di Windows XP tanpa harus repair ataupun install ulang Windows XP anda.
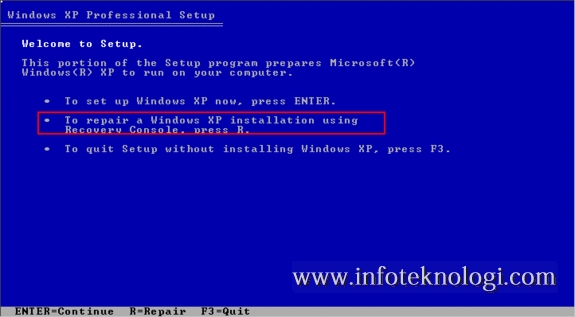
- Masukkan CD Windows XP, Restart komputer, masuk ke Bios lalu buat supaya komputer anda booting melalui CD.
- Ketika Layar “Welcome to Setup” Muncul, klik tombol R keyboard untuk memulai Recovery Console
- Akan diminta memasukkan Administrator password, masukkan bila ada, namun bila anda tidak menset password tekan Enter saja.

- Di command prompt Recovery Console ketik baris berikut (setiap baris tekan enter)
copy c:windowssystem32configsystem c:windows mpsystem.bak
delete c:windowssystem32configsystem
copy c:windows epairsystem c:windowssystem32configsystem
- Ketik Exit untuk keluar dari Recovery Console komputer anda akan merestart.
Go to link Download

Thursday, November 17, 2016
HOW TO RUN XP VISTA AND LINUX ON THE SAME DRIVE TRIPPLE BOOT!
HOW TO RUN XP VISTA AND LINUX ON THE SAME DRIVE TRIPPLE BOOT!
I took the decision to run more than operating system on my computer when Windows Vista made its debut a couple of months back. First, I wanted to run both Windows Vista and XP on the same machine so that I continue using my XP without interruption, but at the same time familiarizing myself with Vista. Later on, after the release of Ubuntu 8.04, I made the decision to run all three operating systems on the on laptop so that I get to enjoy the relative benefits of all the operating systems. Below im going to show you how I managed to do it. This article in written based on the assumption that you have at some point installed a Windows and Linux Operating System before. Please note that throughout this article, whenever I make reference to Linux, I will be talking of the Ubuntu family.
Please note that in order to load the three operating systems you need an empty and preferably unpartitioned hard drive. It is possible to repartition an existing drive in use using the various disk partition tools but the process is too complex and the risk of data loss is very high. In my case I used a 80gig hard drive so I suppose in you case you can adjust accordingly. What I wanted to do with my drive was to create a 20gig partition to put my Vista and this would also be my primary partition (Drive C). I also wanted a 10 gig partition for Windows XP. Lastly, I wanted to reserve 10gig for Linux. The remaining 40 gig will be reserved for another partition where I will store all my files created from the three operating systems.
My first step was to create the 20gig partition on the hard drive. I wanted to reserve Drive C for Vista because on a drive where there are several partition drive speed decreases as you move out towards the drive (the higher the drive alphabet, the slower speed). Second, I created a 10gig partition on the drive where I was going to put my Windows XP. Lastly, I created a 40gig partition where I was going to put all my files. This left about 10gig of unpartitioned space where I was going to put my Linux.
The next step I did was to first install Windows XP on its partition which in my case was Drive D. After installing Windows XP, I immediately installed Windows Vista on Drive C. Upon restarting, the computer booted into Windows Vista. My next step was to download a little bootloader manager called EasyBCD. This application is available on www.neosmart.net. On opening the application there is a button marked Add/Remove Entries. Click on the tab. On the right of the application near there bottom there are several tabs representing Operating Systems. Click on the Windows tab. You are first presented with a drop down box marked Type. Click on the drop down box and select the middle option which is Windows NT/2k/XP/2k3. Under the drop down box there is a box where you can type the name of the Operating system you have chosen, which in our case is Windows XP. Below that is another drop down box marked Drive. Click on the drop down box and select the partition where you installed your Windows XP which in our case is Drive D. After that click on the button marked Add Entry on the bottom right of the application window. After that, click Save which is on the upper right side of the application window. Shut down your Windows Vista. The next time you computer boots you will be presented with a boot Manager where you can choose to boot into either Windows Vista or Windows XP which we installed earlier.
Now that we can successfully boot into both Windows Vista and Windows XP, the next step is to install Linux. In my case I was installing Linux Ubuntu 8.04. For those of you who havent before installed Linux, the procedure is simpler than that of Windows (honestly). The whole installation process consists of steps (which are presented as Step 1 of 7, Step 2 of 7 so that you never get lost and you get to know when you are about to finish). The first steps are easy and self explanatory. On the first step you are asked to choose your language. On the second step you are asked to enter your location and time zone. On the third step you are asked to choose your keyboard layout. Here it is important to assume the default option. On the fourth step you are asked to prepare disk space and show the computer where you want to install your Linux. Choose the option written Use the largest contiguous disk space (this may change depending on the flavour of Linux that you are installing). On the next step you are asked to enter your personal information like username and password and from there you are on autopilot as the option are self-explaining and they will in no way disrupt your installation. After Step 7, Linux will begin installation which in most cases takes about half an hour and after completion you are asked to restart your computer. You will notice that on restarting your computer you will be presented with a new bootloader with Linux at the top. Just scroll down to the bottom of the bootloader and you will come to an option written Windows Vista/Longhorn (loader). Hit enter and you are taken to the old Windows Boot Manager where you are asked to load into either Windows Vista or Windows XP. So the next time you boot if you want to get into Linux, you hit Enter when the Linux Boot Manager appears as Linux is the default option. If you want to boot into either of the Windows Operating Systems, just scroll down to the bottom of the Linux Boot Manager and choose the Windows Vista/Longhorn (loader) option and you will be taken straight to the Windows Boot Manager where you can get to choose if you want to boot into either XP or Vista.
Hopefully by the end of your trial you will have three operating systems successfully running on your computer, In my case, I use Windows XP for my everyday computing as it is faster, Windows Vista whenever I need to use its DirectX10 or many of its diagnostic tools. I mainly use Linux when I go online because of its superior security features that protects me from viruses as well as various malicious spyware and adware applications.
Go to link Download
Monday, November 14, 2016
HOW TO DOWNLOAD WINDOWS XP WINDOWS XP DOWNLOAD KAISE KARE
HOW TO DOWNLOAD WINDOWS XP WINDOWS XP DOWNLOAD KAISE KARE
step by step
1. aap sab ise bhot aasani se download kar sakte hain yeh rar file hai ise aap DOWNLOAD HERE

Go to link Download
Friday, October 21, 2016
How to Download Install and Configure Bluestacks on Windows XP 7 8 or Mac
How to Download Install and Configure Bluestacks on Windows XP 7 8 or Mac

How to download, install and configure bluestacks
Downloading and installing bluestacks


Configuring bluestacks


Go to link Download
Friday, October 7, 2016
How To Make Your Windows XP 7 Server 2003 2008 Look Like Windows 10 With The Latest Transformation Pack
How To Make Your Windows XP 7 Server 2003 2008 Look Like Windows 10 With The Latest Transformation Pack


Go to link Download
Wednesday, September 21, 2016
How to Speed Up a Slow Windows 10 8 8 1 7 or XP Computer
How to Speed Up a Slow Windows 10 8 8 1 7 or XP Computer

Having a slow computer is not something most users fancy, but that is what most of us end
up with after prolonged usage despite having the latest hardware. Understandably, there are
also a few of us
who are trapped with a low-end PC and are forced to get as much out of it as possible. This article caters to both these type of users as it not only explains how to make your computer as fast as it was when new but also how to reduce the footprint of your system to utilize your PCs current system resources in the best possible way. Anyone who has used an infected computer will verify how painfully slow a computer becomes when infected by a virus. More tech savvy users will counter that an infected computers speed depends upon the type of malware. To be honest, it does. However, based on my personal experience, I can say that while some malware are designed specifically for making computers slow and unresponsive, most malwares tend to decrease a computers performance.
STEP1
STEP 2
If you have been using an older version, it is time to upgrade IE or replace it with either Mozilla Firefox or Google Chrome . This will also give you faster internet speeds. Startup programs are the programs which start automatically each time a user logs on. Not only do they result in a slow startup, but they also run persistently, until you close them manually, continuously consuming valuable system resources (CPU and RAM) while they are running. So, disabling unnecessary startup items results in both a faster startup and a more responsive computer, as these applications not running continuously means more RAM and CPU will be available for the operations you perform on the computer.STEP 3
Over time, as you use your computer, chances are that some errors might creep in your hard disk which negatively affect your computers performance. The best way to solve this issue is by using the inbuilt Disk Check utility available in all versions of Windows. To use it, execute chkdsk /r in the Command Prompt . Remember to open the Command Prompt as an administrator. It might prompt you to restart your computer. Execute Y to restart your PC. The chkdsk/ r command scans your computers hard drive for errors and recovers readable data. Depending upon the size of your hard disk, this step might take some time. This step might increase your computers performance phenomenally if there are a lot of errors on your hard drive.
STEP 4
To run the System File Checker, open Command Prompt as an Administrator and execute sfc / scannow. This command will check all your system files and if it finds that some of them are modified or corrupt, it will replace them with the original. This step can take anywhere between 5 to 15 minutes but is one that you should perform especially if your system has ever been infected by a virus. The visual effects that make your computer look beautiful also slow it down considerably.
Disabling these visual effects could lead to a considerable improvement in your systems
STEP 5

STEP 6

To know more click here
Go to link Download
Wednesday, September 14, 2016
How To Become The SYSTEM User In Windows XP
How To Become The SYSTEM User In Windows XP
If you think Administrator has the largest privileges onto the computer, then you are wrong. There is a user who is named SYSTEM. SYSTEM has full control of the operating system and its kernel. If you open windows task manager (press ctrl+alt and delete) you will see that System User controls several processes. These processes cannot be closed by Administrator. In this tutorial we will see how to trick Windows into running our desktop as System. So well get a much greater privileges over computer.
1.Open Command Prompt. Go to Start , then Run. In Run option type cmd and click OK. After this will open Command Prompt, or Start->All Programs ->Accessories->Command Prompt
2. In Command Prompt write at 13:55 /interactive "cmd.exe" and press enter , the time is usually a minute or two ahead of your present time in the 24 hours format.
After a minute or two will appear new Comand Prompt Window wit different title bar. It has changed from cmd.exe to svchost.exe.
3. End current explorer.exe process. Open Task Manager, select explorer.exe and click End Process.
4. In new Comand Prompt with title svchost.exe write cd.. and press enter , then write explorer.exe and press enter.
After this you will become SYSTEM user,
Go to link Download
Sunday, September 4, 2016
how to make windows xp bootable with dos enable
how to make windows xp bootable with dos enable
Perquisites for installing xp from pen drive
- Windows Xp installation disk,
- This file solution.rar
- A working pen drive of at least 2 GB.
We first have to make pen drive bootable and need to put all necessary files in it. To do this go on a running computer which have working CD – ROM.
Now download this file solution.rar and extract it.

Attach a pen drive (caution: - all data will be erase from pen drive)
Now go in the folder where you extracted the files from solution.rar and run HpUSBformat.exe.

This command will auto detect your USB disk, if not, select form the list ( in this example my USB memory stick is drive M: )
Now set these options
- Volume label : - SYSTEM
- Check marks on :- Create a DOS Start up disk
- Select radio button :- Using DOS system files located at:
- Give the path where you have extracted solution.rar (Give the path of DOS folder) files

brows a dos file which u download and extract

now you have got an USB disk with bootable DOS system on it.
Copy all other files from DOS folder to your USB disk. ( you can overwrite existing ones)

Put your Windows Xp installation disk into CD-ROM and copy all files from CD to USB drive.
Now your pen drive should look like this

Now you have a bootable pen drive with xp.
Boot your laptop with previously prepared USB drive ( if you have problems, just check your BIOS or try to access boot menu, DEL? F10? F11?. In bios set first boot to removable media.)And follow these nine easy step to install xp.
Step1:- When system is booted up, and you see command prompt, type sys d: and hit enter if you see system transferred - you have luck, FAT32 file system is on drive C:, you will not lose your data
- go to step 5
- if any problem appears go to step 2
Step2:-REMEMBER, you will loose all data from drive C:/> - when system is booted up from USB, your drive C: appears as D:
Step3:- Type format d:/q/s to format drive D:
accept and when it is finished, go to step 5 ( you are lucky, you dont need to make partitions)
otherwise go to step 4
Step4:- Type fdisk and hit enter
create new partition ( after restart boot with pendrive in)
go to step 3 and format the partitions and come back here :)
type pqmagic and set your new partition active
( physical drive 2, Advanced A, set Active - S, are you sure - Y, Exit - X )
Step5:-Type nc and hit enter, and using Norton Commander, copy all files form pendrive to disk C: ( you can overwrite existing ones)
Step6:-Restart Laptop without pen drive in it (it should start from hard drive)
Step7:-Type cd i386 and hit enter (it will enter i386 folder)
Step8:-Type winnt and hit enter
Step9:-this will launch xp installation process and you can install xp as you do with cd.
Go to link Download