Friday, November 18, 2016
How I Applied Opened Google adsense Account
How I Applied Opened Google adsense Account
Do you own a site, blog or forum? And which you can earn from Your site.
Have you tried Google Adsense? If not then Give it a trial!

Google is a multi-billion dollar company founded by two students of Stanford University a little over 10 years ago. Most people know Google as the universal search engine but actually it is more than that, it is an advertising company. Google have several advertising programs where it generates portion of its revenue apart from the search engine rankings. One of the programs that allow website or content publishers to earn passive income is Google AdSense. It allows fast and easy way to display Google ads that is relevant to the content of the web page therefore bringing in more money. This article will give you tips on how i applied for Google AdSense account.
MAKE A PLAN. Going to the Google AdSense application page and filling in the information required is really the easiest part of the application process. But getting your application approved is a completely different story. It used to be a walk in the park to get an AdSense account approved, but not anymore. So before you submit your application, carefully plan your moves to make sure you will not get denied.
BUILD PORTFOLIO. If you own a website or blog, then you might think that Google will approve your application instantly wrong! The staffs at Google are very particular when it comes to checking the contents of a website. If it does not meet the criteria or if the contents do not have any potential growth or if they think it will not generate any traffic, then it is a candidate for denial. Whats worst is that they will never let you know the concerns that they saw. They will simply email you with a general note saying you did not qualify. So it is advisable to establish your website first before attempting to apply for Google AdSense account.
If you do not have a website, you can still apply for Google AdSense account by publishing contents to sites like eHow. And some other wordpress blog. Use your profile link as the URL when you fill in the application form. But you need to make sure that you have published more than enough contents before you apply for AdSense account. This increases your chance of getting approved.
GENERATE TRAFFIC. Another important factor is the traffic generated by your website/blog or contents. If you do not have any subscribers or followers in your website or contents, chances are you will get denied. Once you get denied, it is more difficult to get approval the second time around. So you need to put in more time and efforts to promote your website or contents to generate a steady traffic to increase its potential for income.
READ GOOGLES TERMS AND CONDITIONS. Do not read the terms and conditions after you submitted your application read it before you even think about applying for an AdSense account. The usual reason for denial of application is not being able to meet Googles terms and conditions and there is actually handful of things to know. Make sure you have read and understand them before you finally send your application.
APPLY FOR ADSENSE ACCOUNT. Finally, go to Google AdSense application page and fill in the required information. Aside from the valid URL, you need to be at least 18 years old with a permanent mailing address. The application can take a couple of days before you receive an email from Google.
Goodluck!
If this article helped you in anyway, please share with your friends who may be interested.
WARNING: Do not fall for scam that promises to guarantee Google AdSense account approval.
See Also : Reason Why Google may Dis-approve your Application Form
If you have anything to say or ask, Kindly make use of the comment form below. If you also want me to post a short review of your company or product, on this blog, do not hesitate to contact me.
Please, do not forget to SUBSCRIBE to this blog, so that you can be receiving future articles, freebies DIRECTLY into your email inbox, even when you are not online.
CLICK HERE TO SUBSCRIBE NOW!
Cheers!
Go to link Download

Wednesday, November 16, 2016
How do i root my samsung galaxy s6
How do i root my samsung galaxy s6

How to root samsung galaxy s6 verizon
First, if you haven’t already got the USB PC drivers for your Samsung device, then head to this link to download them.
SuperSu download links:- The package you’ll need to root your device will depend on the country you reside in the different packages are listed below:
samsung SM-G920F zerofltexx zeroflte LRX22G.G920FXXU1AOD9 Download
samsung SM-G920I zerofltedv zeroflte LRX22G.G920IDVU1AOC6 Download
samsung SM-G920T zerofltetmo zerofltetmo LRX22G.G920TUVU1AOC9 Download
Once that’s downloaded, head on to the instructions below to Root your Galaxy S6.
Instructions to Root the Galaxy S6:-
1) Download and unzip the CF-Auto-Root-….zip file
2) If you end up with a recovery.img and cache.img file, you’ve extracted twice. You need to end up with a .tar.md5 file – don’t extract that one
3) (USB) Disconnect your phone from your computer
4) Start Odin3-vX.X.exe
[post_ad]
5) Click the PDA button, and select the tar.md5 file
6) Put your phone in download mode (turn off phone, then hold VolDown+Home+Power to boot – if it asks you to press a button to continue, press the listed button).
7) (USB) Connect the phone to your computer
8) Make sure Repartition is NOT checked
9) Click the Start button
10) Wait for Android to boot
11) Done
You should now see SuperSU installed in your app launcher and able to grant any apps that require root the appropriate permissions. For the root to work, the device must reboot into recovery. Most devices will do this automatically after flashing these files, but in case that does not happen, please boot into recovery manually..
Don’t forget to Share it with your friends via Facebook & Google+ and Twitter, And if you like the article How do i root my samsung galaxy s6 and you may even Subscribe for New post, to get directly in your mail inbox.
Go to link Download
Saturday, November 12, 2016
 Go to
How I Set Up And Watch DSTV Channels For Free On My Android Device
How I Set Up And Watch DSTV Channels For Free On My Android Device

Hey guys, I am going to be teaching you how to watch the satellite TV; DSTV on your android phones. First of all you need is a good internet connection and the second thing you need is the fantastic app called MOBDRO it has over 2000channels and it keeps updating, all you have to do is to download it by following
Screenshots



Download
Download Now
Go to link Download
Sunday, October 30, 2016
How i Rooted my Tecno N7 Root any Chinese Android running Android 4 0 ICS 4 1 JB
How i Rooted my Tecno N7 Root any Chinese Android running Android 4 0 ICS 4 1 JB
Here’s an easy to follow tutorial on how to root any Chinese Android device you got there. It uses the rooting script Root_with_Restore_by_Bin4ry, which you can find at XDA. This is confirmed working for any MediaTek MT6577 devices running Android 4.0 or up, even devices with the dual core Qualcomm S4 procie can be rooted by this as long as it is on Android 4.x.
I first tested it on rooting a Cherry Mobile Titan, and it works. On this tutorial, I had used the method on my HDC Galaxy Note 2.
First, you need to properly install the ADB drivers. To do that, you must download and install first an app called Moborobo. Link here.
After installing the app, on your phone, enable USB Debugging by going to Settings > Development.
Connect your device and open the Moborobo app. Moborobo will attempt to install the necessary drivers. Just allow it to do the changes on your computer and if it succeed, you’ll see something like this:

Moborobo can read your connected Android device
You can now exit Moborbo. Be sure to close it completely and not just minimize it on the system tray.
Download this file. Root_with_Restore_by_Bin4ry_v18_2.7z
It is the rooting script. Extract it anywhere. You’ll something like this:
 Root_with_Restore_by_Bin4ry_v18_2.7z
Execute the RunMe.bat file if you are on Windows. A command prompt will open.

Root with Restore by Bin4ry
Just enter 1 as your option. It will now do its task. You’ll now see something like this on your device. Click restore and wait for the process to finish.

Restore data, ignore that encryption password thing
While on the command prompt window, you’ll see this:

rooting….
Your device will restart, and if you see the SUPER SU icon on your apps drawer it means that you had successfully rooted the phone.

SUPER SU
Checking root access with the Root Checker App:

Rooted HDC Galaxy Note 2 PRO
It is really easy on these Android 4.x devices now. I just posted this so I can just use this as reference for the queries on how to root such Chinese-made Android smartphones. While on lower version of Android, such as 2.3.6 Gingerbread, its a bit tricky as it needs some hacking with the boot.img if the SuperOneClick or UnlockRoot doesnt works. We’ll cover that up on the next update.
As they say, rooting voids the warranty but it depends on where did you buy your Android phone. Root only when you think you really have to and already know why you need to do that. On the other note, this process isnt risky and there is nothing to fear in case you messed up with the steps. Still, do this at your own risk.
If you dont want to miss anything on Stalyfblog, please like us on Facebook. and follow us on Twitter
You can also Subscribe to our updates by email or with your favorite browser. This way, you wont miss any updates from stalyfblog. If you subscribe by email, make sure to check your email to confirm your subscription.
Posted By: Oke David Umurhohwo.
Follow me on Google+, Twitter.
Cheers!
Go to link Download
How I made a global Joomla! website compliant with EU cookie legislation
How I made a global Joomla! website compliant with EU cookie legislation
- Do a cookie audit of your site to figure out what cookies are set and which of them are not essential to the functioning of your website – Tabulate all your findings to describe all cookies that are set by name, lifetime and description in your privacy policy. (Joomla sets an initial session cookie, and another to keep track of authenticated sessions when users login – I judged these 2 as essential). Work from the ico.gov.uk privacy policy if you need a guide.
- Install the ‘MetaMod’ Joomla! module – This is a really powerful and versatile module for user experience customization, but I used it specifically for its ability to display modules to visitors based on their location (determined by IP address) in this instance.
- Create a ‘Cookie opt-in’ form module that sets a ‘CookiesAccepted’ cookie (for 2 years) and reloads the current page when users opt in.
- Identify modules that are setting non-essential cookies and replace them with MetaMod modules that only load content when ‘The user is not from the EU OR the CookiesAccepted cookie has been set. Otherwise you should insert a message to explain that ‘This content can not be loaded, unless you accept cookies from this site…’. Common examples include: Analytics, Twitter, YouTube and DISQUS*.
if (!(in_array($fromCountryId, $optinCountries)) || isset($_COOKIE[CookiesAccepted])) {
//full cookie loading code goes here
} else {//you need to accept cookies message}
Go to link Download
Saturday, October 22, 2016
How can i clean up my gmail inbox
How can i clean up my gmail inbox
How to clean up your gmail inbox fast
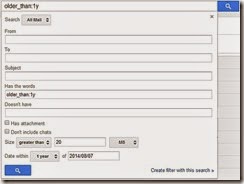
Gmail search filters
Gmail doesnt have the option to sort files - you cant get the inbox to display mails alphabetically, or according to the date received, or size. This might sound like a problem, but as is to be expected from a Google company, Gmail has a superb search function, which can be used to solve the problem easily. Follow these steps to clear up the emails you dont need:
Find Big Mail

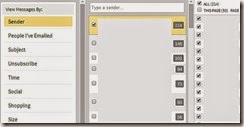
Mailstrom
Go to link Download
Monday, October 10, 2016
How I Got Glo 6GB For N1 500 Works on All Devices
How I Got Glo 6GB For N1 500 Works on All Devices
Glo has been a life safer for some of us since 1900BC and Ill like to unlock this awesome features to those who dont know it exist. To those who already know it exist or using it, you deserve a cool glass of juice in such a weekend like this.

Im going to show you how I got 6GB for N1,500 using my Glo line. The first thing that will perhaps comes to your mind is does glo have plan like this? the question can only be answered spiritually and not physically.
How Did I Get 6GB For N1,500?
You are all aware that you can get 3GB for N1,000 by dialing *777*21#... I can hear someone saying a big YES! Good...
So I first of all subscribed for Glo 3GB for N1k on my device and then activated the Glo weekend plan of N500 for 3GB by dialing *777# and then follow the prompt...
The weekend plan was activated the moment I connected to the net.
Note
You cannot use the two plan at thesame time. What I did was to pulse my Blackberry subscription by changing my apn to glosecure. Immediate the plan was activated and the speed is completely out of this world.
Who Should Use This Plan?
Those who have something big to download over the weekend. If Airtel 1GB for N100 didnt work for you, this will work out for you.
Will it work on my Smart Device?
Yes, it works on all device.
source :http://www.yomiprof.com/2016/01/how-i-got-glo-6gb-for-n1500-works-on.html
Go to link Download
Sunday, October 9, 2016
How can I unlock my iPhone if I forgot the passcode
How can I unlock my iPhone if I forgot the passcode

Image Credit: EveryiPhone.com (iPhone Passcode Screens - iOS 6, Left; iOS 7, Right)
If you repeatedly enter the wrong passcode, your iPhone will be disabled for longer intervals before you can try again. After too many unsuccessful attempts, you wont be able to try again until you connect it to the computer with which you last synced it [if it has been synced to a computer].
Note: You can configure your device to erase itself after ten consecutive incorrect password attempts. This setting is off by default. It can be turned on by tapping Settings > General > Passcode Lock.
If you cannot remember the passcode, you will need to restore your device using the computer with which you last synced it [or iCloud]. This allows you to reset your passcode and resync the data from the device (or restore from a backup). If you restore on a different computer that was never synced with the device, you will be able to unlock the device for use and remove the passcode, but your data will not be present.Please also note that Apple representatives cant unlock an iPhone for you without restoring the iPhone, either. The restore process will erase everything on it.
To restore your iPhone -- which, again, deletes all of your data (songs, photos, videos, apps, and so on) on the iPhone use the following directions. Be absolutely sure that you have backed up the content on your iPhone before restoring it.
After the backup, you just need to "restore" your iPhone and have the backup copied onto the iPhone with iTunes.
Apples official instructions to restore an iPhone with iTunes are:
- Connect your iPhone to your computer [that you have previously used to sync the device].
- In iTunes, select the iPhone in the "Devices" list, then "Summary" at the top of the screen.
- If iTunes doesnt automatically synchronize your iPhone, do so manually [and confirm that the sync and backup were successful.]
- Click “Check for Update.” iTunes tells you if there is a newer version of the iPhone software available.
- Click Restore. Follow the onscreen instructions to complete the restore process. When restoring, it is recommended that you [again] backup the iPhone when prompted.
- When iOS Setup Assistant asks to set up your iPhone, choose "Restore from iTunes backup."
- Select your device in iTunes and choose the most recent backup of your iPhone.
Apple separately explains the simple iCloud process to erase an iPhone. This is mostly intended for an iPhone that has been lost or stolen, but the portion relevant for a forgotten password is:
- Sign in to iCloud with your Apple ID (the one you use with iCloud [rather than your iPhone passcode that you do not remember]), then click "Find My iPhone."
- Click "All Devices," then select the iPhone you want to erase.
- In the Info window, click "Erase iPhone."
- Enter your Apple ID password [for confirmation]. If the device youre erasing has iOS 7 or later, enter a phone number and message. [This is intended to be displayed to anyone who may have found your iPhone if it is lost or stolen. To just erase the iPhone, it is not necessary.]
- [Now] you can restore the information on the device using iCloud Backup (if backup was turned on before you erased it).
If you find yourself in this situation try not to panic. Take a deep breath. Leave your iPhone behind, go for a walk, and try not to think about the passcode per se. Separating yourself from the frustration may help jog your subconscious to release the information you have forgotten.
If you still do not remember your passcode when you return, hold the iPhone in your hand and ideally sit or stand somewhere where you know you have entered your passcode before.
If that is not an option, try to face a direction that you were facing when you successfully entered your passcode previously. Relax. Close your eyes. Open your eyes again. Enter the passcode without a conscious effort to remember the numbers or letters but instead "feel" it. You may be able to essentially trigger "muscle memory" of the motion pattern you have used before to enter the code.
If none of that works, sadly, you will have to start over as if you just got a new iPhone. If you have only had the iPhone for a few days (which is when people tend to forget the passcode the most, perhaps it is not a major problem).
If you recently set a passcode on an iPhone with a lot of personal information that is not synchronized using iTunes or backed up using iCloud and this information is really important to you, you could consider buying a new iPhone without restoring the old one. The hope would be that you might remember the passcode at some point in the future. Perhaps buying an expensive new phone will allow you to remember the passcode the next day. Doh!
Nevertheless, next time, either (1) do not use a passcode, (2) use the fingerprint enabled Touch ID on the iPhone 5s instead, or (3) be sure to sync your lesser iPhone with iTunes and/or iCloud.
Go to link Download
Thursday, October 6, 2016
How I Got 7GB For N700 on Airtel Network
How I Got 7GB For N700 on Airtel Network

Go to link Download
Monday, September 26, 2016
How I Restore And Recover My BBM Contacts
How I Restore And Recover My BBM Contacts

Contained by this article, I shall discuss with you how to recover or restore your BBM Contacts even if you include not at all backed up the BBM Contacts.
With no much story and explanation, we already know with the aim of The BBM get in touch with back up is like a store up or safe box where your Blackberry envoy contacts are being saved and synchronize, though the frequency in support of which this is being made is single-minded by your BIS or BES subscription and the service bringer.
Furthermore, you can manually back up your BlackBerry envoy get in touch with in the sphere of a folder on your media card(Memory Card). In support of details on how to work out, this article should guide you on how to Back Up your BBM Contacts in support of Easier reinstatement.
STEPS:
Depending on the option you used once assistance up your BBM Contacts, you can either restore or recover your BBM Contacts using the locally saved method (Media Card) or from the remote server
The following is how to restore your BBM get in touch with from Remote server
This is the greatest option you be inflicted with in the same way as a BBM user for the reason that you just need the email lecture to you configured with your Blackerry device in the same way as the means to your BBM Contacts however, you can restore or recover your BBM Contacts just if you be inflicted with an on the go BIS or BES subscription on your phone and it will power restore your BBM Contacts to the only remaining second you had BIS or BES on the go on your before Blackberry device.
At this moment, to restore your BBM Contacts using this option, original configure the email lecture to you apply on your Blackberry device on the lone you at this moment apply at that time, open/lunch/run BBM on your Blackberry device, depending on how it starts (If you are running BBM in lieu of the original phase, it starts up differently), in a minute navigate it to its routine screen at that time, press the "Blackberry menu button" and scroll down to "Option". This displays personalization and management options in lieu of BBM app. Scroll down to "Back Up Management" and click "Restore"
Prefer to restore from "Remote Server". The device without doubt detects the email lecture to you configured with the Blackberry device and the reinstatement process begins as soon as possible.
How to Recover or Restore your BBM Contacts from Media tag
Sooner than you can befall able to recover your BBM Contacts from a media tag, you need to be inflicted with access to the media tag and secondly; you ought to know the exact folder in the sphere of which your BBM Contacts were backed up in the back up process.
At this moment, to restore your BBM Contacts, open/lunch/run BBM on your Blackberry device, depending on how it starts (If you are running BBM in lieu of the original phase, it starts up differently), in a minute navigate it to its routine screen at that time, press the "Blackberry menu button" and scroll down to "Option". This displays personalization and managment options in lieu of BBM app. Scroll down to "Back Up Managment" and click "Restore"
Prefer to restore locally i.E from media tag. If you be inflicted with not misused the default folder in lieu of BBM Back up collection, it displays the folder otherwise, navigate to the folder in the sphere of which you be inflicted with saved your BBM Back up column and "Select" at that time, you can proceed to "Restore"
Go to link Download
Wednesday, September 21, 2016
How do I Made 100 Per Month Easily
How do I Made 100 Per Month Easily

Secret Reveals to Earn 100$/Month Easily ! ! !



Dont Forget that "Money is the Overrated Motivation". If You have Money You can Buy Everything and Live Your Dream, So Start Working on Your Dream. Hard Work on Your Blog and You can Get More Money as You Can.
Go to link Download
Thursday, September 15, 2016
How do i unsubscribe unwanted emails
How do i unsubscribe unwanted emails
Let’s face it – you get emails from people, places, and services for things you don’t care much about. Maybe it was a restaurant mailing list so that you can earn a free appetizer. Or, perhaps you signed up for a music service that alerts you of uploads. Whatever it is, you’re getting hit on a regular basis and you’re first reaction is to delete them.
The problem is that simply deleting a message doesn’t stop the problem, it just temporarily brings you peace of mind. Let’s get proactive about it and stop them from coming altogether. Yes, we’re talking about unsubscribing. As the Gmail app for Android has evolved over time it continually improves with new features. One such option is the ability to unsubscribe to messages. Yes, you can let Google do the legwork of removing your name and email address from a database and mailing list. Fortunately for us, it’s a dead-simple process. Here’s how to unsubscribe to emails in the Gmail app for Android.

2) In the top right corner of the screen you’ll see three dots – tap them
3) You should see a drop-down menu of options including, Move To, Change Labels, Mark Important, etc.
It’s here, in this menu, where you’ll occasionally find Unsubscribe as an option. Tap it and Google will make it so that you’re not bothered by any more mail for this newsletter, update, or release.
[post_ad] 
Go to link Download
Wednesday, September 14, 2016
How do I download or save a YouTube video to my computer
How do I download or save a YouTube video to my computer
How do I download or save a YouTube video to my computer?
 YouTube has been designed to only allow users to watch and view videos on their website. Many users want to save their favorite videos to their computer so they can watch them without being connected to the Internet or so they can watch them on other devices. Below are the steps required for downloading and watching YouTube videos on your computer for free.
Saving YouTube video as a video file on your computer
Go to link Download
Saturday, September 10, 2016
How I Crack Avast Antivirus 9 Till 2050 A Very Easy Process
How I Crack Avast Antivirus 9 Till 2050 A Very Easy Process

Avast Have a very good reputation. Due to defence from virus and malware. Avast 9 includes new technology to secure your pc browser , cloud computing and others like software update checker ,real time performance data etc.
proof Image : Click on the image to Zoom This image. This screen shot shows that 13227 days still remains. Means avast licence is remains 13227 days more its approximately 36 year and 3 month from now. Its 2014 so avast licence is valid till July of 2050.
 |
| Avast 9 crack till 2050 |
How i crack avast 9.0.2013 antivirus :
Step 1- Complete Downloading: First of all download avast 2014 latest version 9.0.2013 and crack file from the link provided below this post.
Step 2 - Install Avast: Install avast in regular process. Choose Express install. After installation process do not restart your pc. Because you have to restart your pc in next step.. Cracking step.
Step 3 - Cracking Process: Install the crack file [avast crack .exe ] on your pc or laptop computer. it may ask for password. Then Proceed with this password: ZeNiX. Now restart your pc and laptop. OOWW bookmark our page now. You may have to came back later for help.

Download Avast 9 Latest 2014 Antivirus
Download Avast 2050 Cracker Software
Go to link Download